Documentation
Technical details cover both the backend architecture and client-side technology,
ensuring secure and efficient access to content. The documentation includes
guidelines for installation, user management, API access, and troubleshooting,
along with updates on new features and maintenance.
Using the specified versions of the various technologies ensures that our project
remains compatible, stable, and performant. Each version listed has been carefully
chosen to leverage the latest features, security updates, and optimizations specific
to that version.
Setup Admin Panel
This section will guide you through setting up the admin panel for your Backand
application.
Deploy Admin Panel & Build Database
BookA Admin panel is built using Laravel Framework
10.0 so you need PHP version upto 8.4.5 or higher version installed on your
server.
How to Deploy Admin Panel code on a server :
-
VPS (Virtual Private Server)
-
Upload the Zip File to Your Server
■ Connect to your VPS using an
FTP client or SSH.
■ Upload the zip file containing your Admin
Panel code to the server.
-
Move the File to the Appropriate Directory
■ Navigate to the directory
where you uploaded the file.
■ Move the zip file to the
/var/www/html/ directory using the command:
mv your-file.zip /var/www/html/
-
Unzip the File
■ Unzip the file using the
following command:
unzip your-file.zip
-
Rename the Folder
■ Rename the unzipped folder
to admin:
mv your-unzipped-folder admin
-
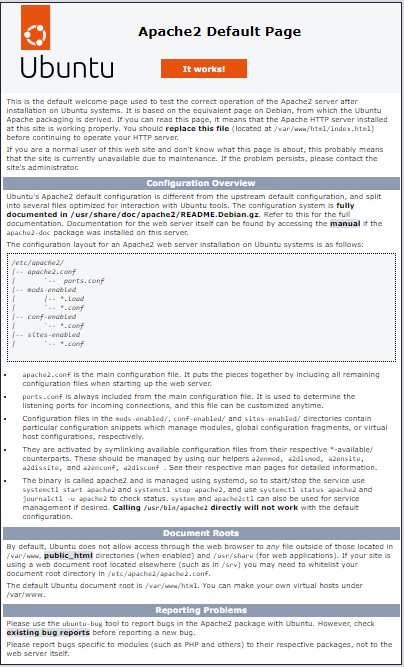
Visit Your Domain
■ Navigate to your domain URL.
You should see the installation wizard. Follow the instructions
to complete the setup.
-
Shared Hosting
-
Log in to cPanel
■ Access your hosting account
and log in to cPanel.
-
Open the File Manager
■ Go to the File Manager in
cPanel.
-
Navigate to the public_html Directory
■ Navigate to the public_html
directory where your web files are hosted.
-
Upload the Zip File
■ Upload the zip file
containing your Admin Panel code to the public_html directory.
-
Extract the Zip File
■ Right-click the uploaded zip
file and choose "Extract" to unzip the contents.
-
Rename the Folder
■ Rename the extracted folder
to admin.
-
Visit Your Domain
■ Navigate to your domain URL.
You should see the installation screen. Follow the instructions
to complete the setup.
How to Build Database on server :
-
VPS (Virtual Private Server)
-
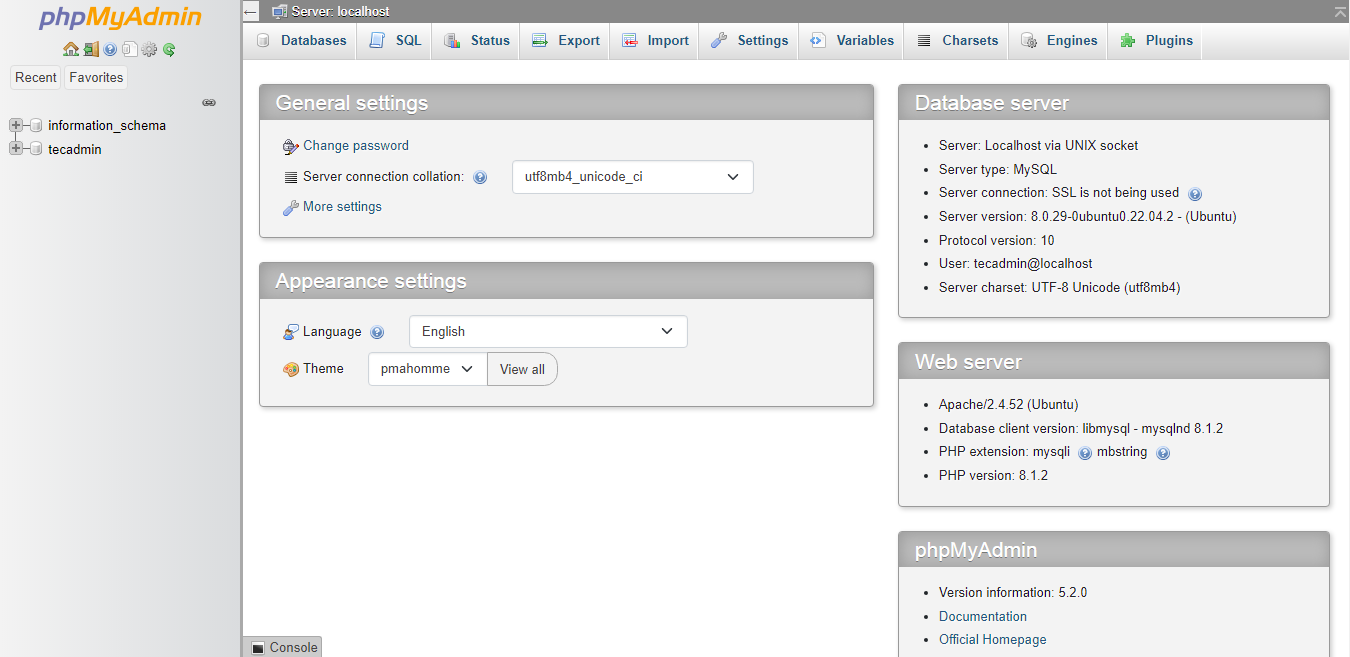
Access phpMyAdmin
■ Once phpMyAdmin is installed
and configured, access it by entering its URL in your web
browser. Typically, you can access it using:
http://your_server_ip/phpmyadmin
-
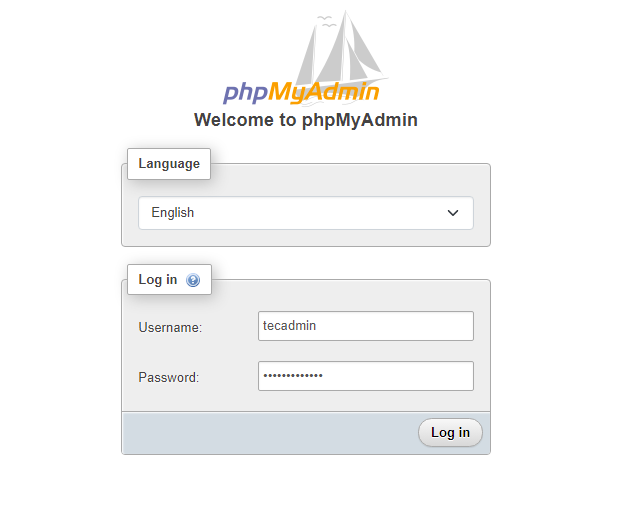
Login
■ You'll be prompted to log in
to phpMyAdmin. Use the MySQL root Username and
Password for authentication.
-
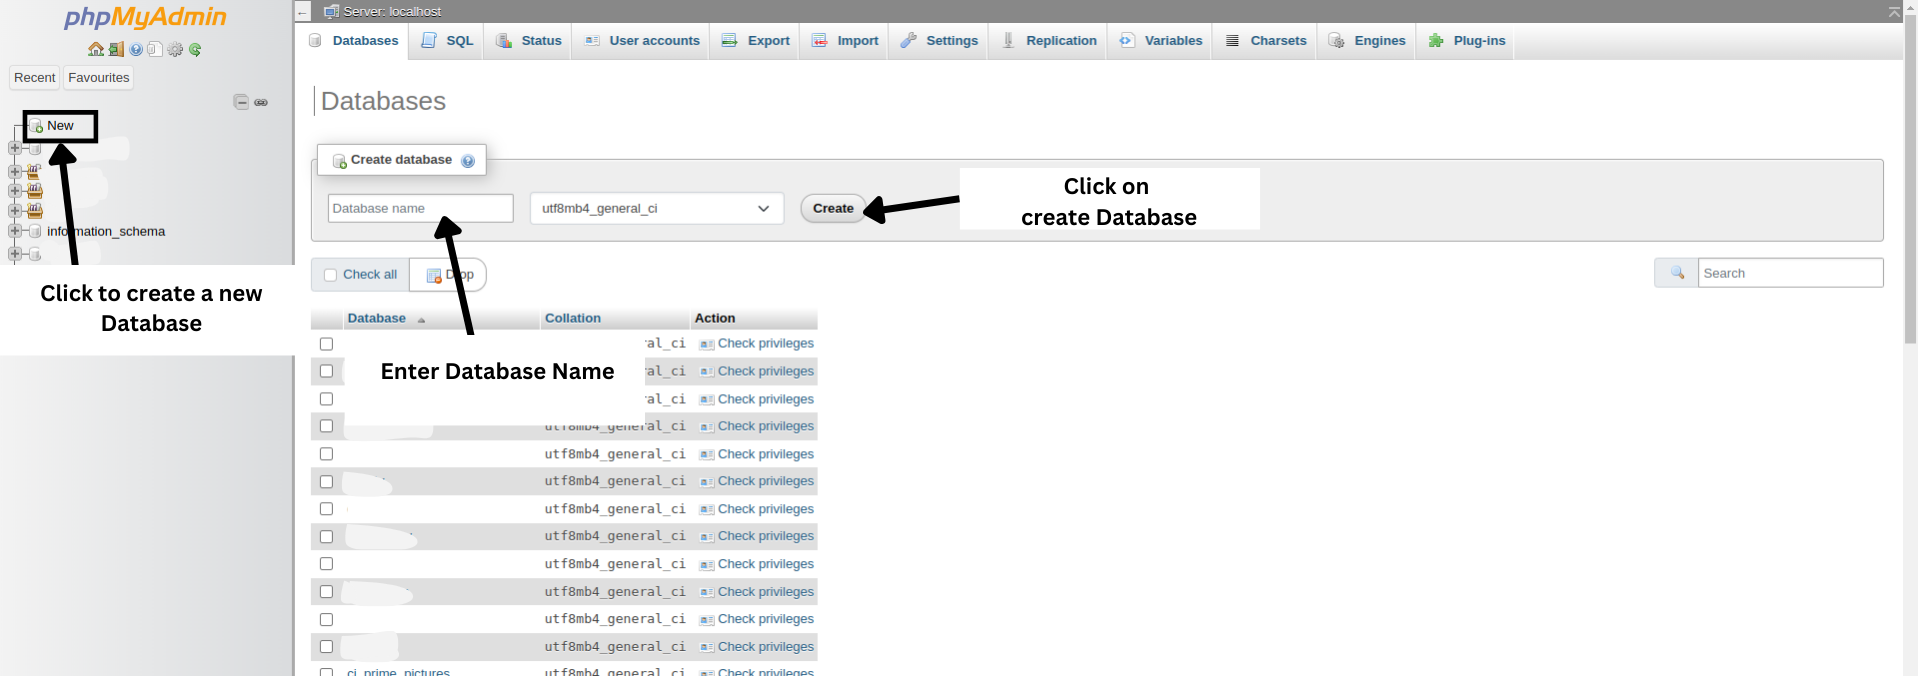
Create a Database
■ Use the phpMyAdmin dashboard
to create a new database. You can navigate to the
"Database" section and click on the
"New database" button. Then, provide a name for
your new database and click on the "Create"
button.
-
Database Created
■ Now, Database is created
Successfully.
-
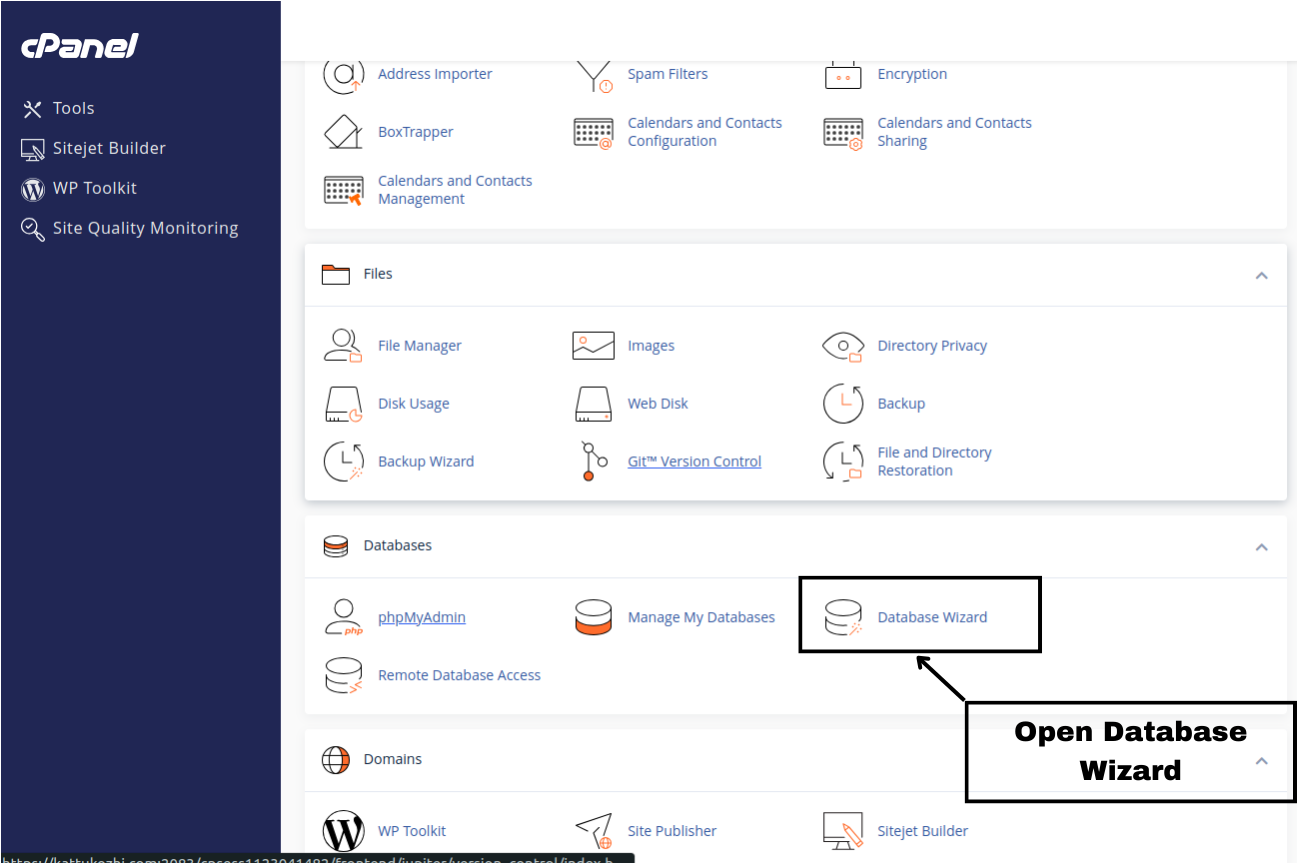
Shared Hosting
-
Access cPanel
■ Log in to your shared
hosting account's cPanel dashboard.
-
Locate MySQL Databases
■ In the cPanel dashboard,
find and click on the "MySQL Databases" icon or
link.
-
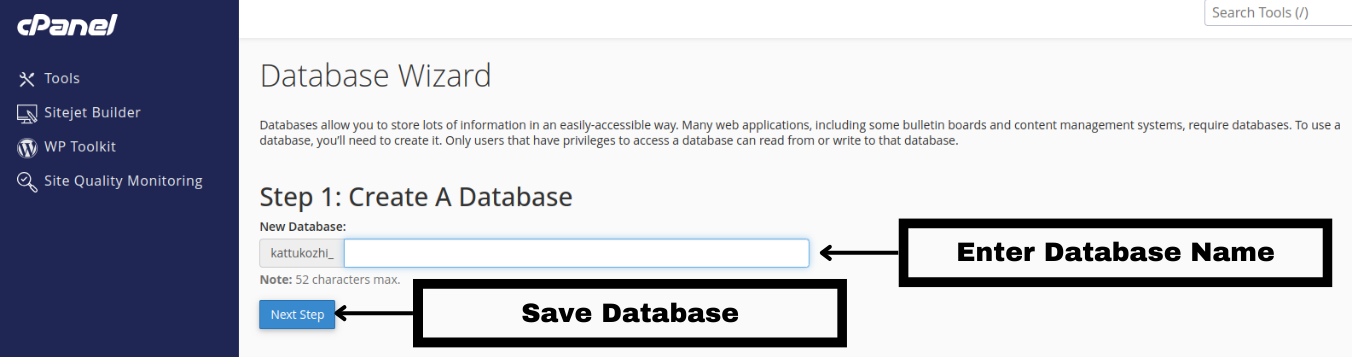
Create Database
■ Under the "Create
New Database" section, enter a name for your new
database and click the "Create Database"
button.
-
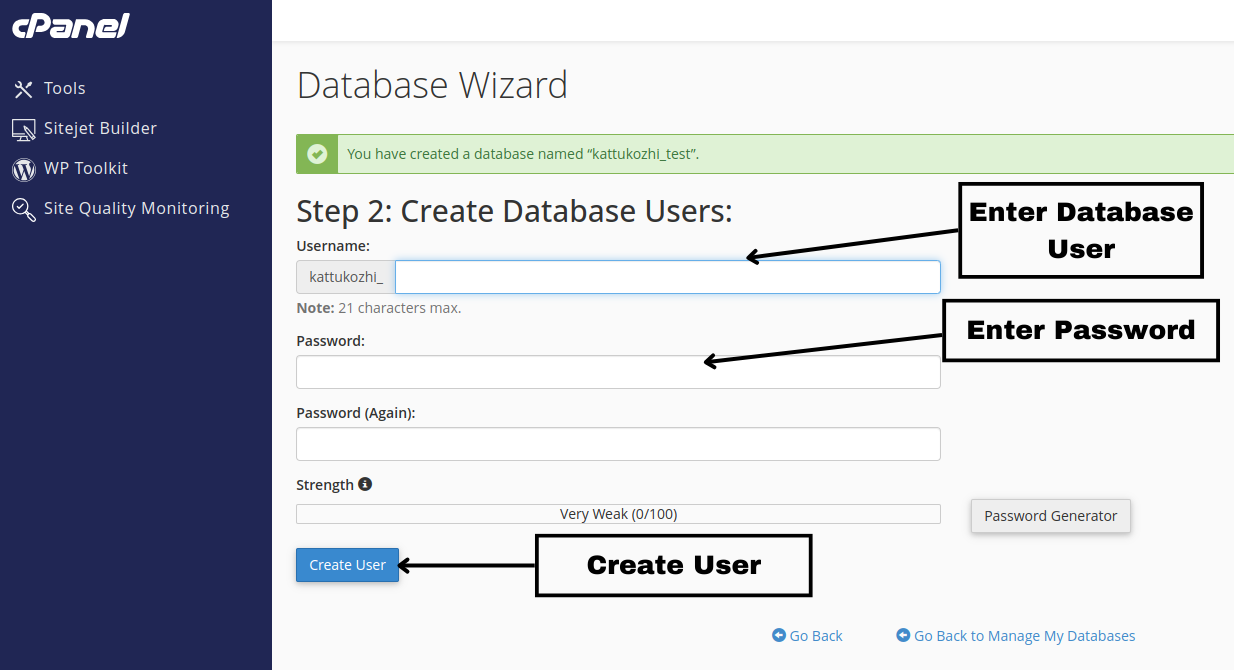
Create Database User
■ Scroll down to the
"MySQL Users" section, provide a
Username and Password for your
new MySQL user, and click the "Create User"
button.
-
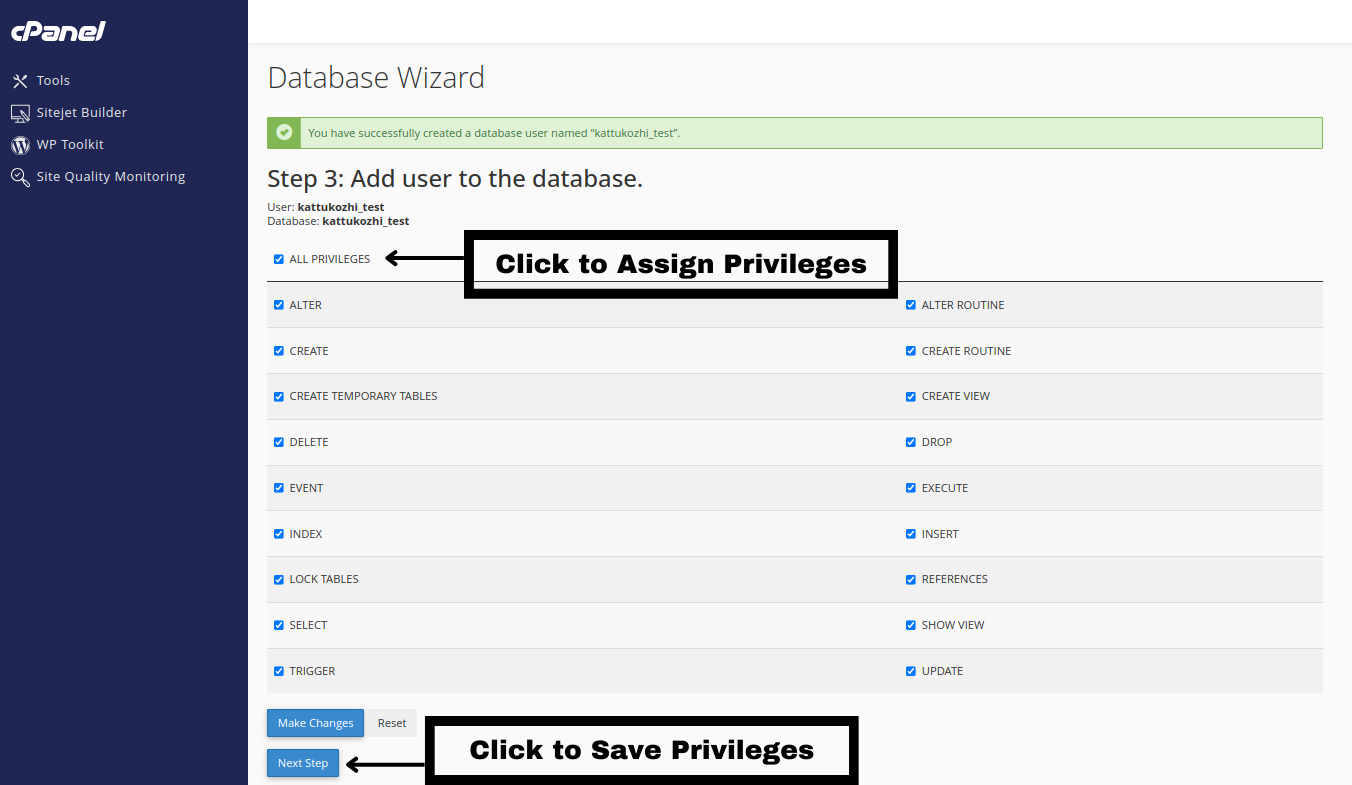
Assign Privileges
■ On the following screen,
select "All Privileges" and then click the
"Make Changes" button.
-
Confirmation
■ You should receive a
confirmation message indicating that the user has been
successfully added to the database with all privileges.
-
Database Created
■ Now, Database & User are
created Successfully.
PHP Installation Steps
-
Installation Windows
■ Click this link to download XAMPP(PHP + MySQL
bundled):
Download And Documentation
Link
■ Install XAMPP, aur start Apache + MySQL And Check
PHP Installation Is Complate php -v on Terminal
■ Install Composer:
Download And Documentation
Link
■ Install Composer and ensure its path is added to
the system environment variables and check is complate installation composer -v on Terminal
■ Install MySQL:
Download And
Documentation Link
■ Navigate to the PHP project folder, open the
terminal, and run the following command cd project-name composer
install on Terminal
■ Open the .env file and configure the database
details.
DB_CONNECTION=mysql
DB_HOST=127.0.0.1
DB_PORT=3306
DB_DATABASE=your_database_name
DB_USERNAME=root
DB_PASSWORD=
■ For Laravel, it is necessary to generate an
application key.
■ If you encounter any issues, click this link
here
■ Start the Server
Note: First, make sure that the software you installed is properly configured in the system
environment so that you don’t face any issues later.
-
Installation Ubuntu(LTS recommended — e.g. 22.04/24.04) / Linux
■ Click this link to download PHP ≥ 8.1, XAMPP:
Download And Documentation Link
■ Install Composer:
Download And Documentation
Link
■ Install Composer and ensure its path is added to
the system environment variables and check is complate installation composer -v on Terminal
■ Install MySQL:
Download And Documentation Link
■ Navigate to the PHP project folder, open the
terminal, and run the following command cd project-name composer
install on Terminal
■ Open the .env file and configure the database
details.
DB_CONNECTION=mysql
DB_HOST=127.0.0.1
DB_PORT=3306
DB_DATABASE=your_database_name
DB_USERNAME=root
DB_PASSWORD=
■ For Laravel, it is necessary to generate an
application key.
■ If you encounter any issues, click this link
here
■ Start the Server
Note: First, make sure that the software you installed is properly configured in the system
environment so that you don’t face any issues later.
-
Installation Mac Os
■ Homebrew:
Download And Documentation Link
■ Install PHP ≥ 8.1:
■ Install PHP and ensure its path is added to the
system environment variables and check is complate installation
php -v on Terminal
■ Install Composer
■ Install Composer and ensure its path is added to
the system environment variables and check is complate installation Composer --version on Terminal
■ By default, MySQL comes pre-installed on a Mac
Mini, but if it’s not available on your Mac, you can download and install it from this link,
or alternatively, install it using Homebrew:
Download And Documentation Link
■ Navigate to the PHP project folder, open the
terminal, and run the following command cd project-name composer
install on Terminal
■ Open the .env file and configure the database
details.
DB_CONNECTION=mysql
DB_HOST=127.0.0.1
DB_PORT=3306
DB_DATABASE=your_database_name
DB_USERNAME=root
DB_PASSWORD=
■ For Laravel, it is necessary to generate an
application key.
■ If you encounter any issues, click this link
here
■ Start the Server
Note: First, make sure that the software you installed is properly configured in the system
environment so that you don’t face any issues later.
-
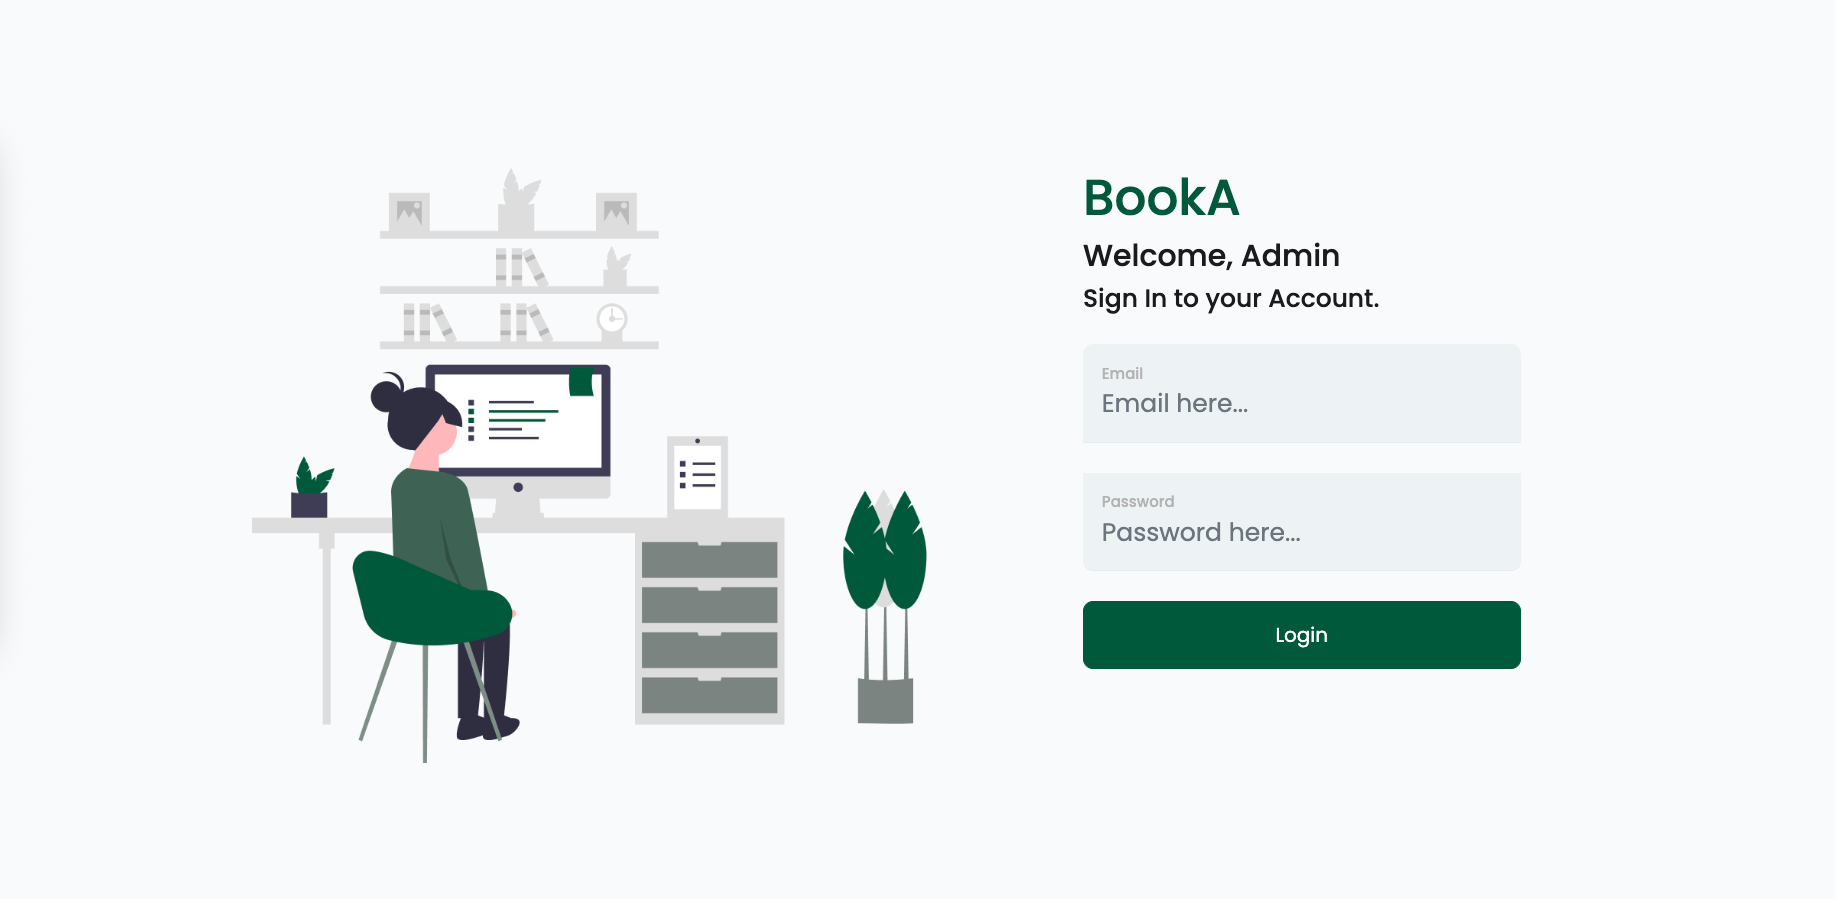
Admin Panel Login
■ The final step involves
logging into the admin panel to start managing your
application:
● Admin Login
Page: You will be presented with the admin login page (as
shown below).
● Enter Admin
Credentials: Use the admin email and password you set up
during the installation process to log in.
■ Once logged in, you can
start configuring and managing your application from the admin
panel.
Admin Panel Configuration
This section provides detailed instructions on configuring the admin panel for
your Backand application.
Basic Configuration
Ensure you have the required tools and environment prepared before you begin
setting up the Admin Panel. This will help streamline the configuration
process.
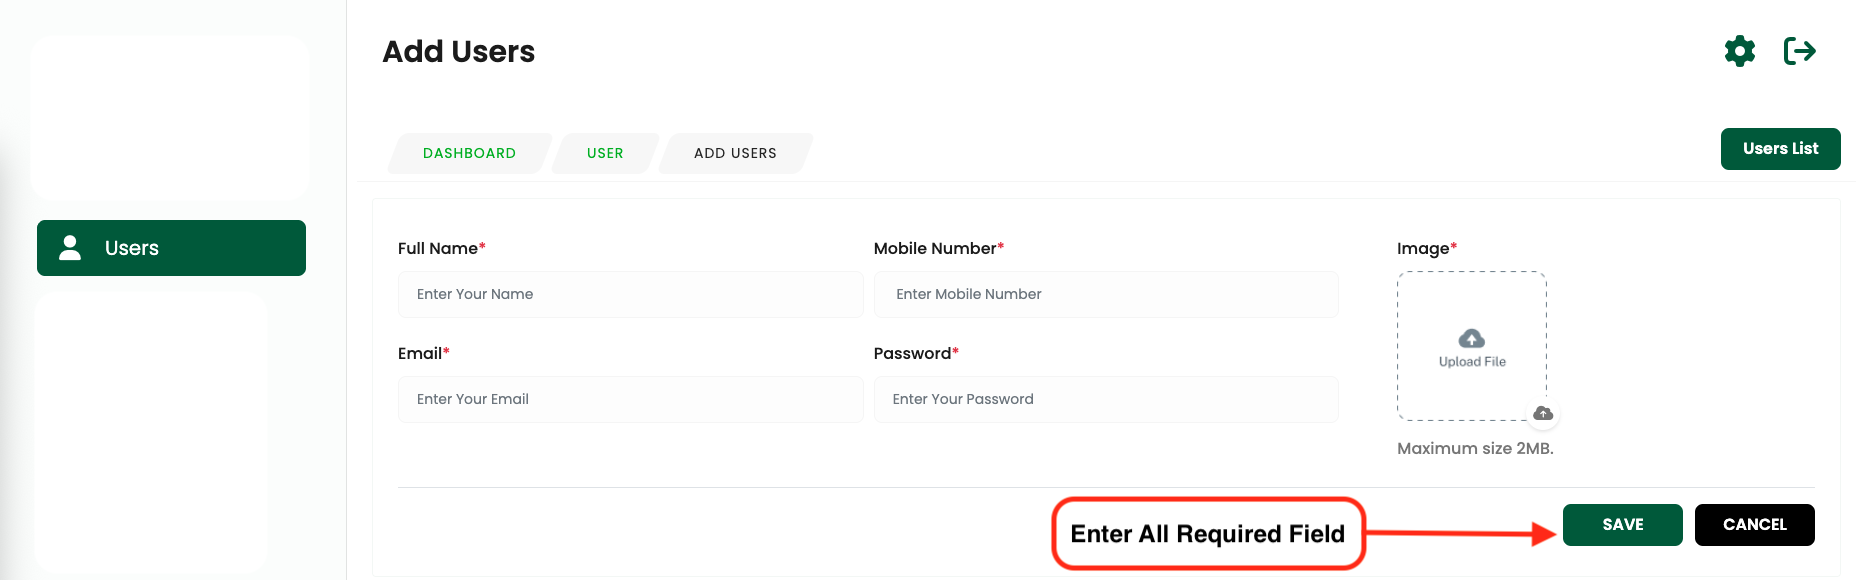
Admin Profile
Use the following images to change Admin Profile Data &
Password.
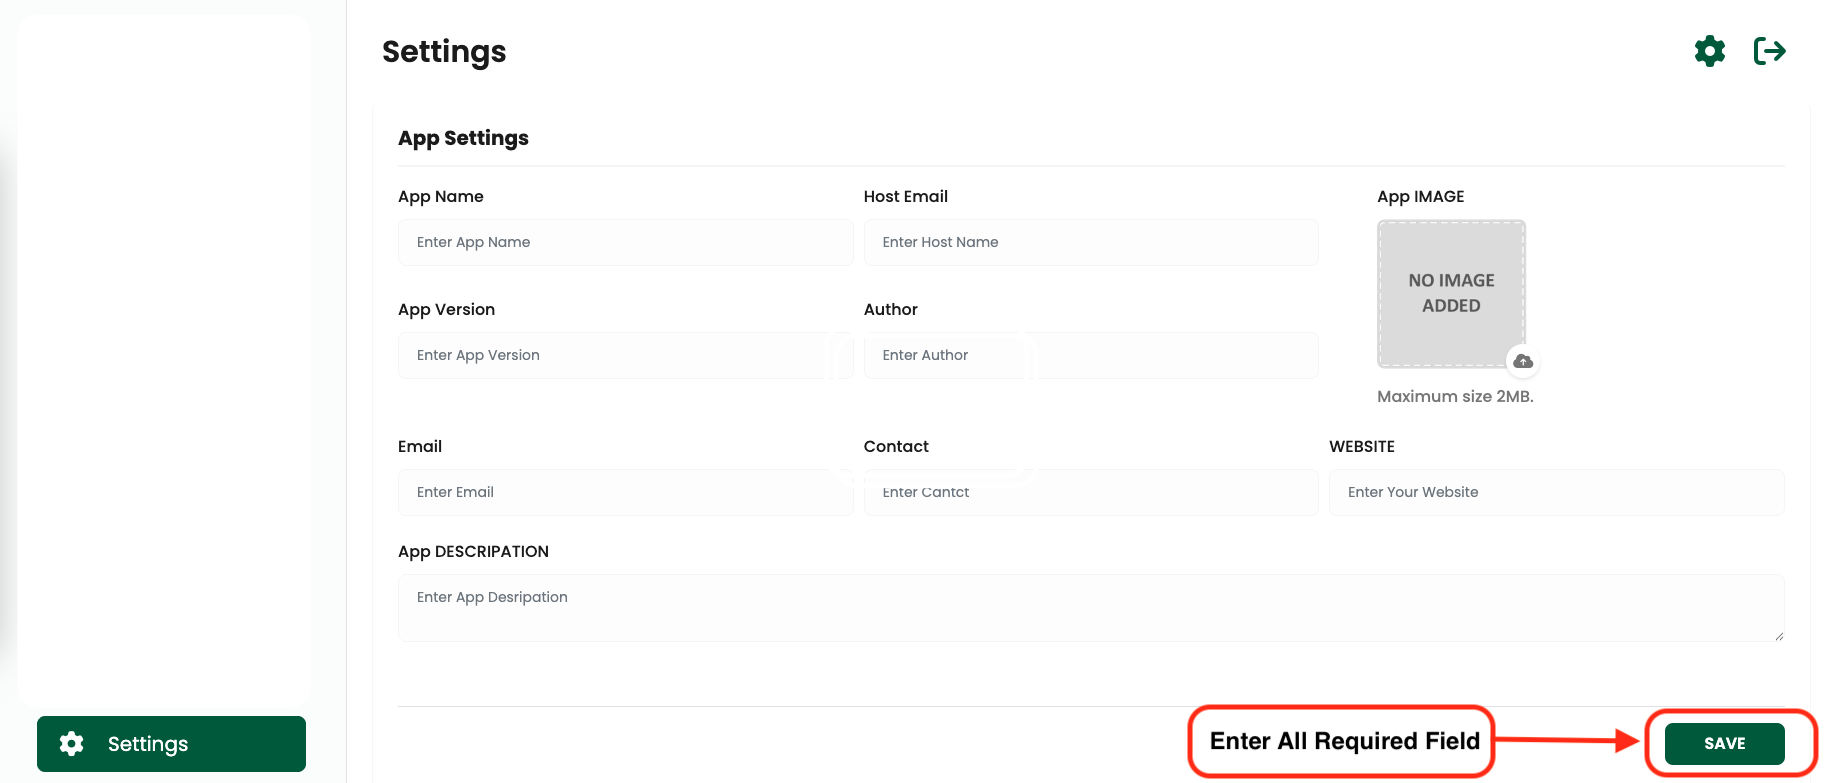
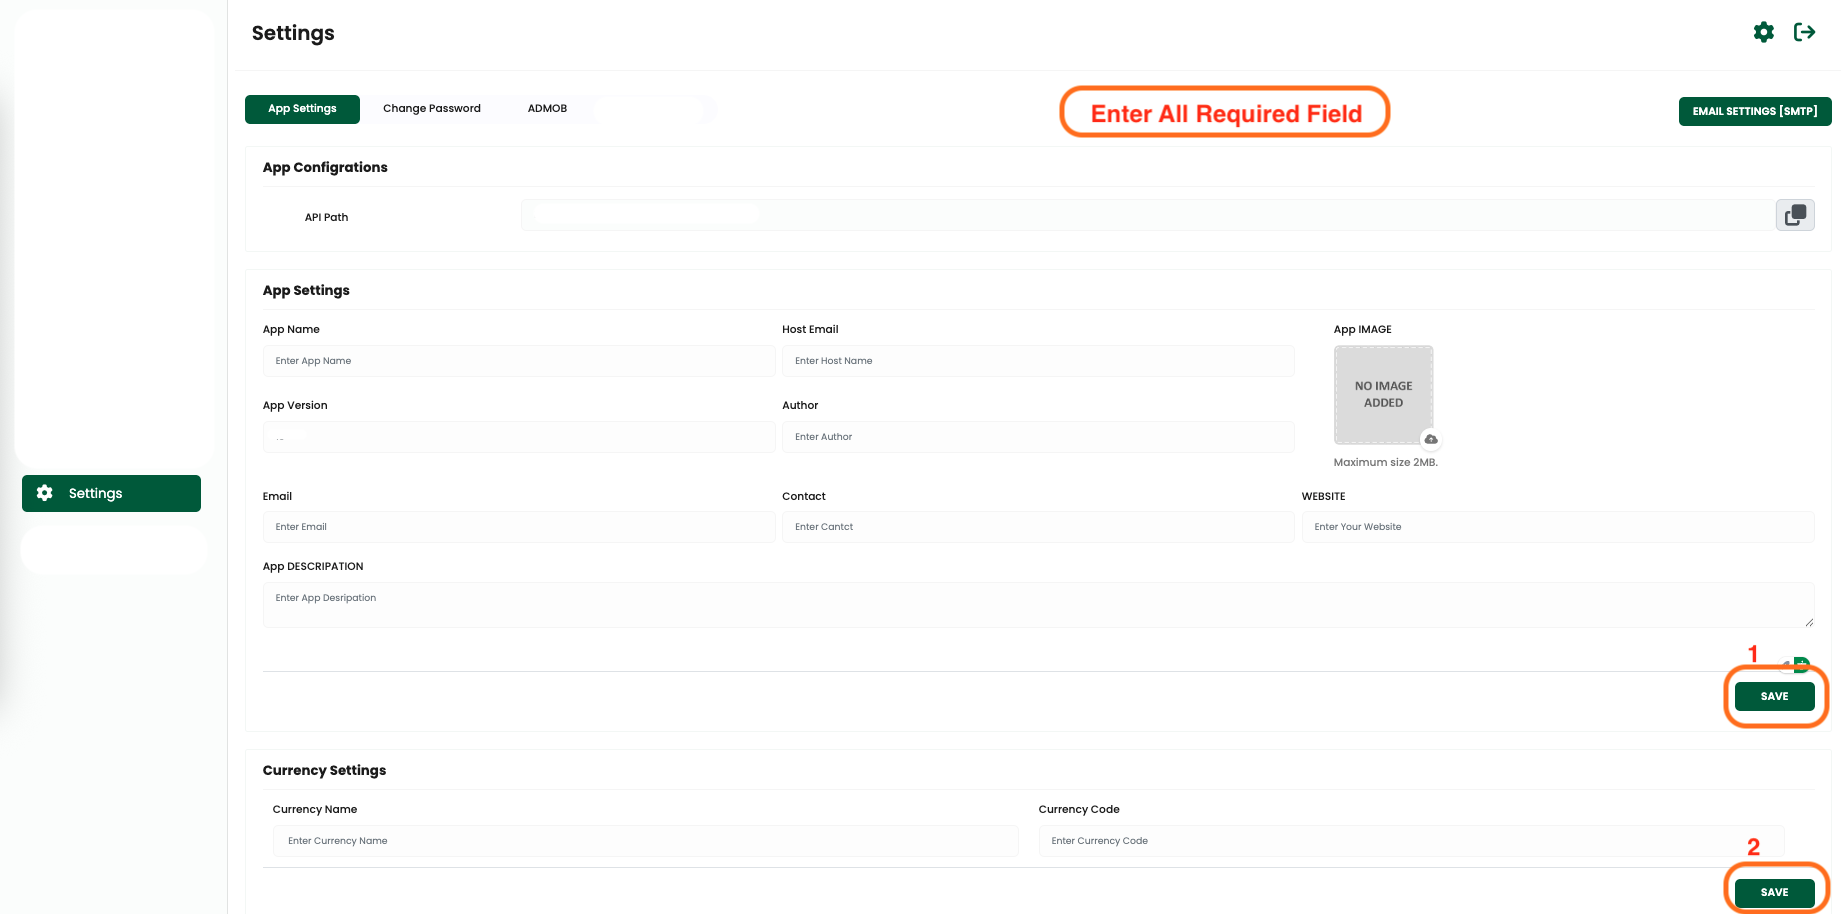
App Setting
Refer to the images below to modify App Settings, including
changing the App Name, App Icon, App Description, and more.
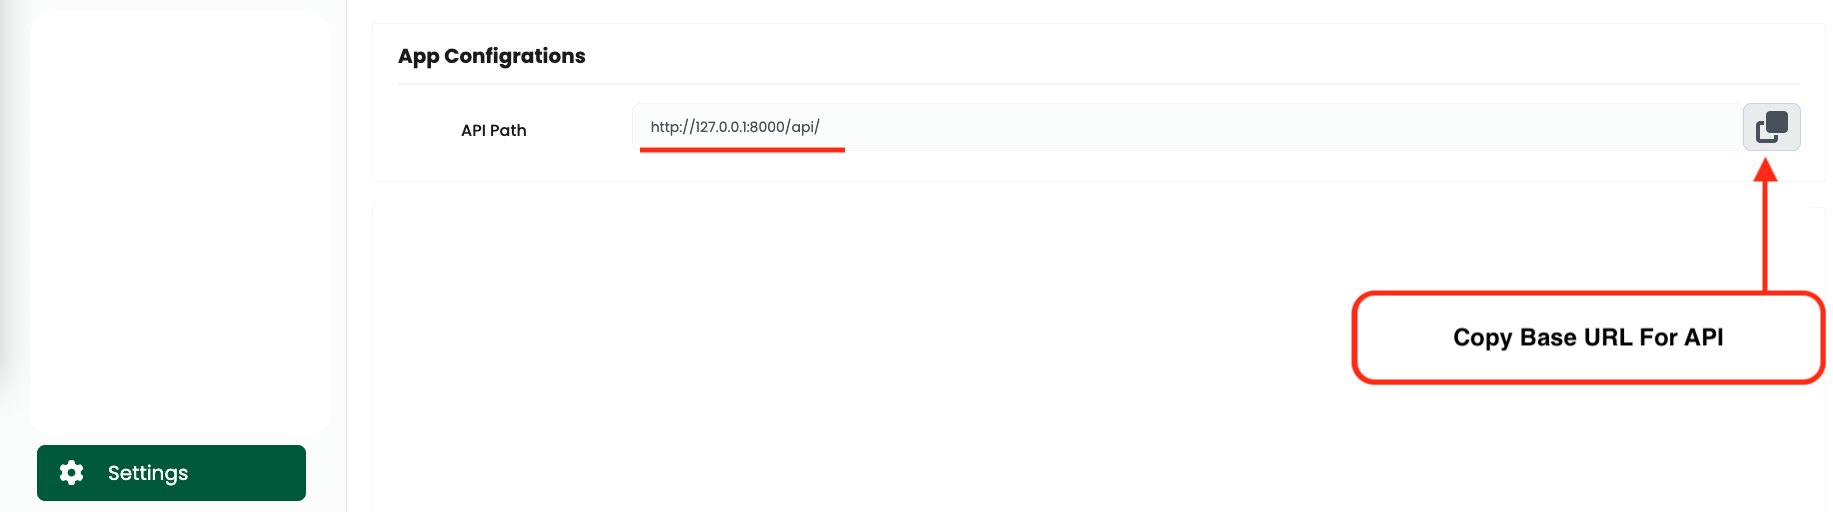
API Configuration
Refer to the images below to manage your Base URL, and
configure or start Your App.
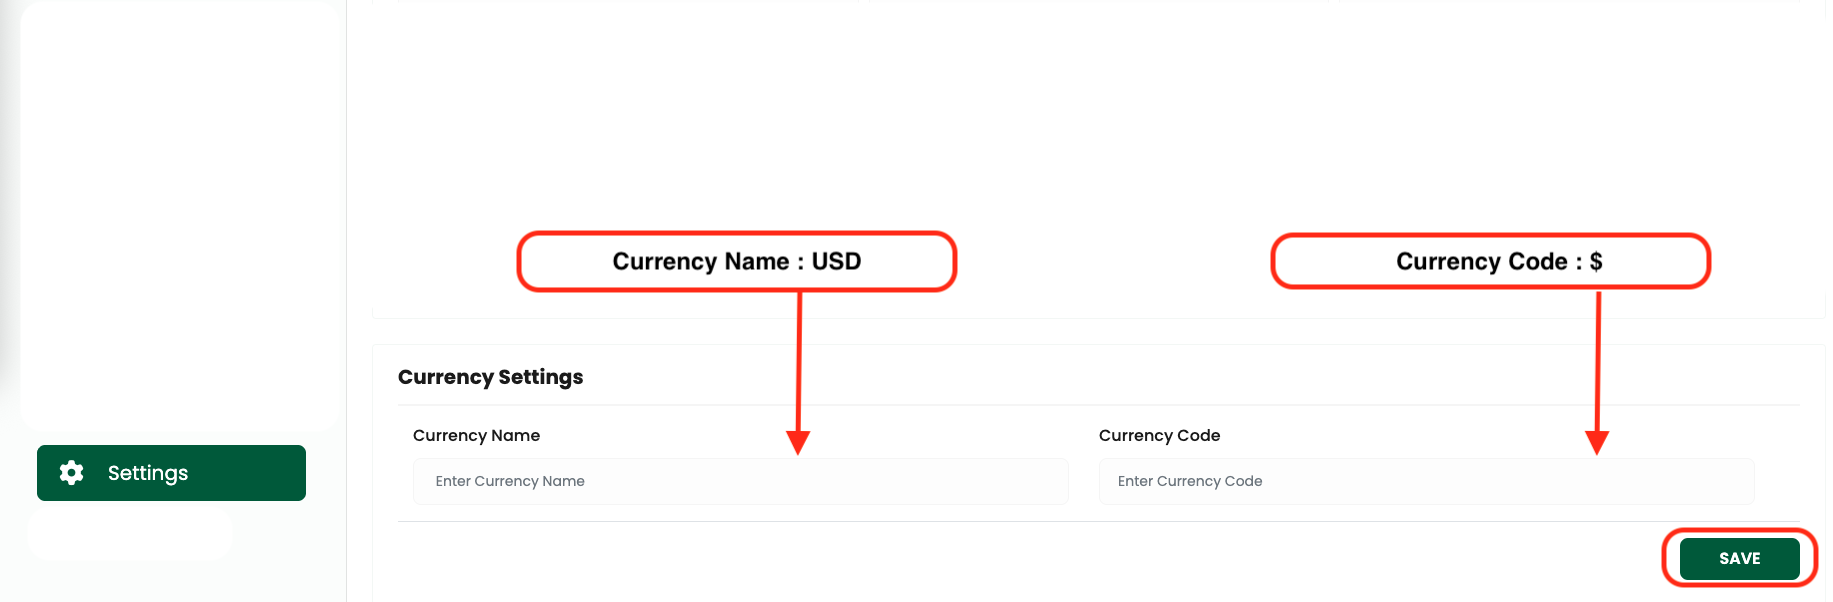
Currency Settings
Refer to the images below to manage your Currency Settings.
You can enter your currency details and manage Transactions.
Page Setting
To manage and customize your Social Pages, including About
Us, Privacy Policy, Terms & Conditions, and Refund
Policy, follow the instructions below.
In the Page Layout Setting section :
- Set Page Background Color : Use the color picker to set the
background color of your page.
- Set Page Title Color : Adjust the title color to match your branding.
In the Page List :
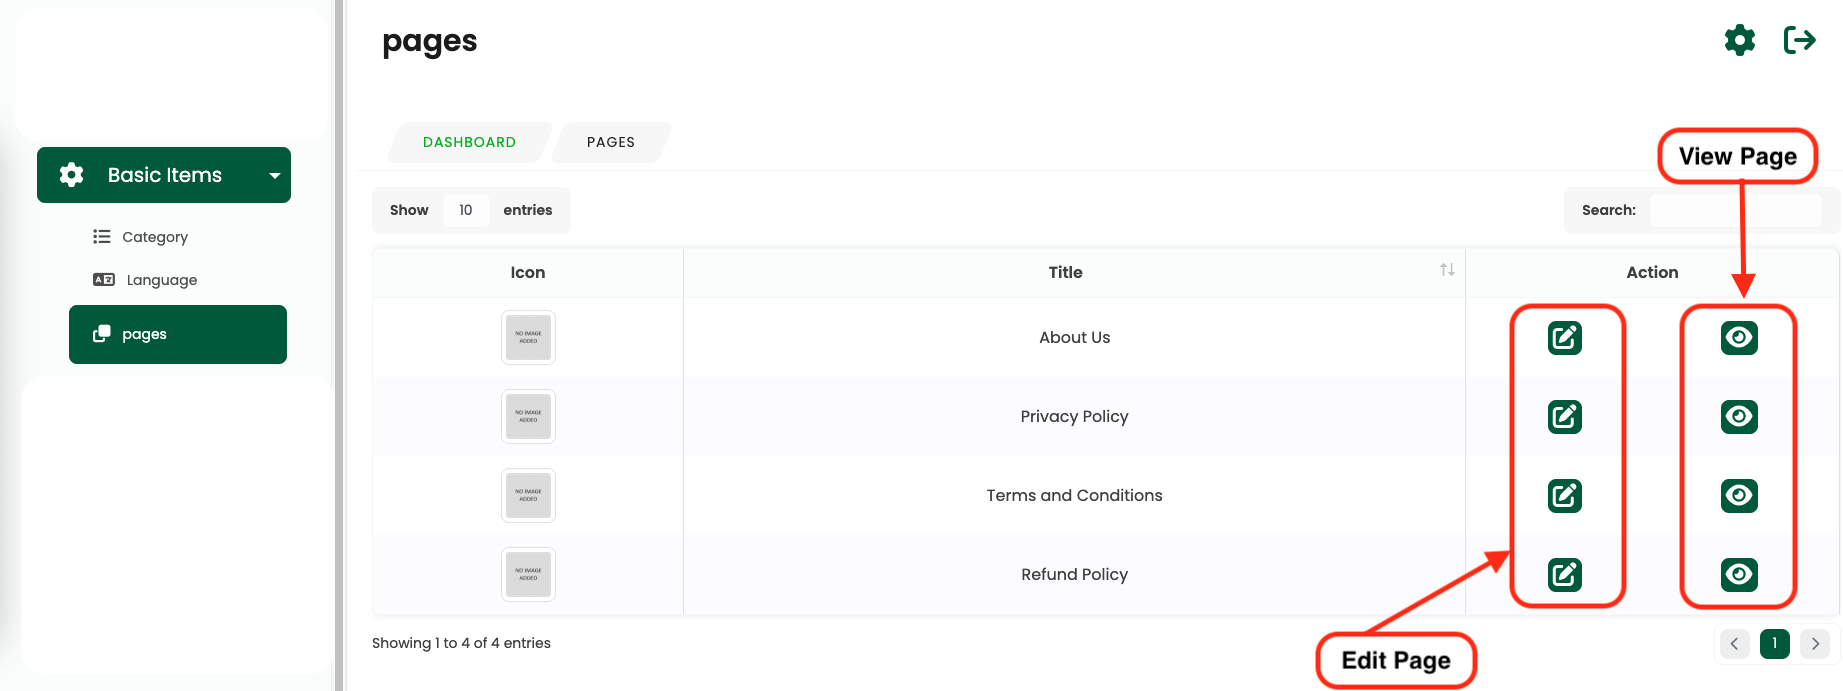
- View Page : Click the Eye Icon to preview how the page will look to
users.
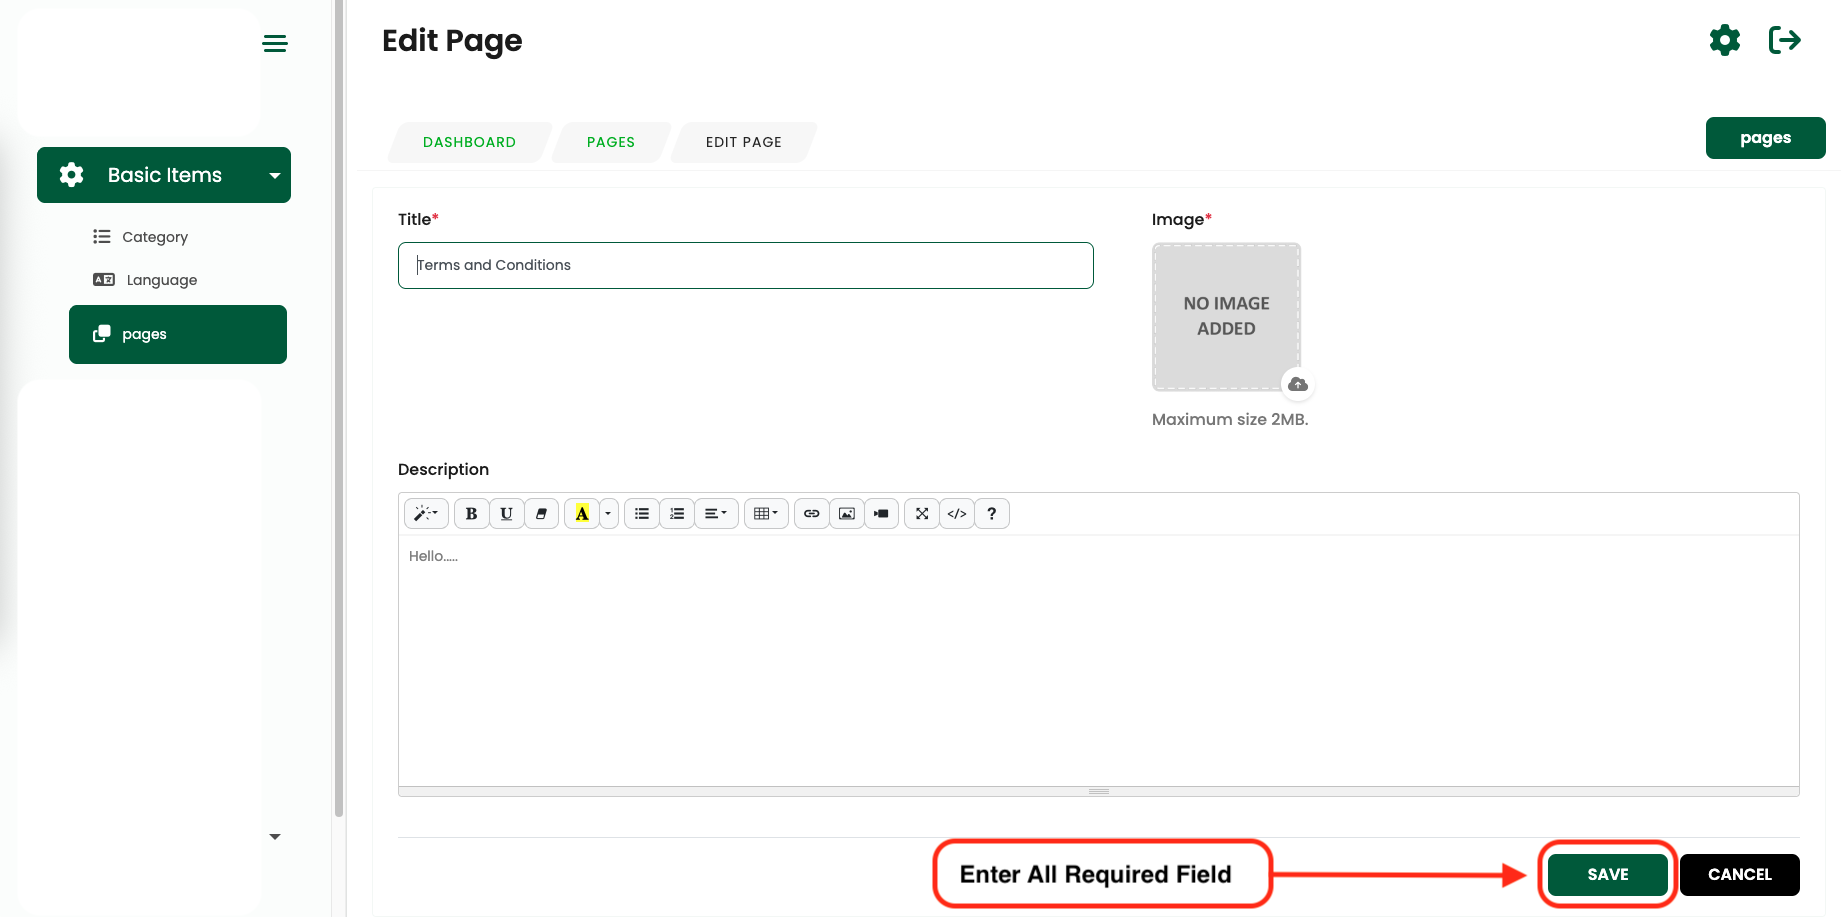
- Edit Page : Click the Pencil Icon to make changes to the content and
settings of each page.
Use the images below for reference :
Page List Overview : Displays all your social pages with
options to view and edit them.
Edit Page Settings : Customize the appearance and content
of each page according to your preferences.
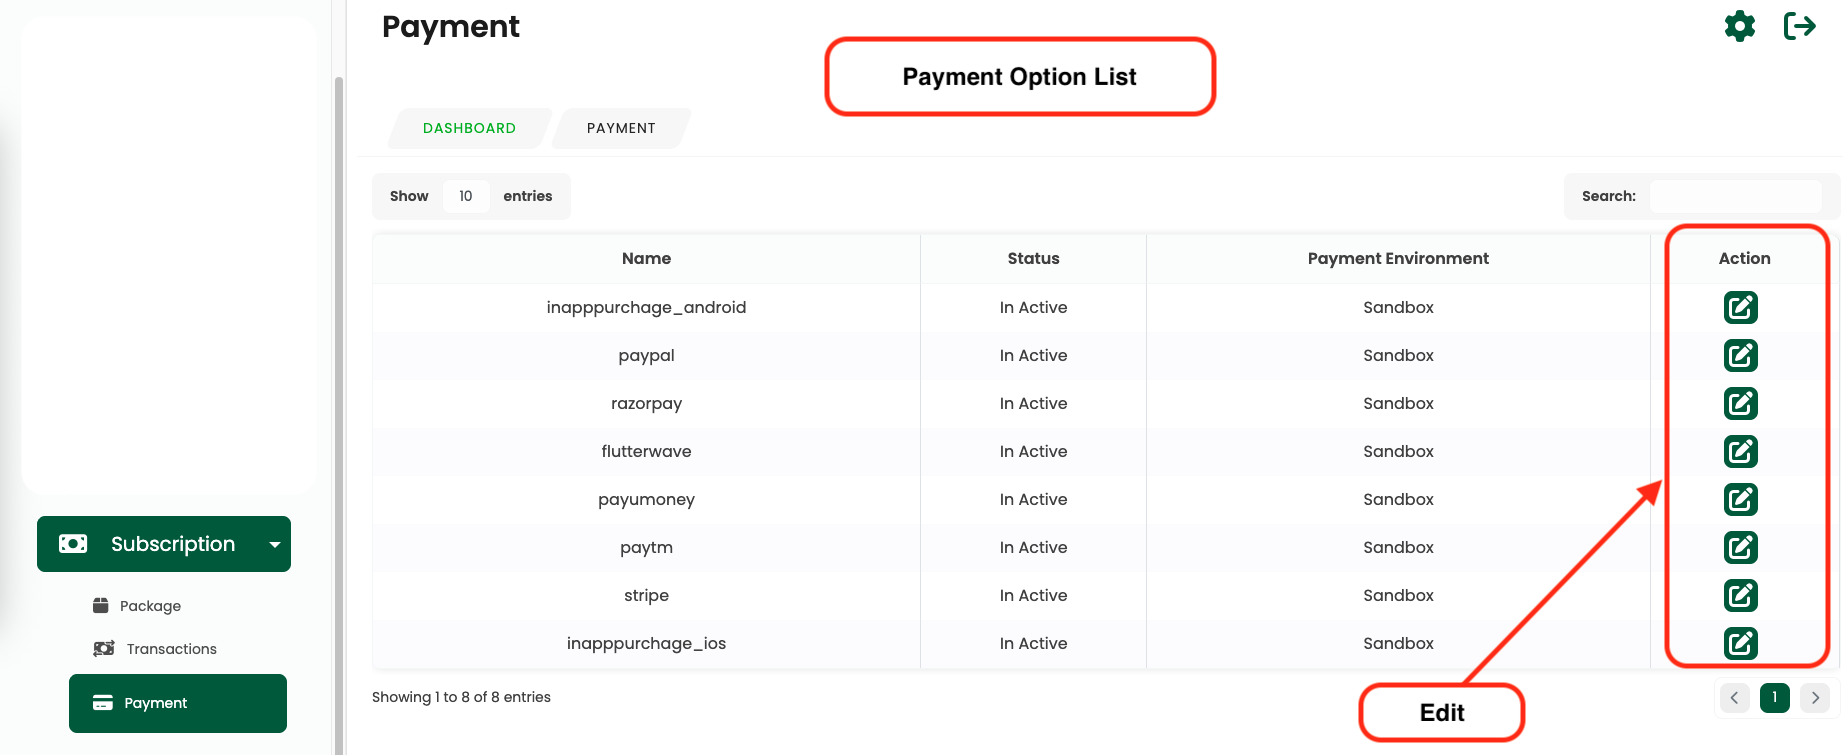
Payment Option Setting
Use the following images to manage your Payment Gateway
options, such as In-App Purchases, PayPal, Razorpay,
Stripe etc.
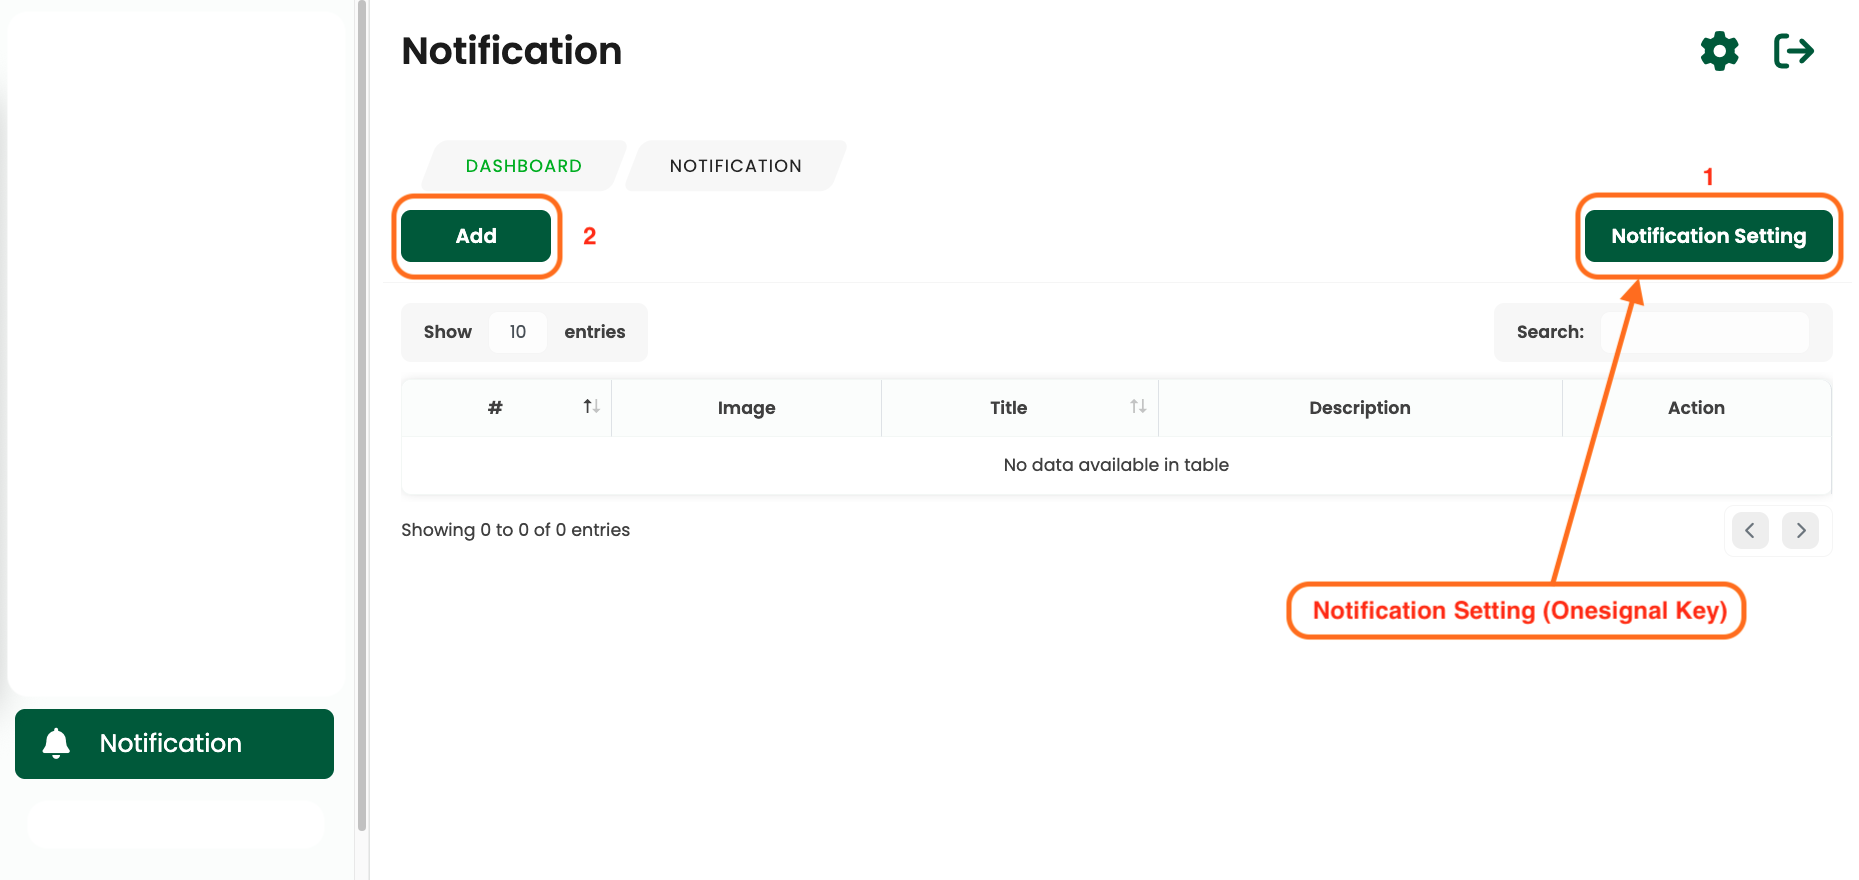
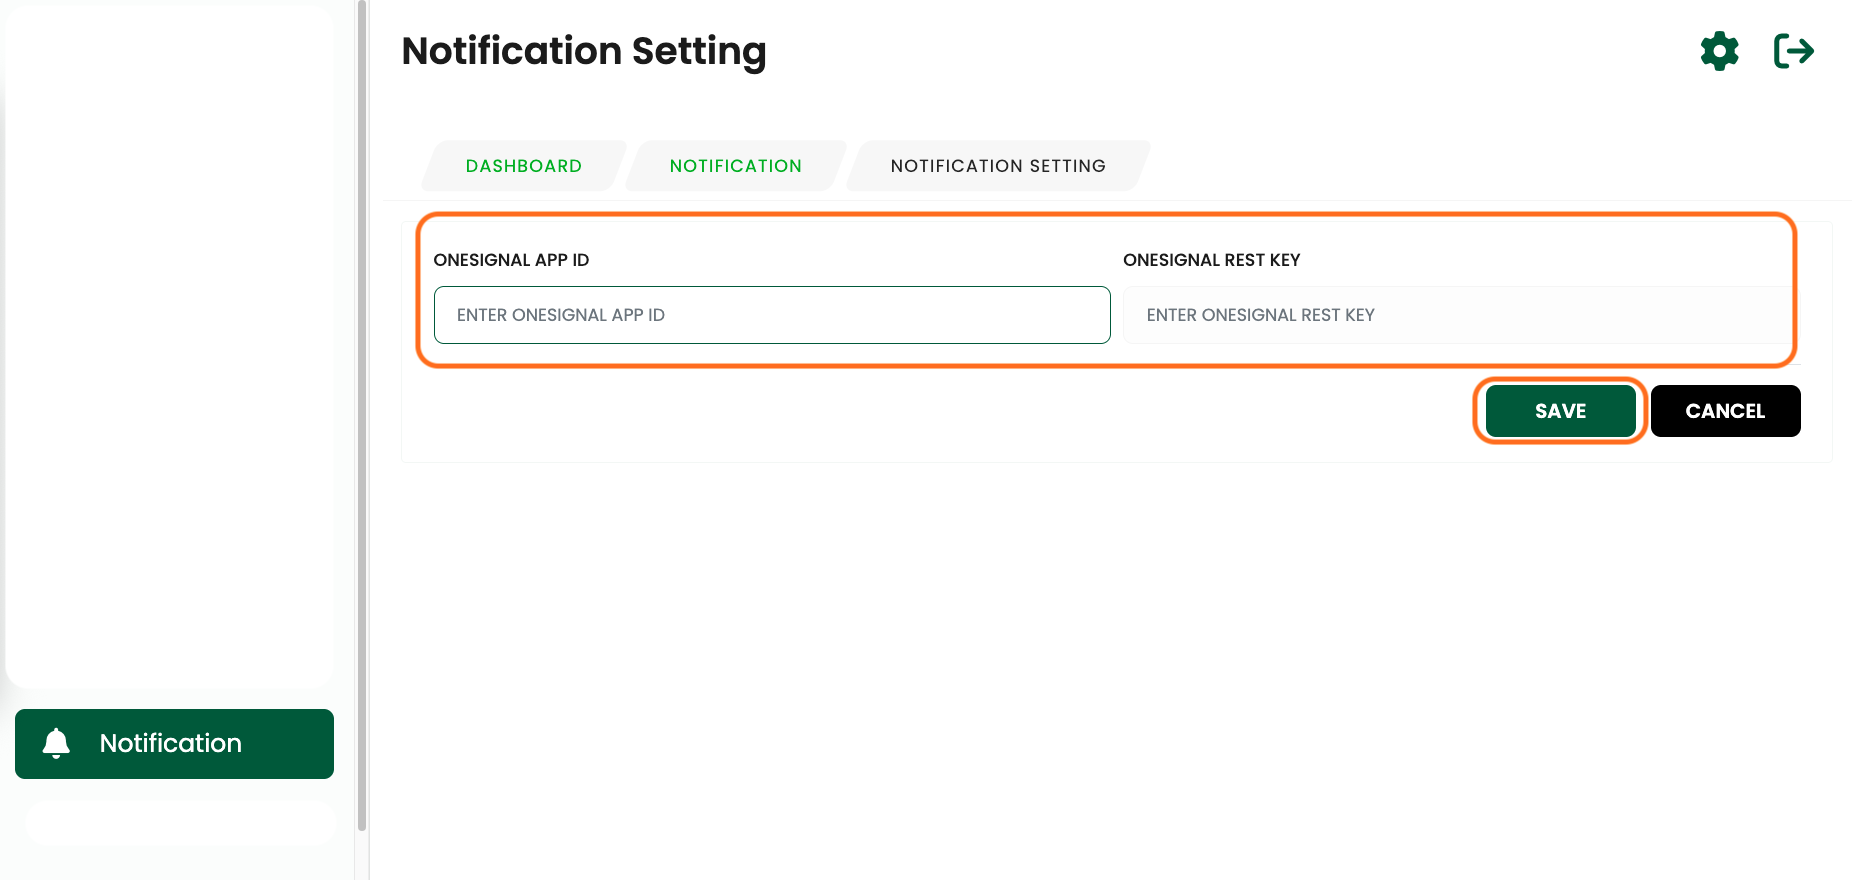
Push Notification Setting
Use the following images to manage your Push Notification
Settings and set up notification settings in OneSignal.
Ads Configuration
Ensure you have the necessary tools and environment ready before configuring
the ads settings in the Admin Panel. This preparation will make the setup
process smoother.
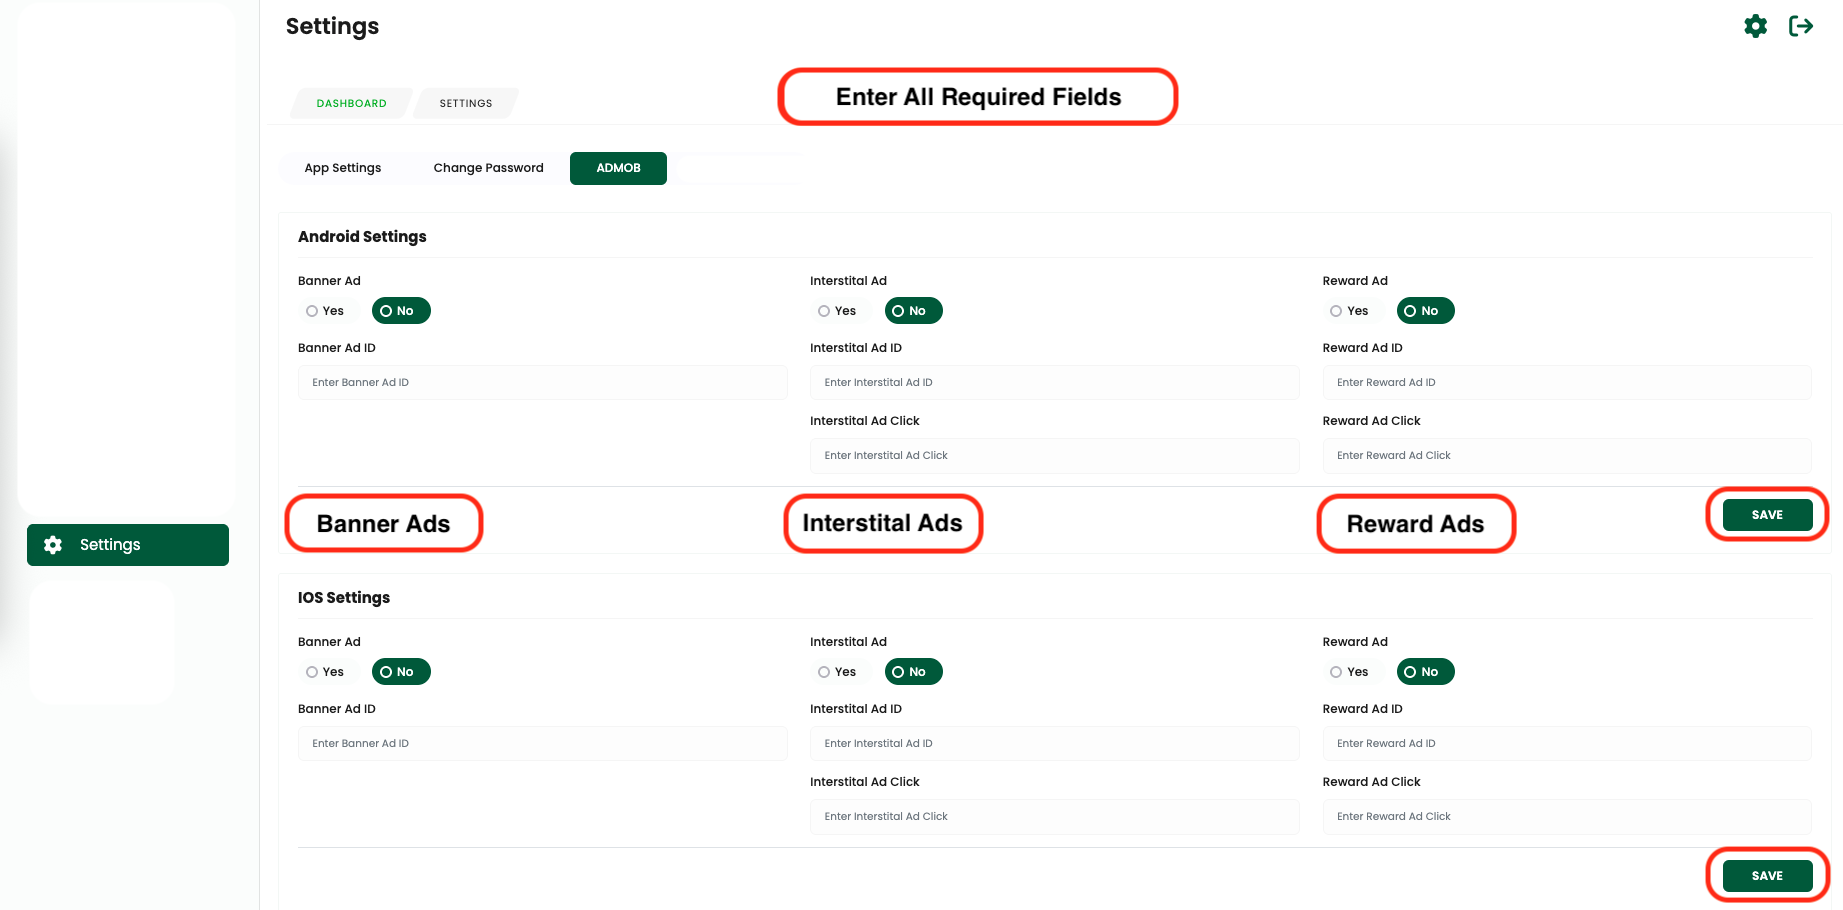
Admob Setting
Use the following images to manage your AdMob ads in the app,
including Banner Ads, Interstital Ads & Reward Ads.
Content Configuration
Make sure you have the required tools and environment set up before you begin
configuring the content settings in the Admin Panel. This will help ensure a
smooth configuration process.
Manage Section
Refer to the images below image to Configure and
Organize various sections of Your App, including the Layout and
Content of the Home Page.
Setup App
This section will guide you through setting up the App for your Backand
application.
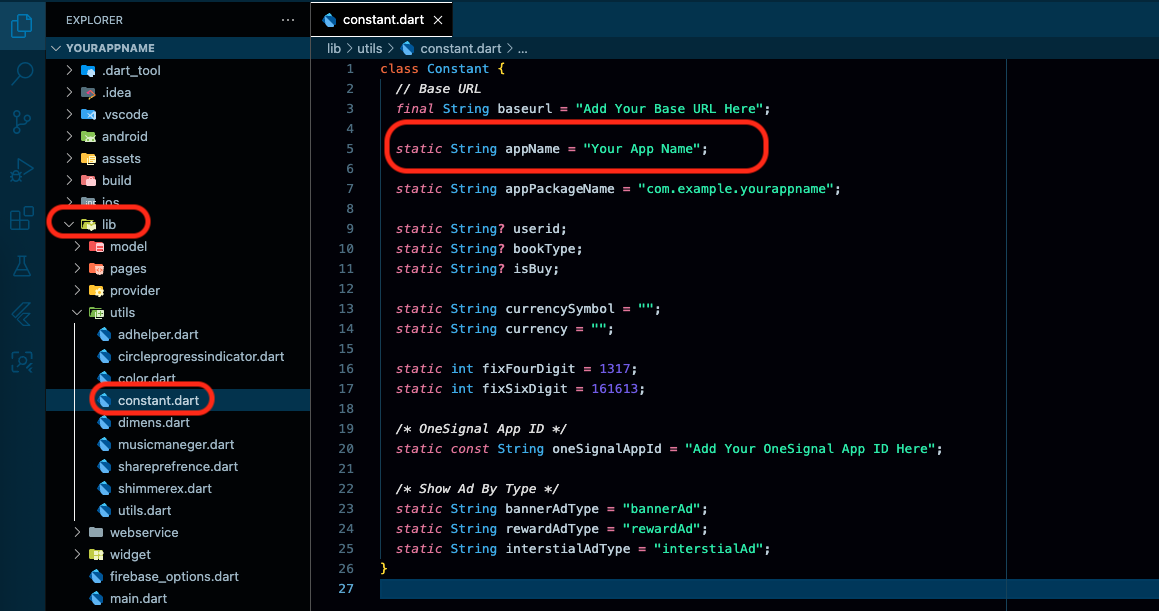
Change the AppName
Before setting up the Admin Panel, make sure you have the following tools and
environment ready:
Step 1: Modify the Constant File
Make sure you have Apache web server Installed. If not, run the
following Command in your terminal:
- Open the Constant.dart file in your project.
static String appName = "yourappname";
-
Find the line where the app name is defined:
- Change 'yourappname' to your desired app name. For example:
static String appName = "MyNewAppName";
Step 2: Rename the App Using Flutter Command
- Open your terminal or command prompt.
- Run the following command to activate the rename package:
flutter pub global activate rename
- Use the rename command to set the new app name across iOS, Android, and web
platforms. Replace "YourAppName" with your desired app name:
rename setAppName --targets ios,android,web --value "MyNewAppName"
Change the Package Name
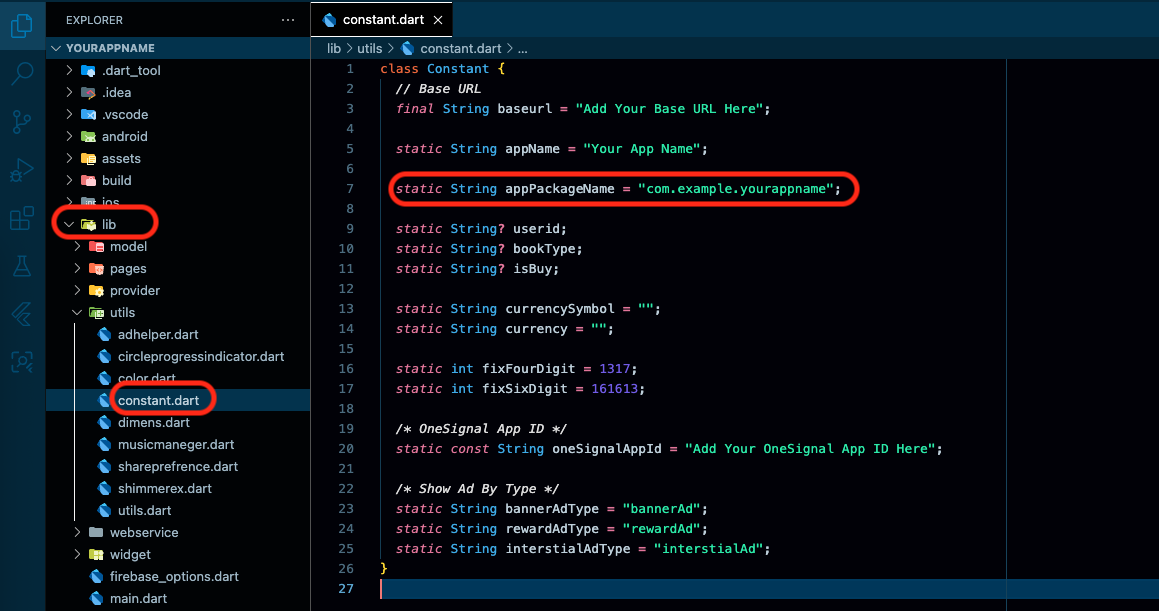
Step 1: Modify the Constant File
- Open the Constant.dart file in your project.
static String appPackageName = "com.example.yourappname";
- Find the line where the package name is defined:
- Change 'com.example.yourappname' to your desired package
name. For example:
static String appPackageName = "com.example.mynewappname";
Step 2: Rename the Package Using Flutter Command
- Open your terminal or command prompt.
- Install thi package 'change_app_package_name'.(pub.dev), Click Here!
- Use the rename command to set the new package name for both Android and iOS
platforms.
Replace "com.example.yourappname" with your desired package
name:
dart run change_app_package_name:main com.example.yourappname
Change the App Icon
Step 1: Place Your App Icon in the Project
- Ensure that your app icon is in PNG format and named 'appicon.png'.
-
Press Click Here! 'Generate Your AppIcon' and Download it,
'Add File name'
Click Here!
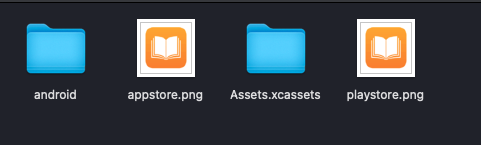
- A ZIP file named AppIcons will be downloaded, containing android and Assets.xcassets folders
with images for the App Store and Play Store, ready to use as app icons.
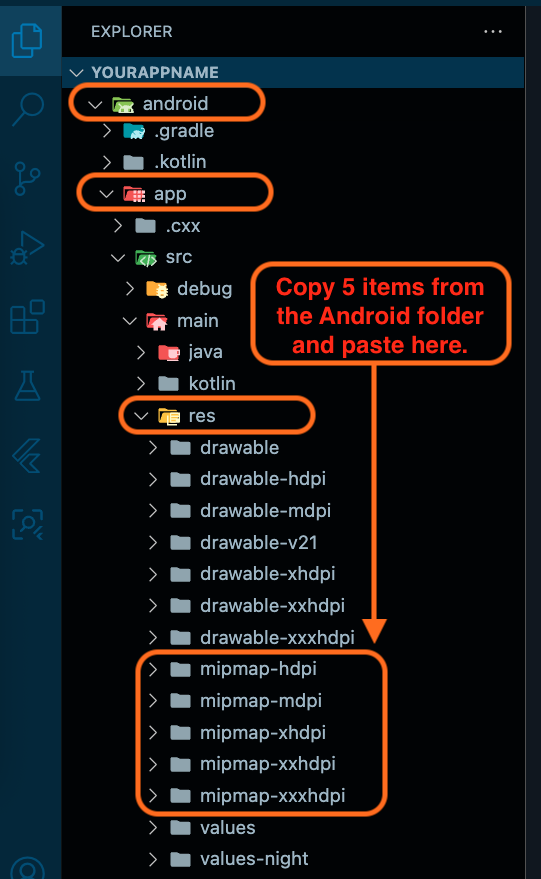
- Go to android/app/src/main/res, right-click the res folder, and select Reveal in Explorer.
Delete all existing mipmap folders, then paste the mipmap folders from the AppIcon/android folder
you downloaded.
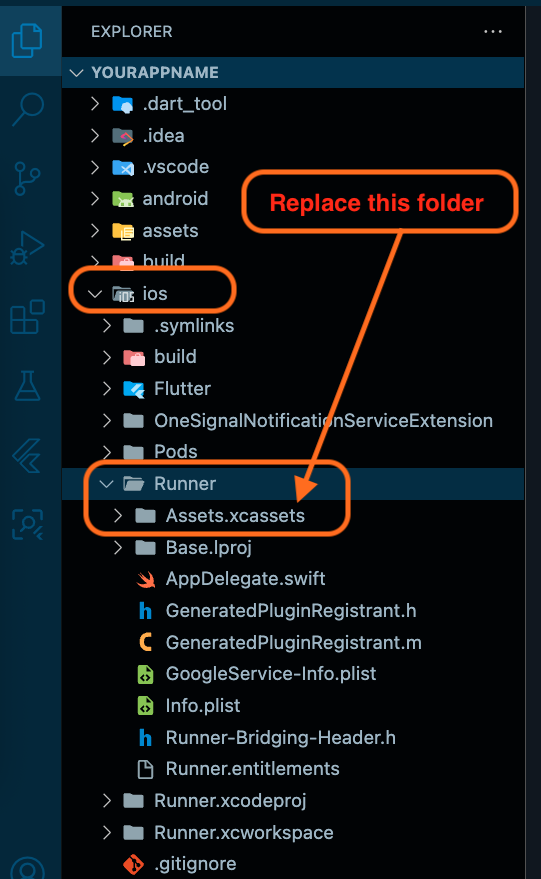
- Go to ios/Runner/Assets.xcassets. Right-click the Runner folder and select Reveal in Explorer.
Delete the existing Assets.xcassets folder, then paste the Assets.xcassets folder that you
downloaded.
Step 2: Update Your Project Configuration
- Open your terminal or command prompt.
- Run the following command to fetch the latest dependencies:
flutter pub get
- Run the command to set the new app icon:
flutter pub run
Troubleshooting
If you encounter any issues while changing the app icon, please feel free to
create a support ticket at
Ekika
Corporation Support.
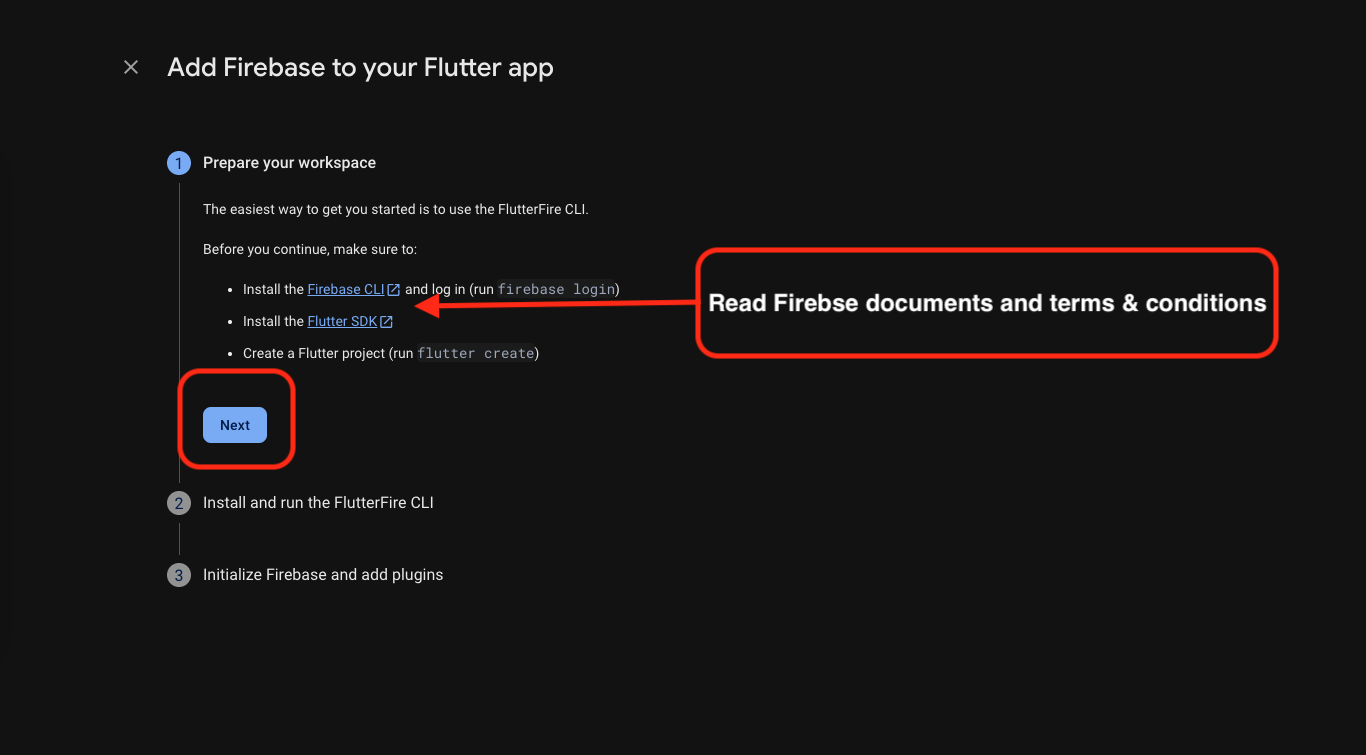
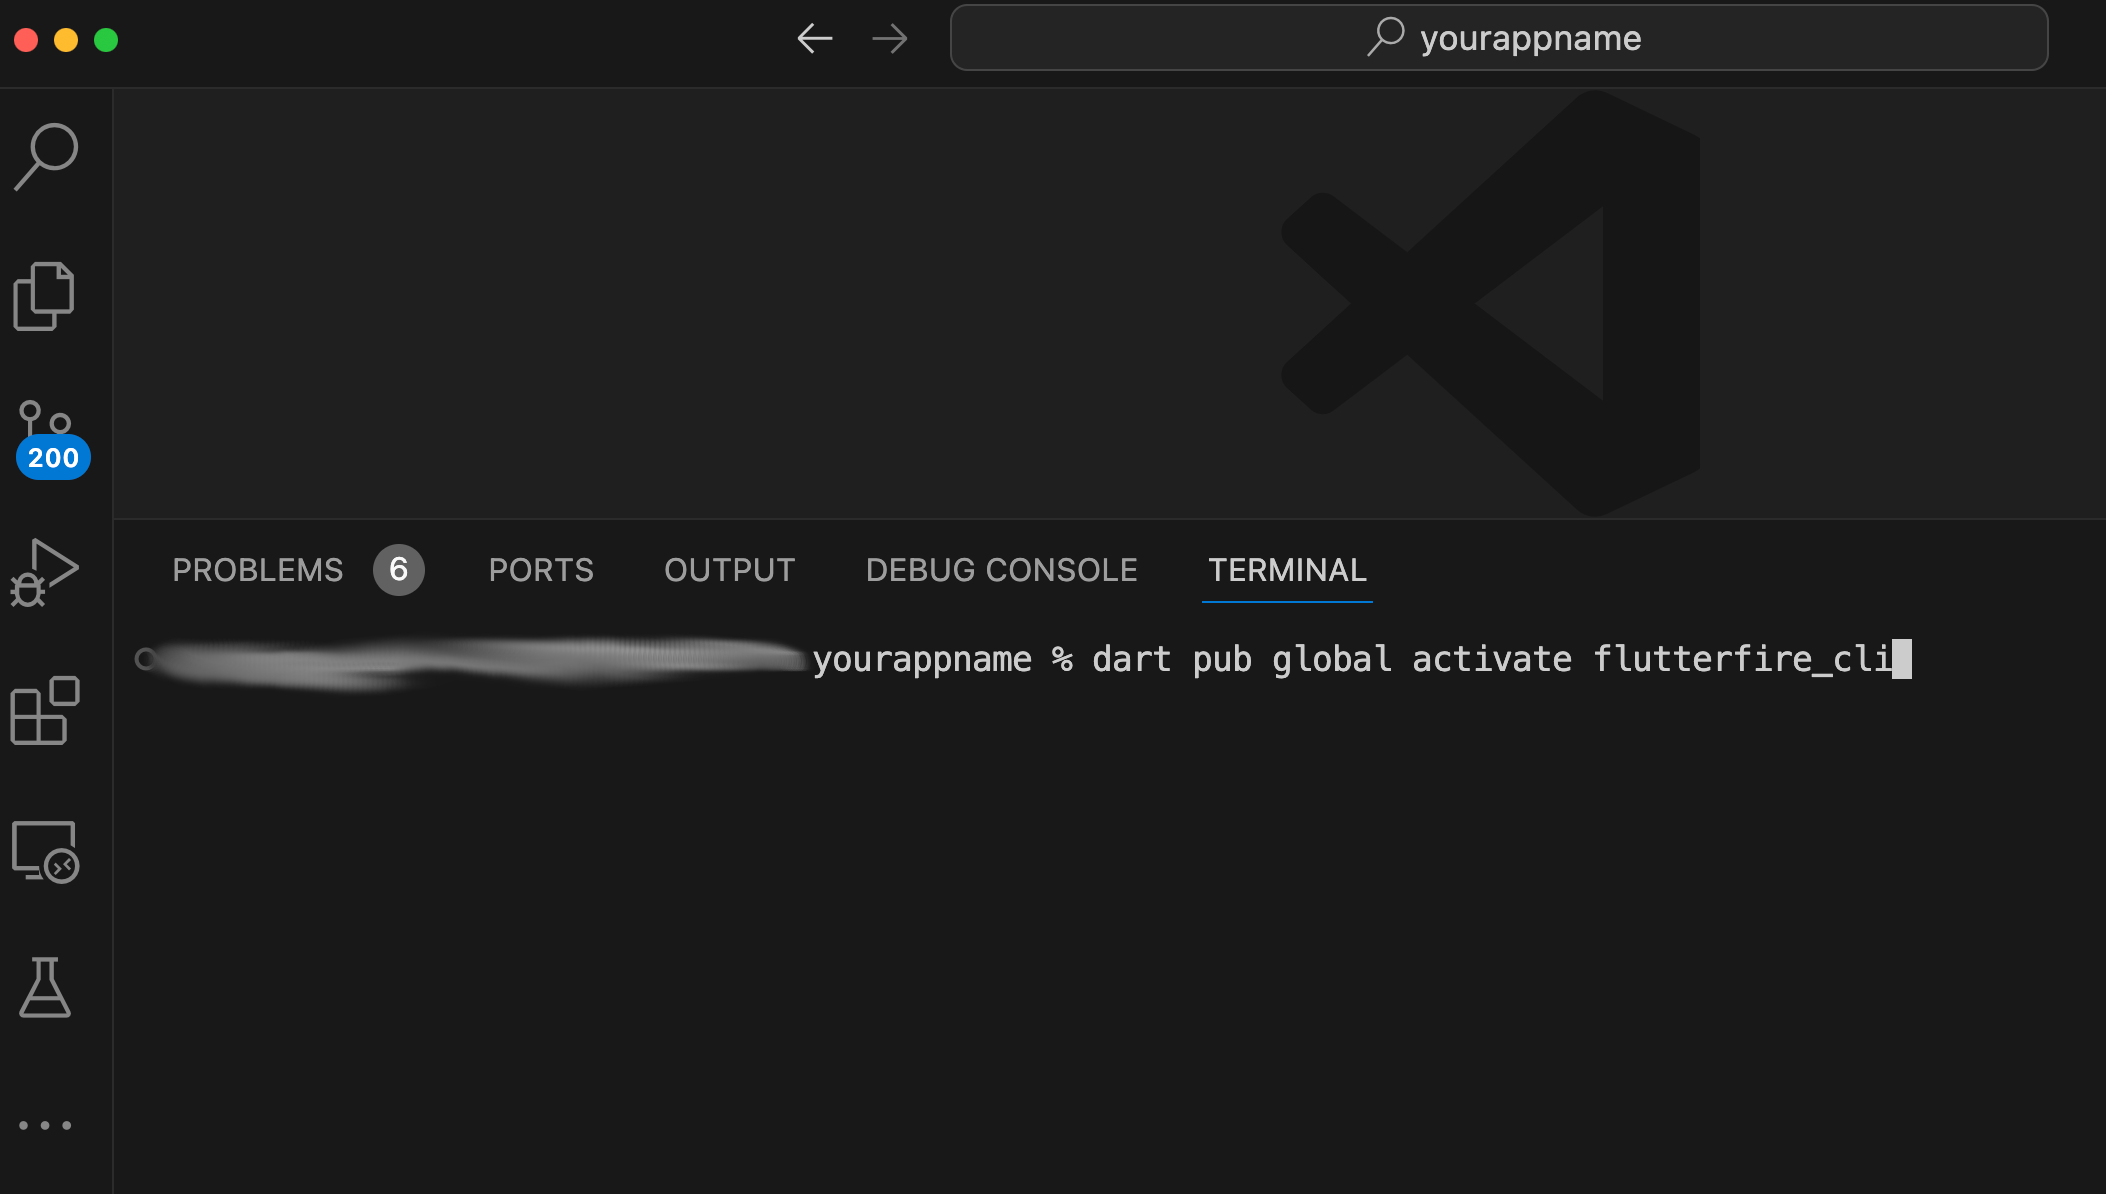
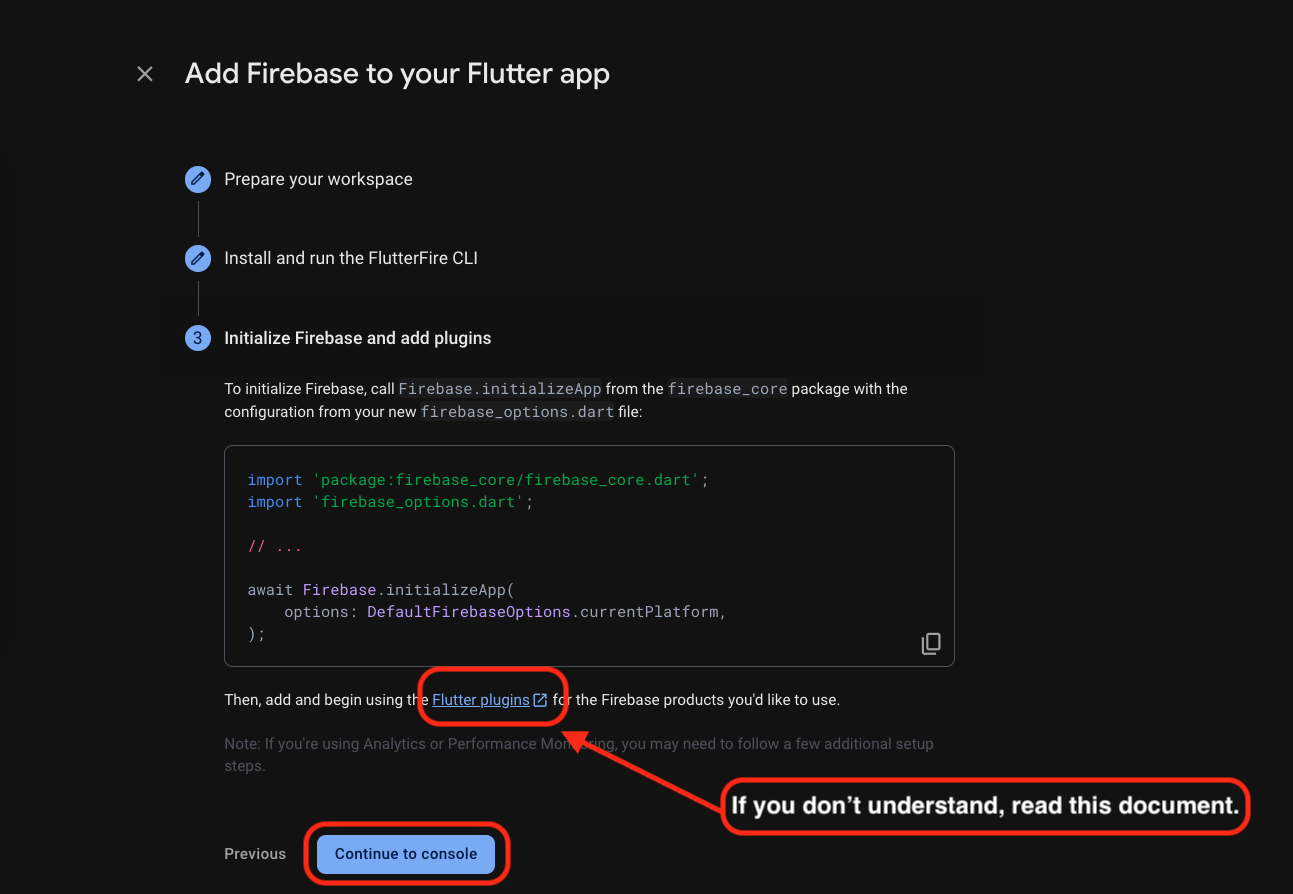
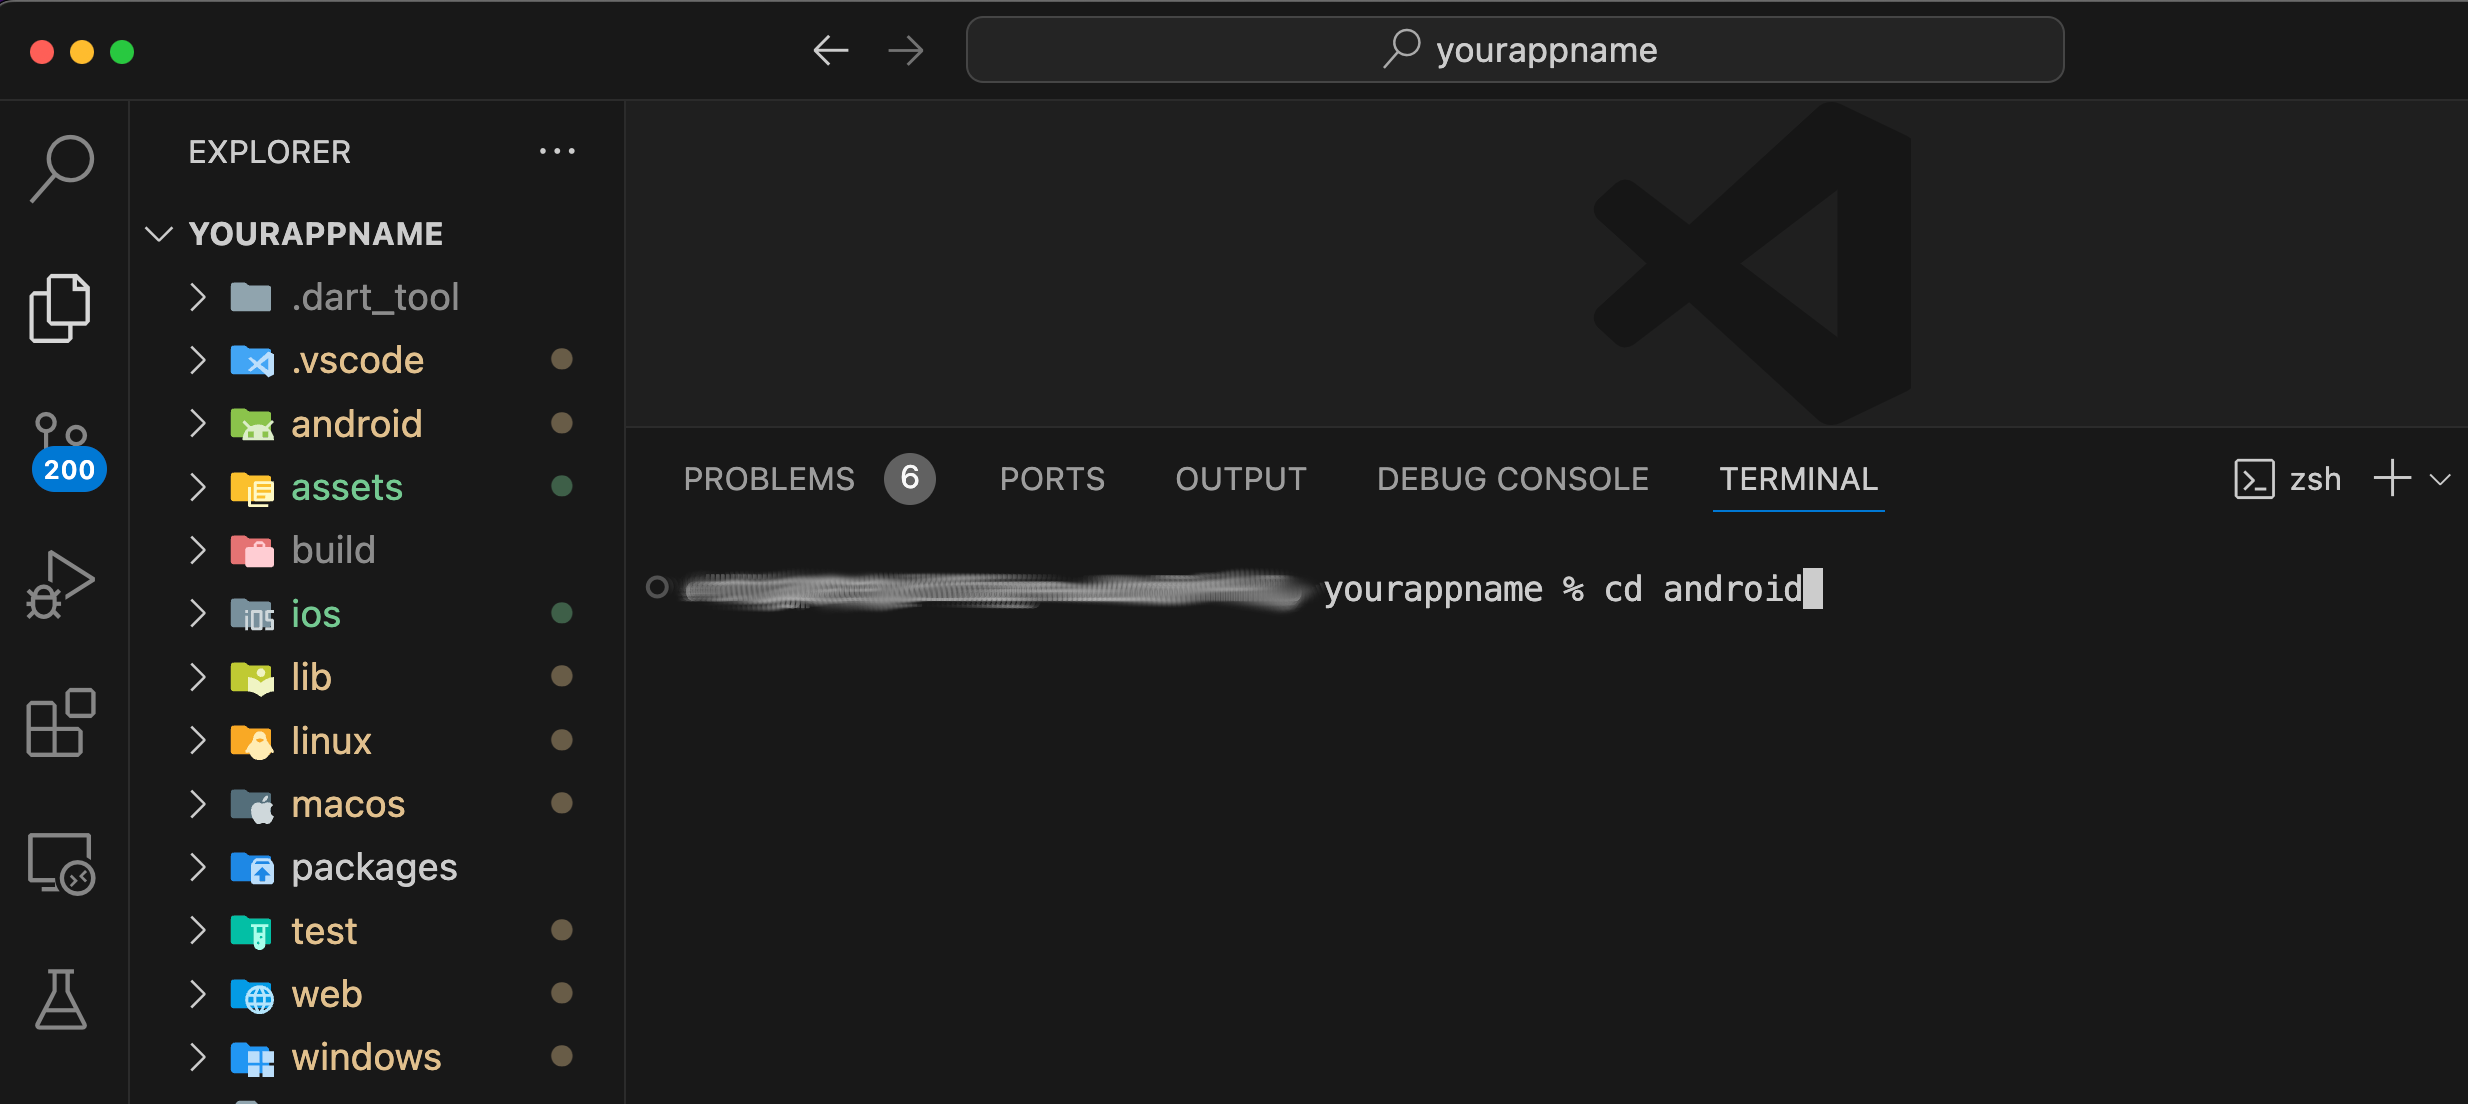
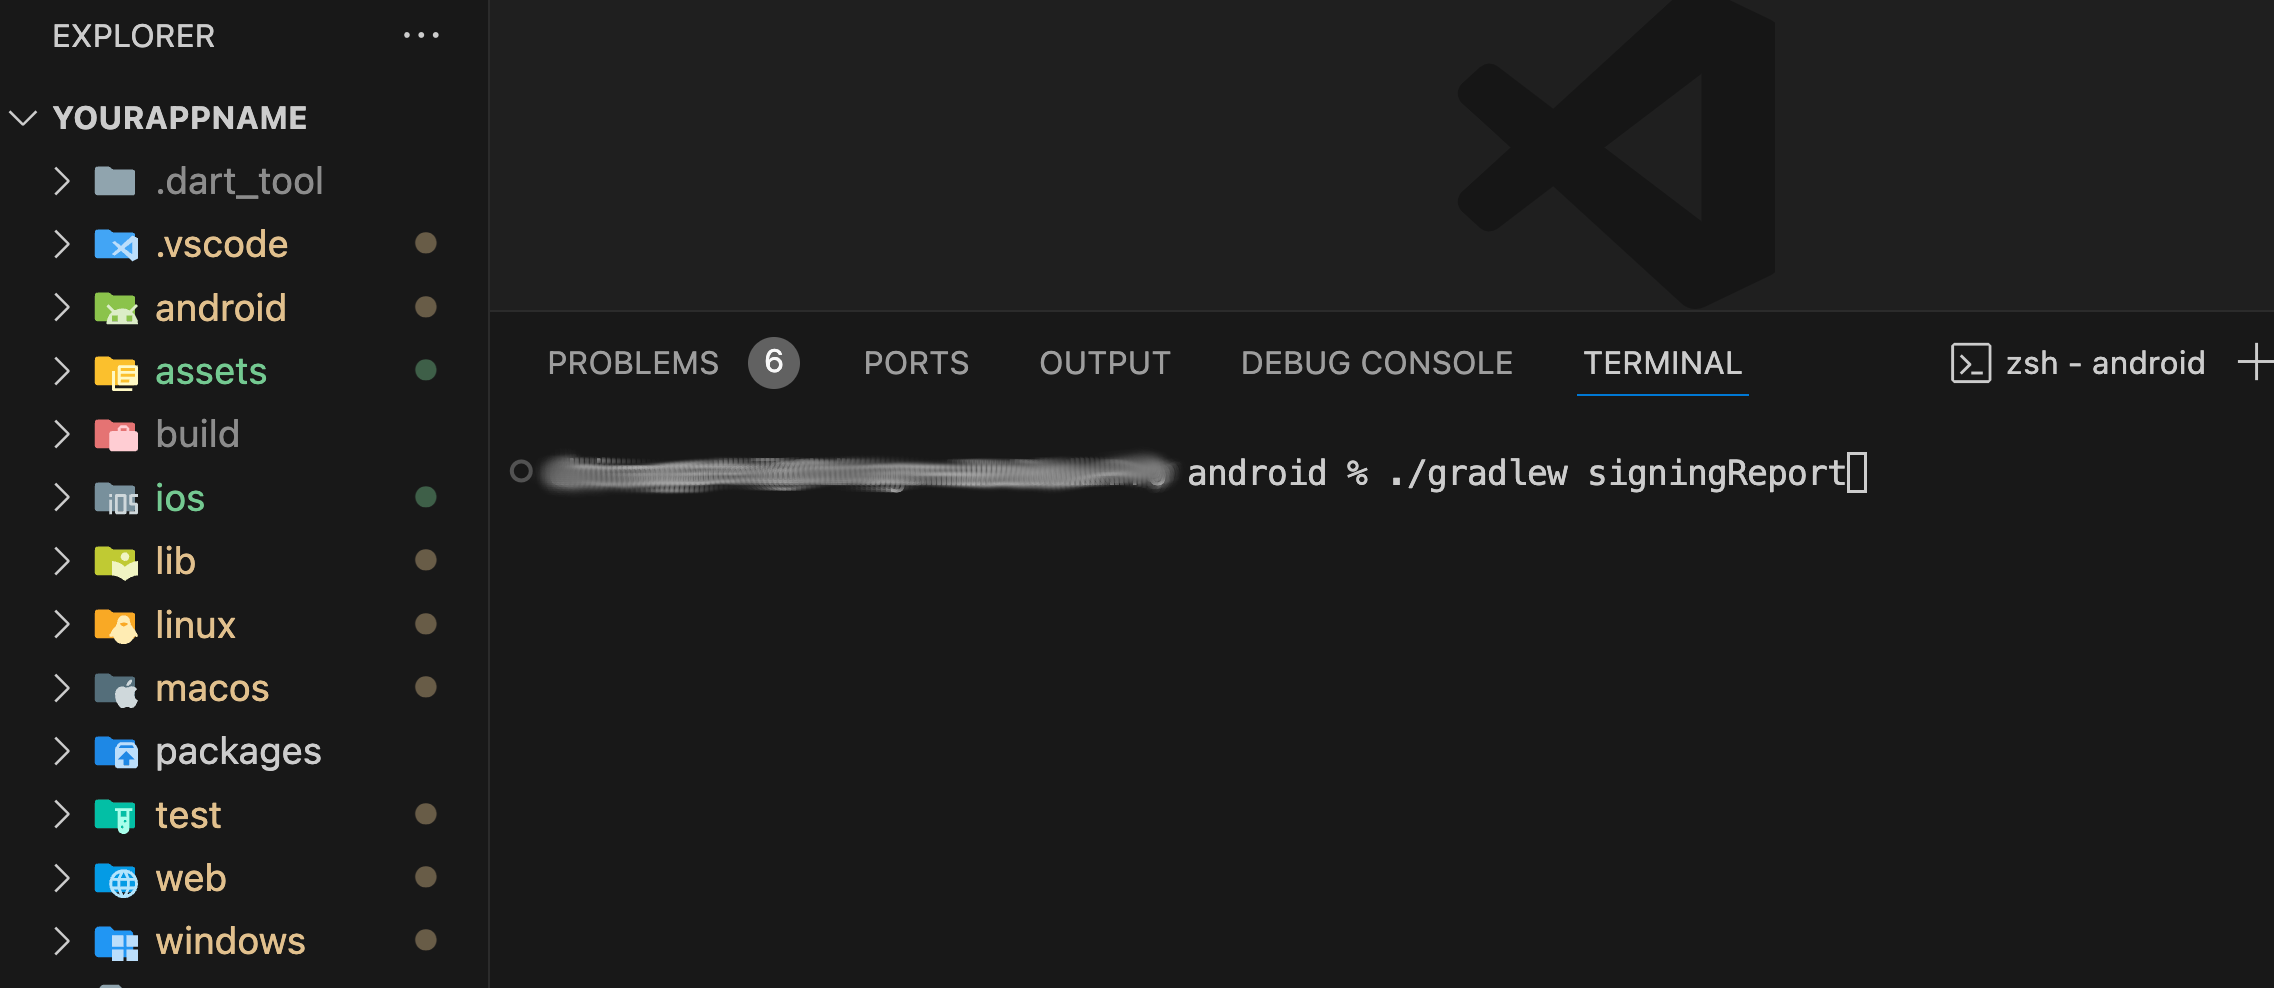
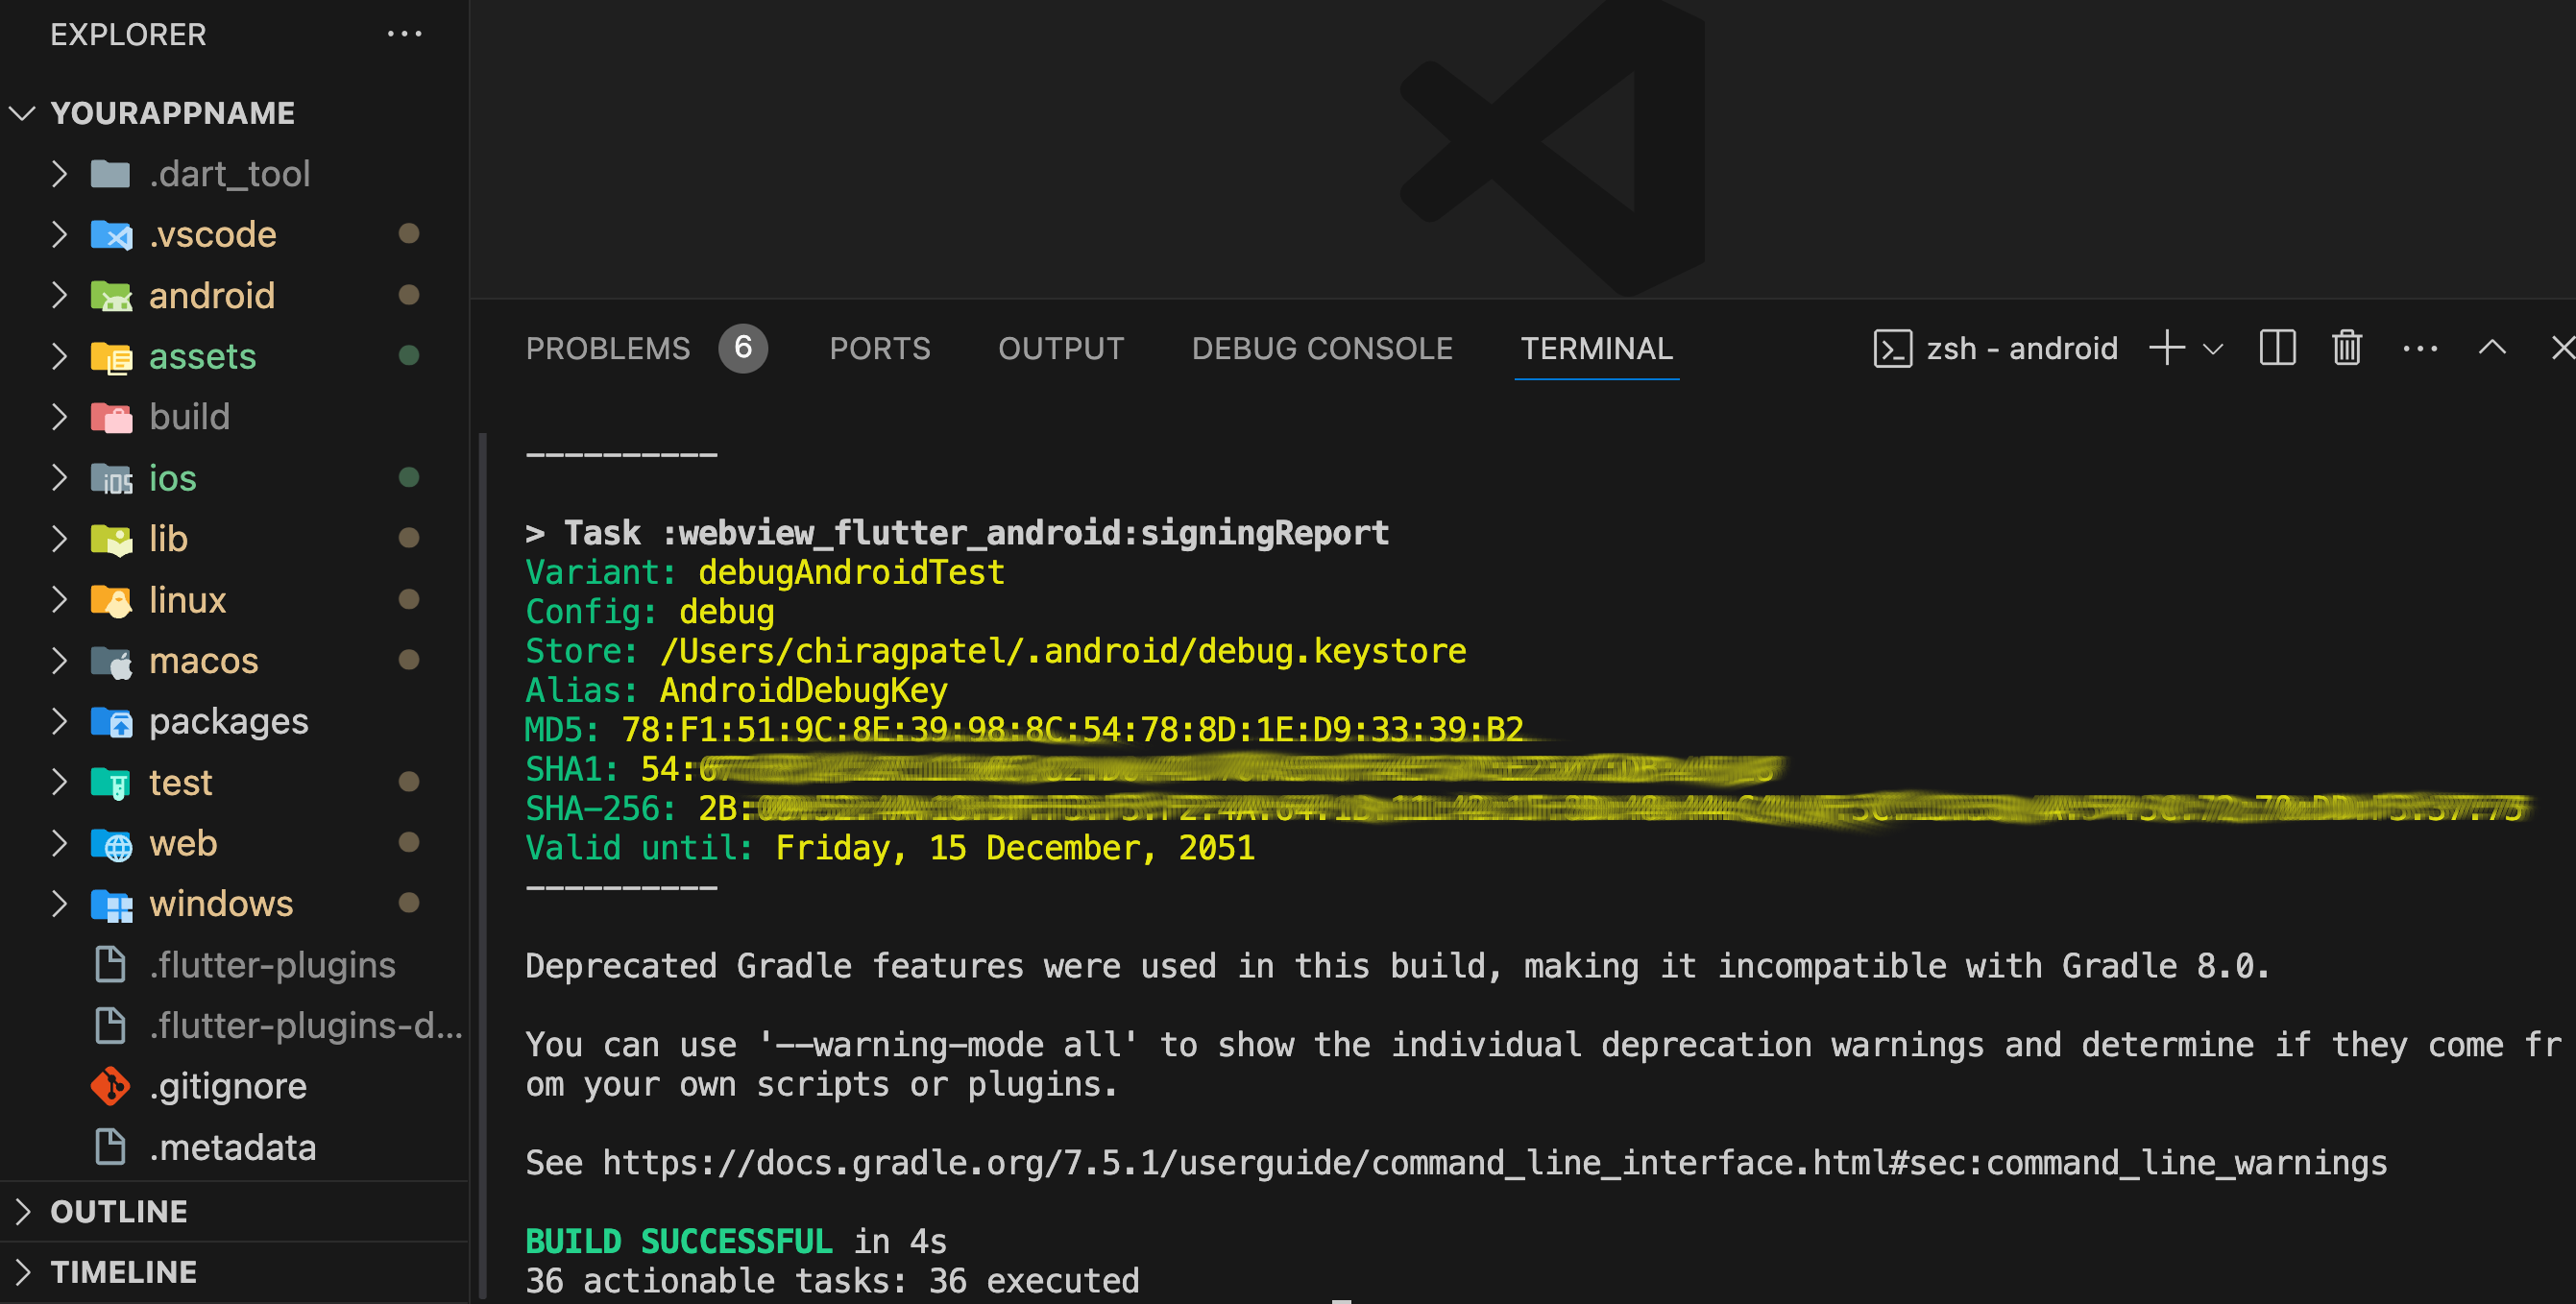
Note: If you face an error when running this command, please ensure that Firebase is properly
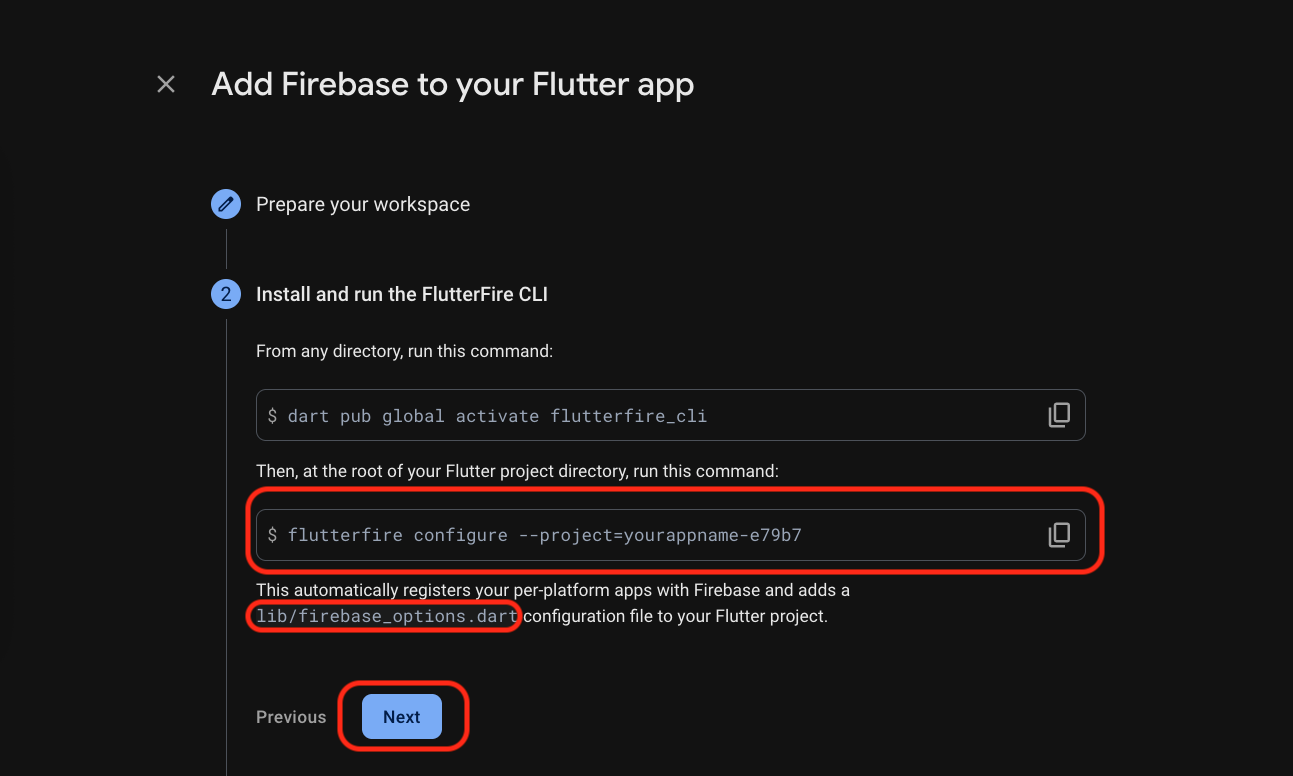
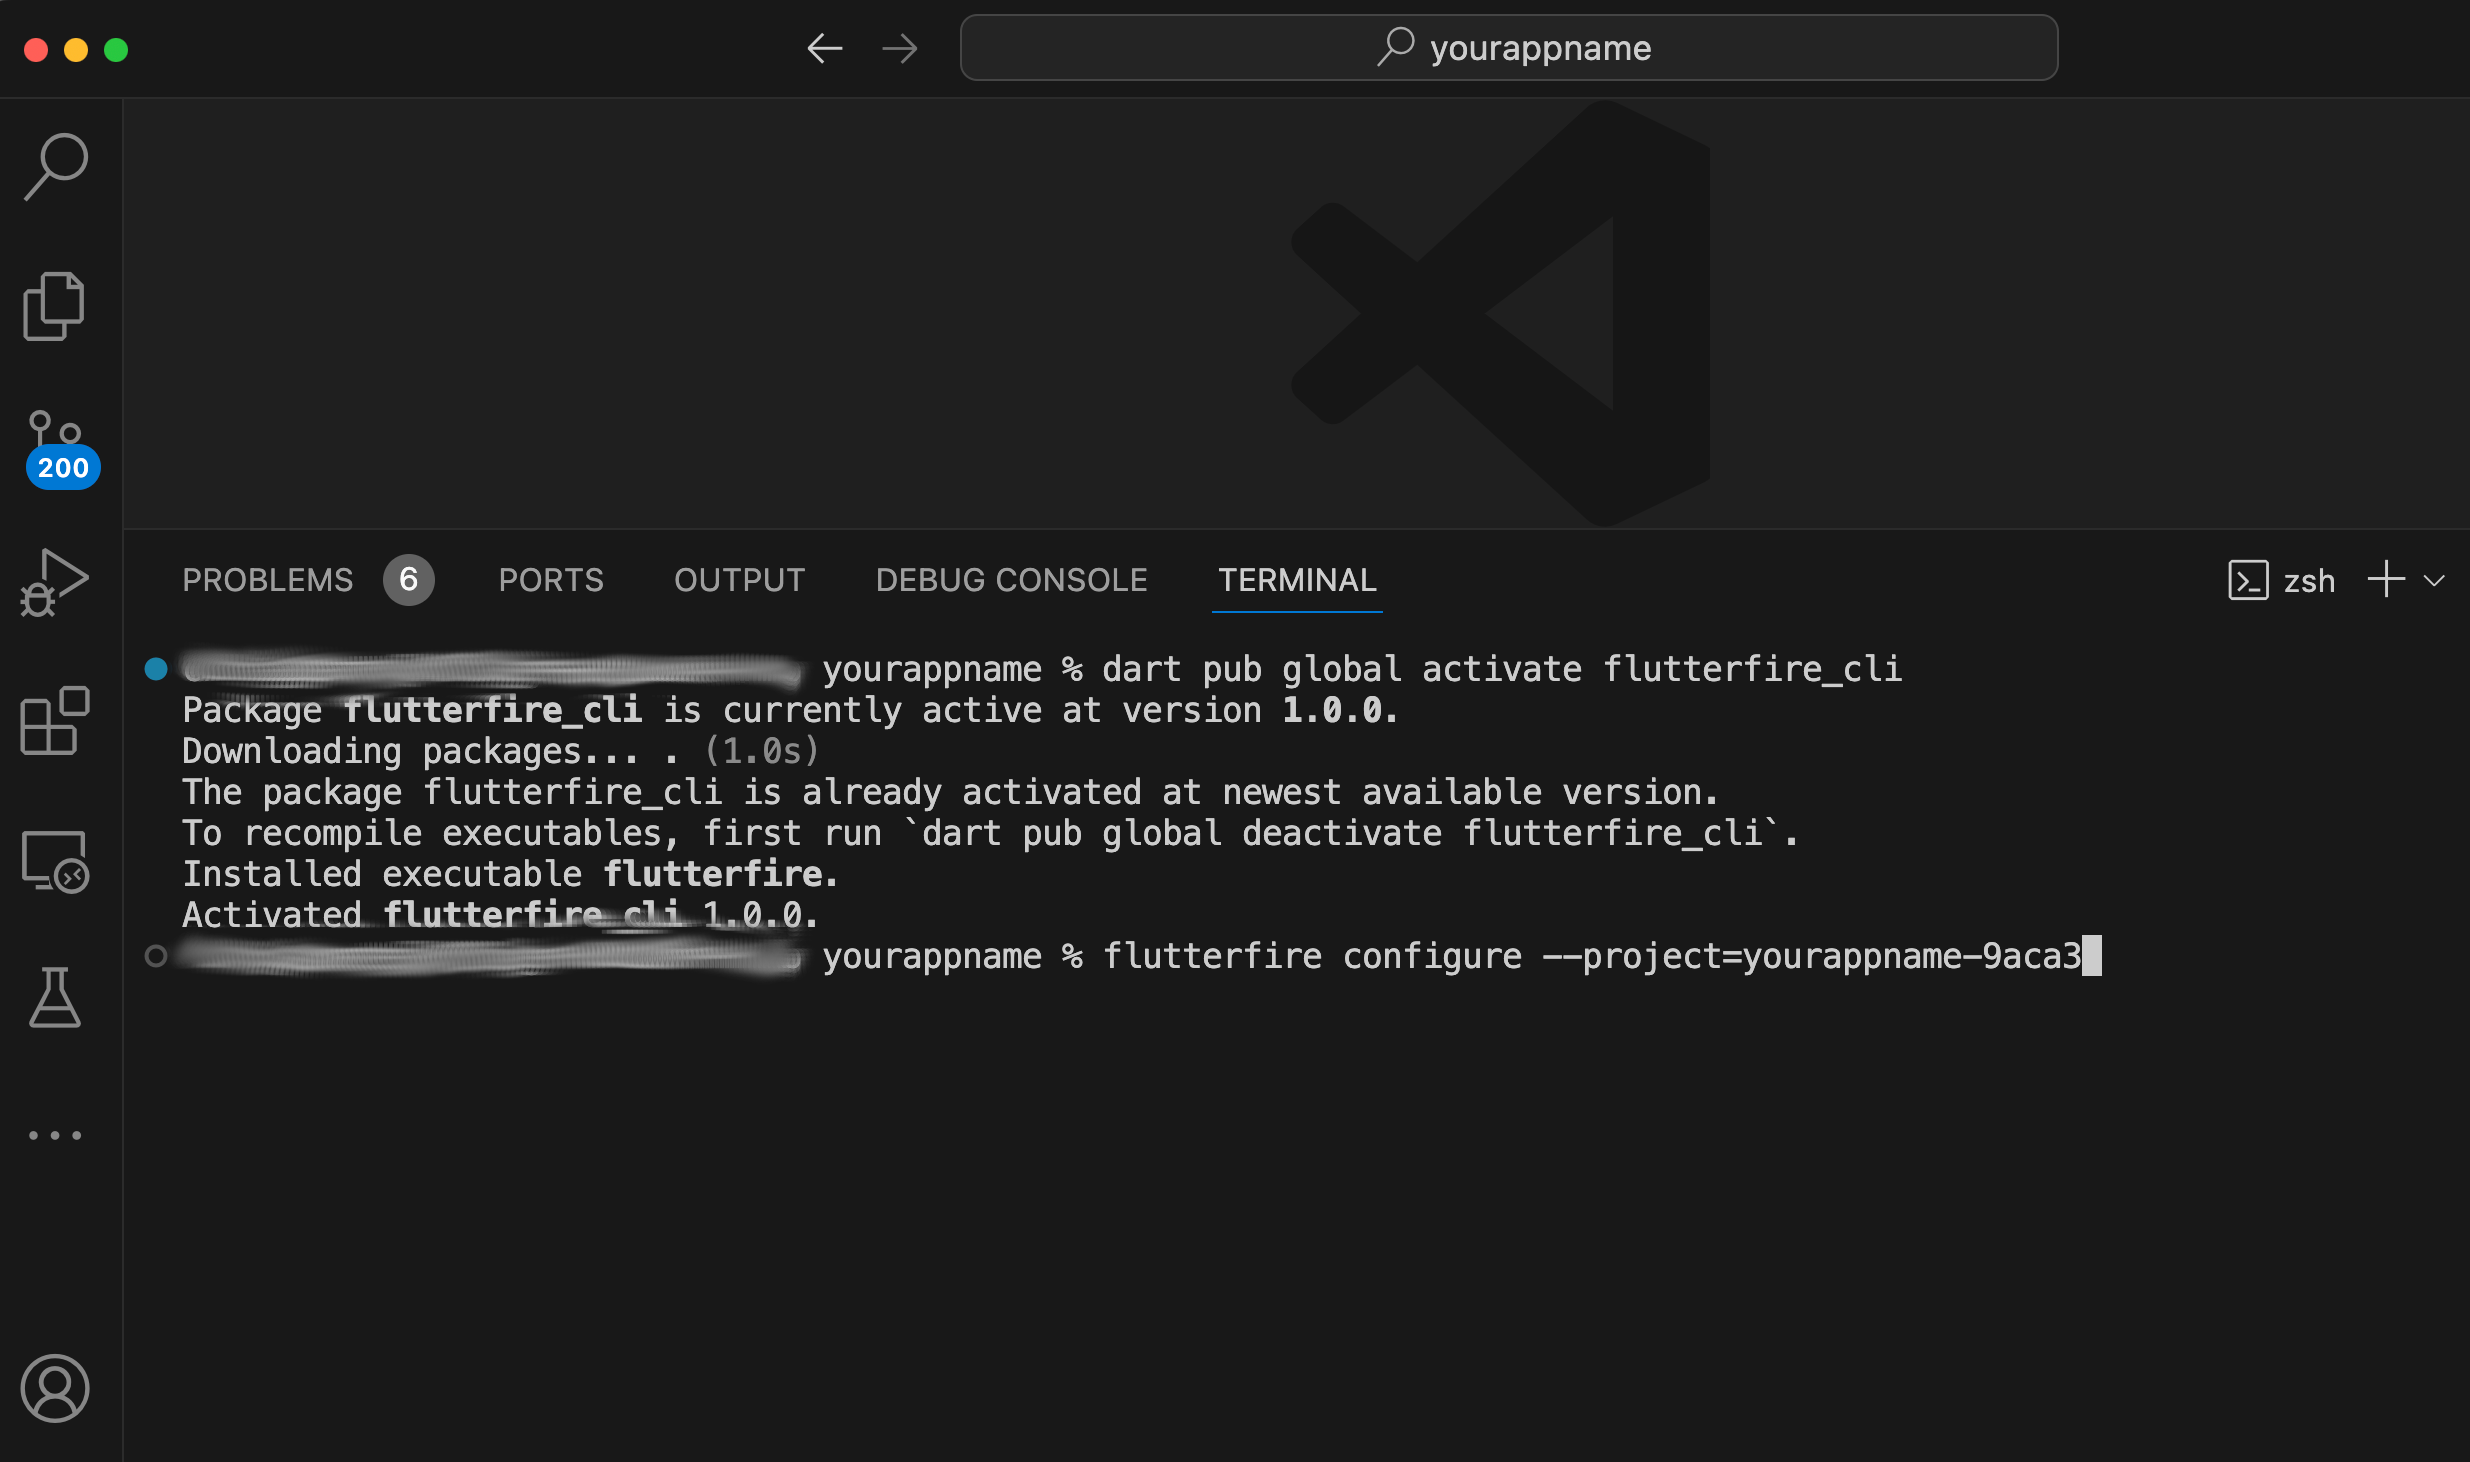
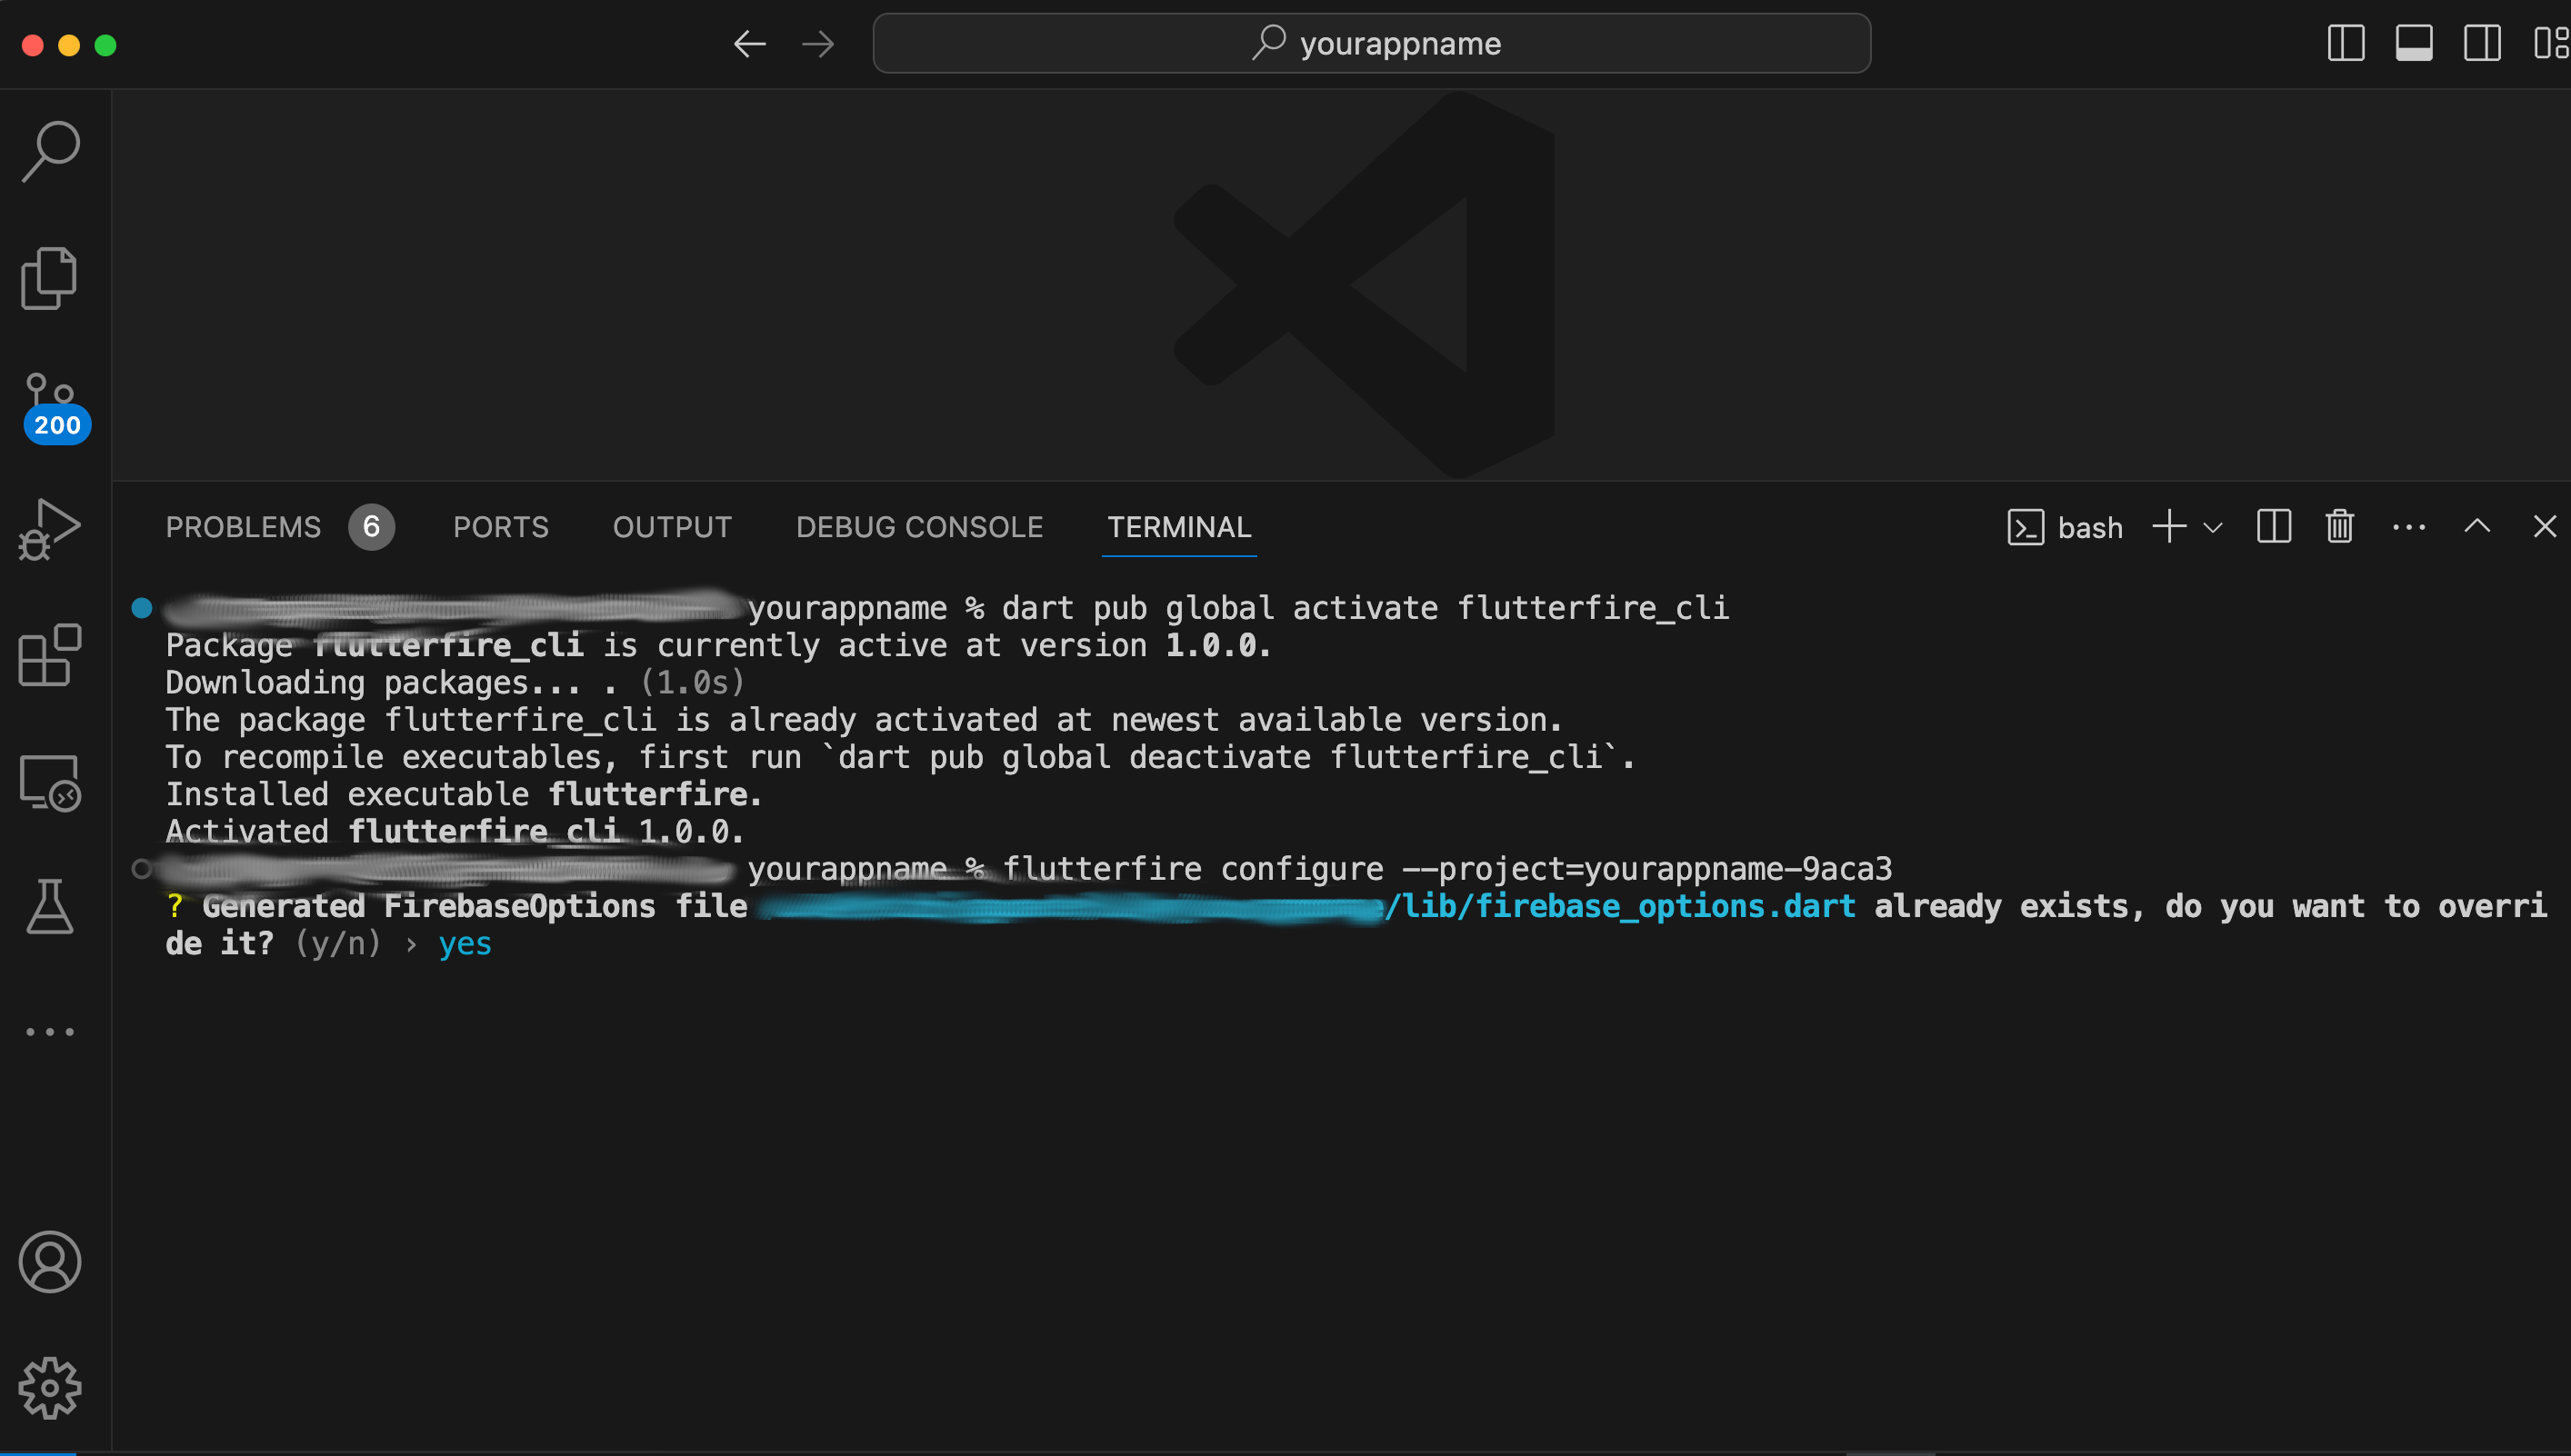
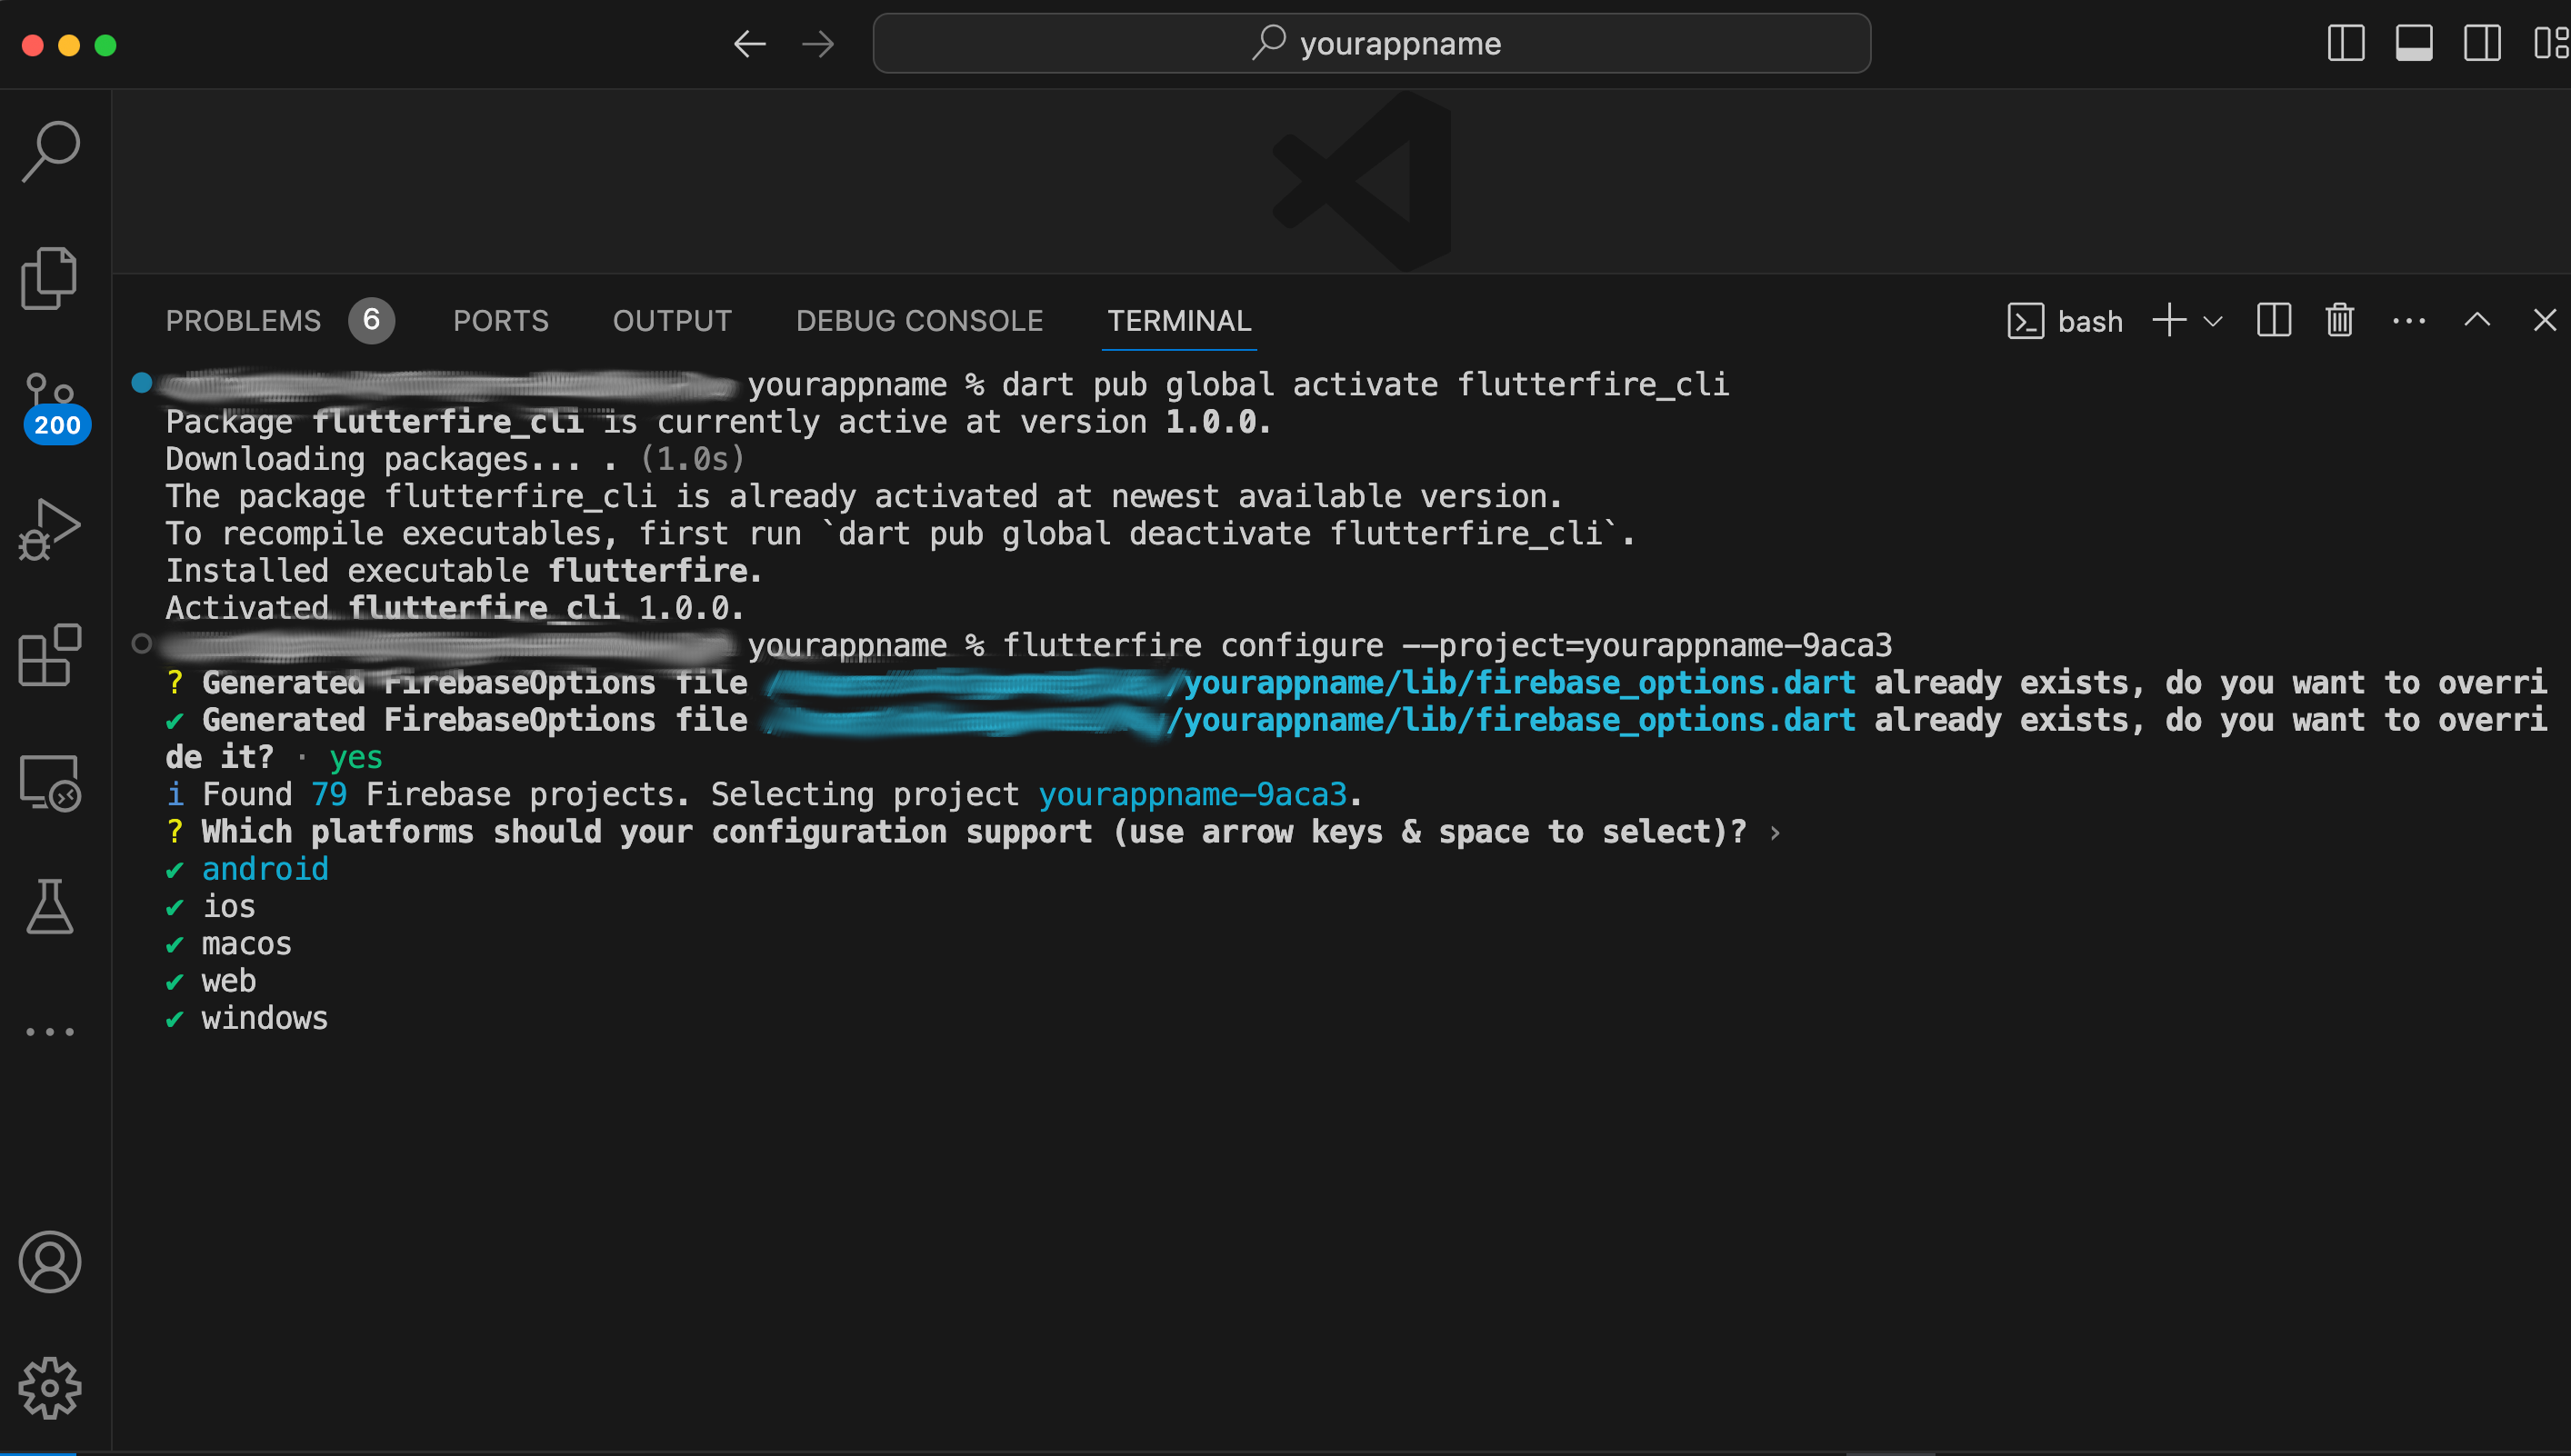
set up in your project before running flutter pub run,
Firebase Setup Link
Change the App Color
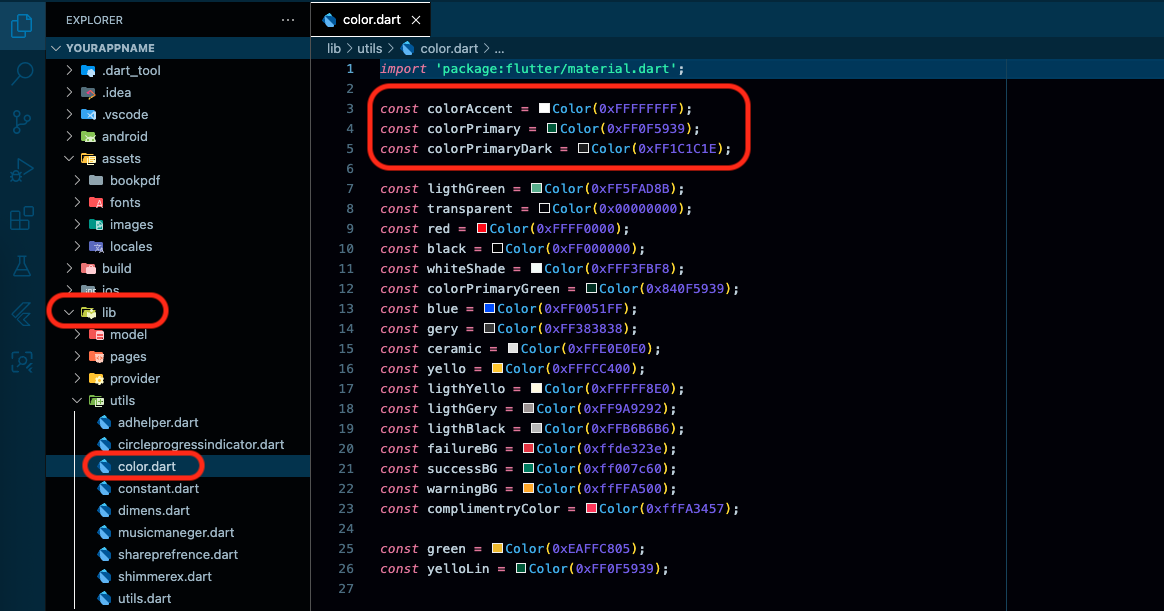
Step 1: Modify the Color Constants
- Open file color.dart which located lib => utils =>
colors.dart
- Locate the color constants defined for your app's primary colors:
                                                    const colorPrimary = Color(0xFFyourhexa);
                                                    const colorPrimaryDark = Color(0xFFyourhexa);
                                                    const colorAccent = Color(0xFFyourhexa);
- Replace the placeholder hex color codes (0xFFyourhexa) with your desired hex
color codes. For example:
                                                    const colorPrimary = Color(0xFF123456);
                                                    const colorPrimaryDark = Color(0xFF654321);
                                                    const colorAccent = Color(0xFFabcdef);
Step 2: Update Other Colors According to Your Branding
- Review the file to find and update any other color constants according to
your app's branding.
- Replace the hex color codes for these additional colors as needed to match
your design specifications.
Change the Base URL
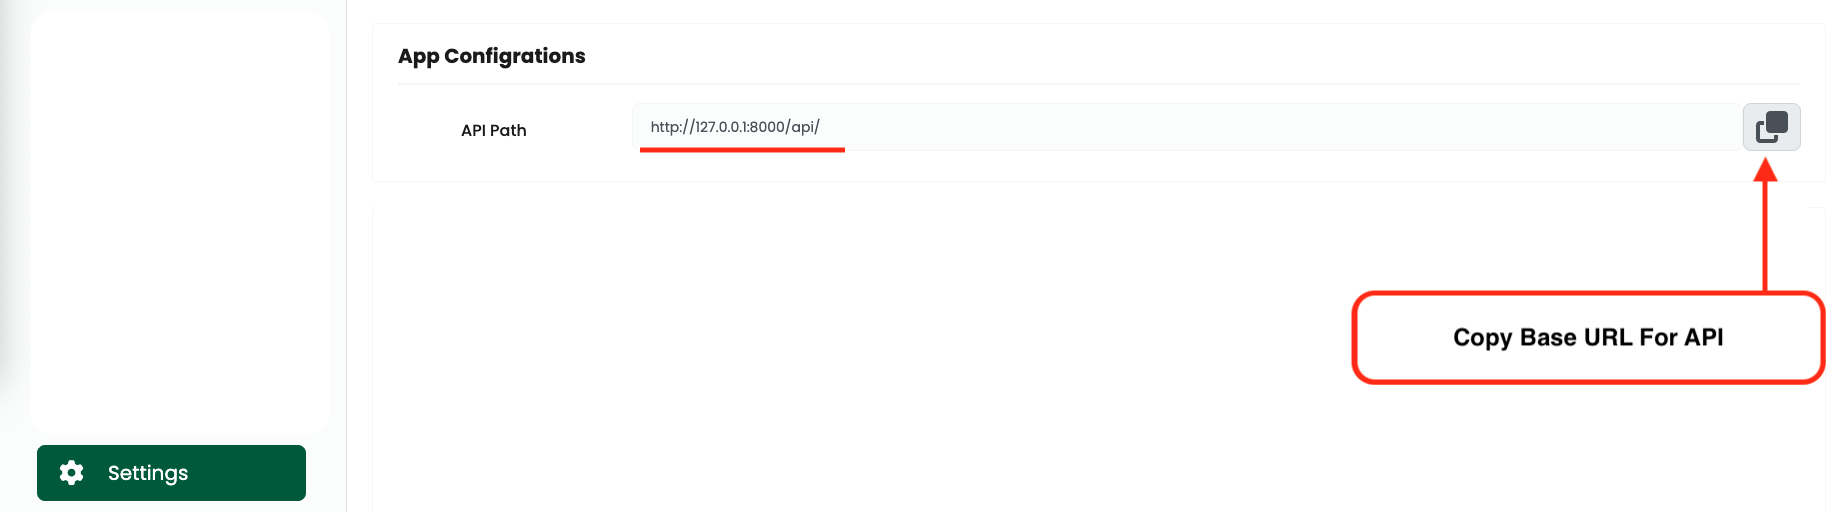
Step 1: Copy Base URL from Admin Panel
- Log in to your admin panel.
- Navigate to the app settings section where the base URL is provided.
- Copy the base URL from the admin panel. Refer to the screenshot below for
guidance.
Step 2: Paste the Base URL in App Constants
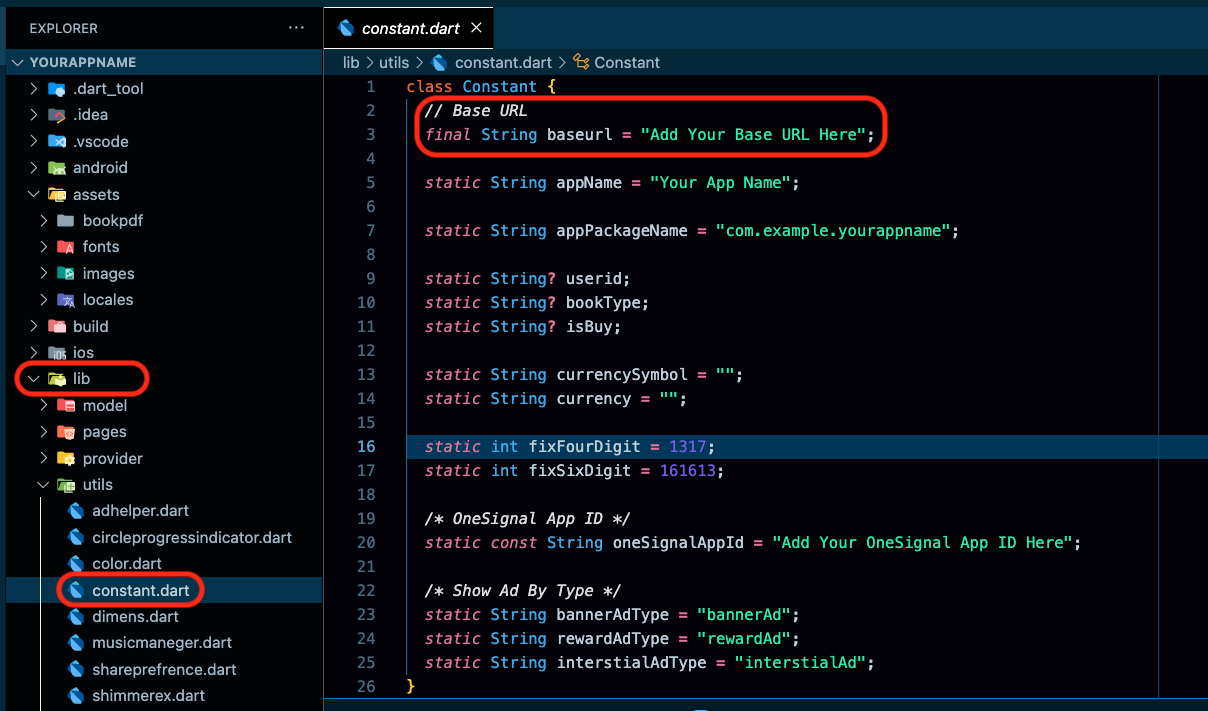
- Open the Constant.dart file in your project.
- Locate the line where the base URL is defined:
final String baseurl = " Add your Base URL here";
- Replace "https://example.com" with the base URL you copied from the admin
panel. For example:
final String baseurl = "https://yourbaseurl.com";
- check screenshot below
Ensure that you have set up the admin panel correctly before proceeding
with this step. If the admin panel is not set up, the app will not run
and will be stuck on the splash screen. You can follow the admin panel
documentation to learn how to set it up.Click
here
Change the Splash Screen
Step 1: Prepare Your Splash Screen Design
- Ensure that your splash screen design is ready and saved as
splash.png.
- Make sure the image dimensions and resolution are appropriate for your app's
splash screen.
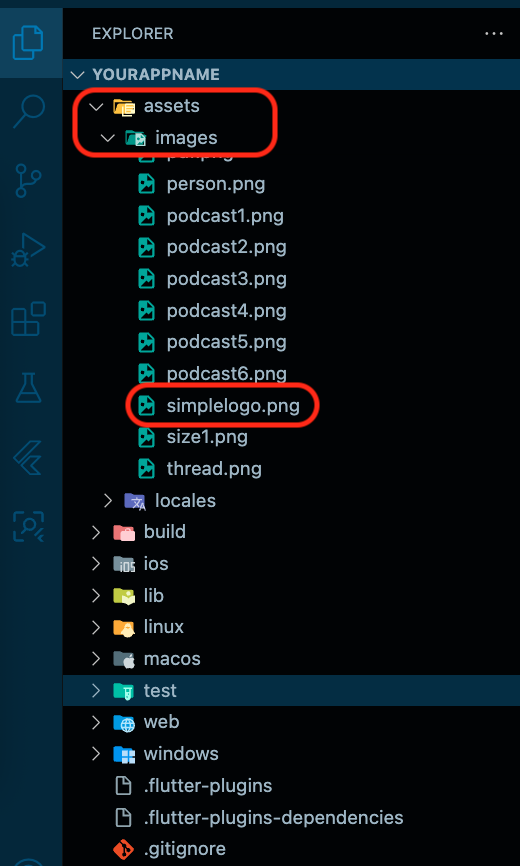
Step 2: Replace the Splash Screen Image
- Navigate to the assets/images folder in your project.
- Replace the existing 'splash.png' file with your new 'splash.png' file.
Ensure that the splash.png file is named correctly and placed in the
assets/images directory.
Firebase Setup on App
This section will guide you through setting up the App for your Backand
application.
Create a Firebase Project
Before setting up the Admin Panel, make sure you have the following tools and
environment ready:
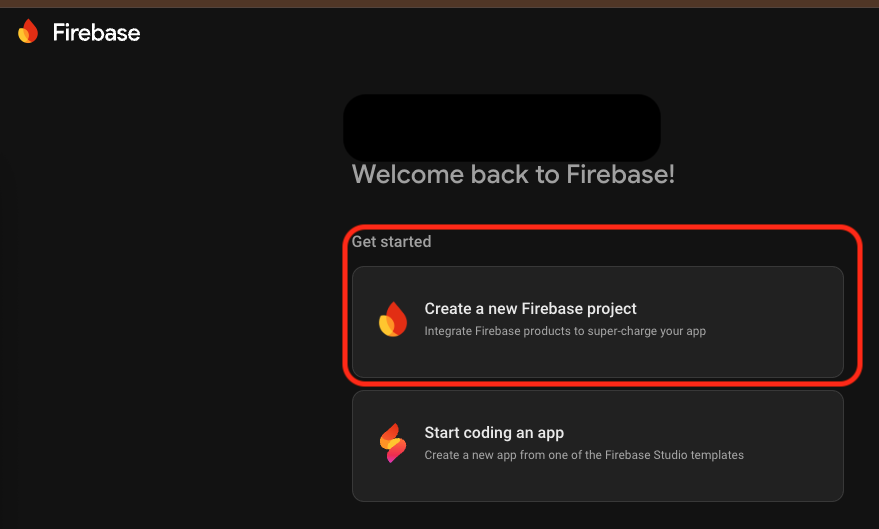
Step 1: Visit Firebase Console:
Step 2: Sign In/Create Account:
- Sign in with your Google account or create a new one.
- Click on "Get Started" to set up your first project.
Step 3: Create a New Project:
- Click on the "Add project" button.
- Enter a project name and choose a suitable project ID
- Select your country/region and click "Create Project."
Example Screenshot
Enable Firebase Authentication ( Mobile - Gmail -
Apple )
Overview
To enable login with OTP, Gmail, and Apple, you need to configure Firebase
Authentication. If you skip this step, you will not be able to log into the
app.
Step-by-Step Instructions
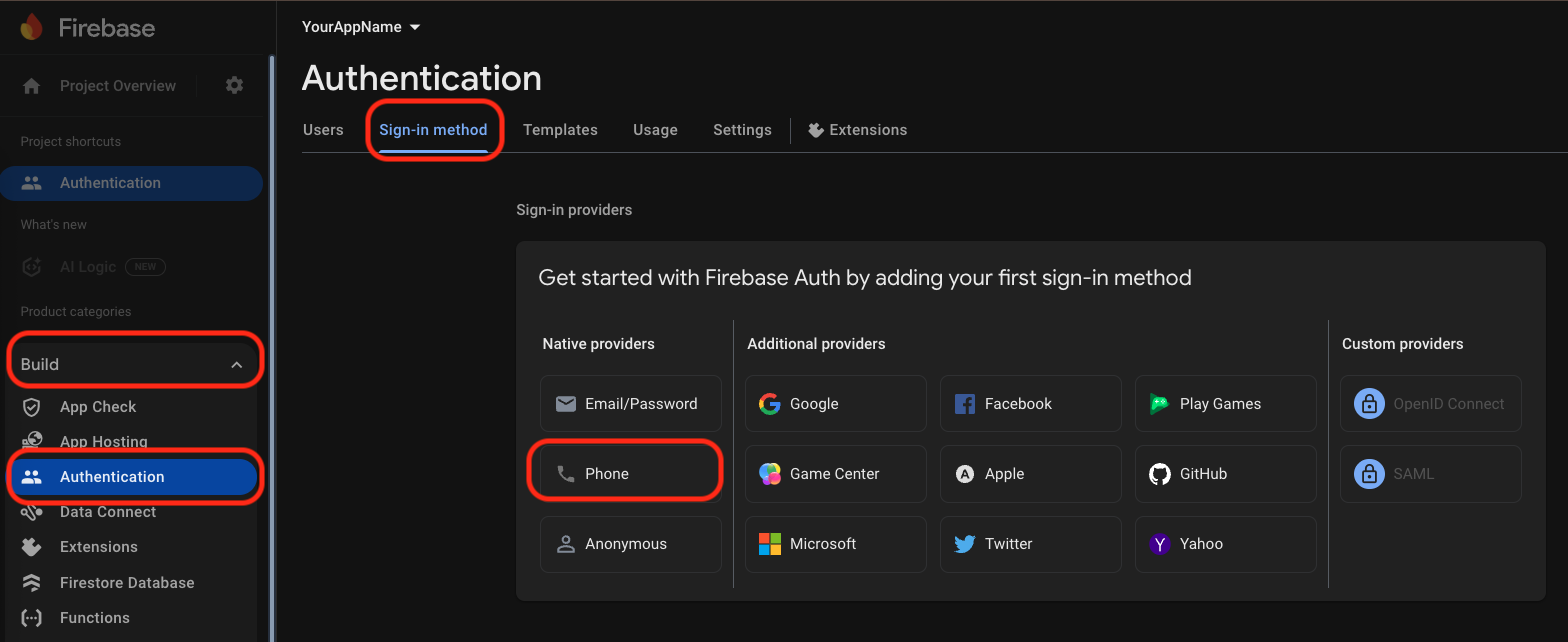
Step 1: Mobile Auth
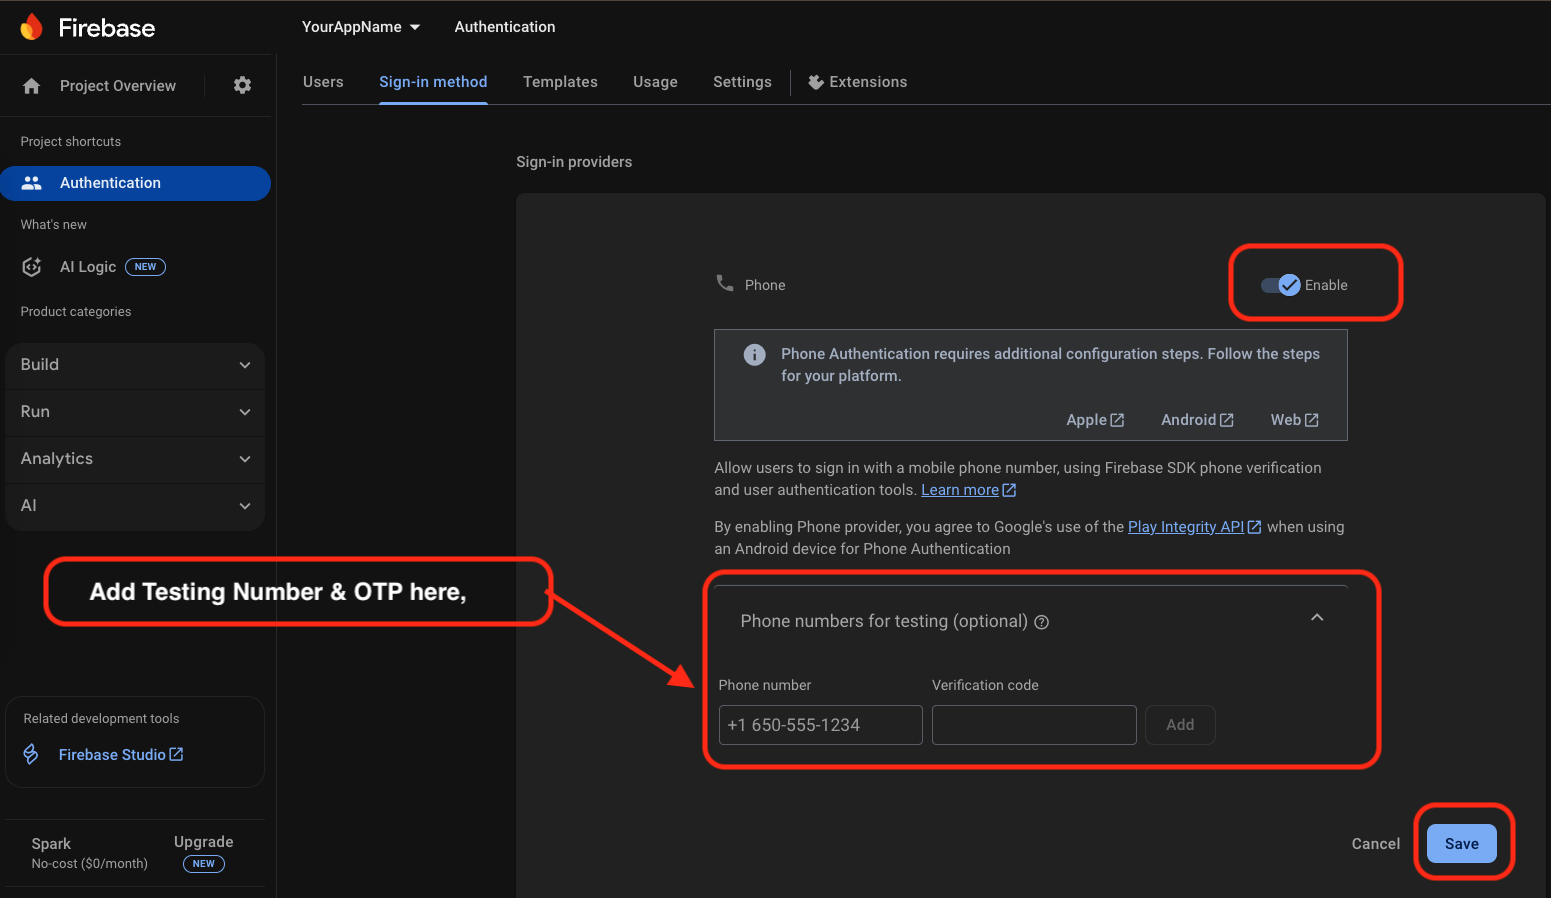
- In the Firebase Console, go to the Authentication section. Turn on the
Phone
login by tapping on the switch button as shown in the image below.
- Add a Firebase testing number for testing purposes to avoid temporary
blocks
due to multiple logins with the same number or device.
- Example Screenshot:
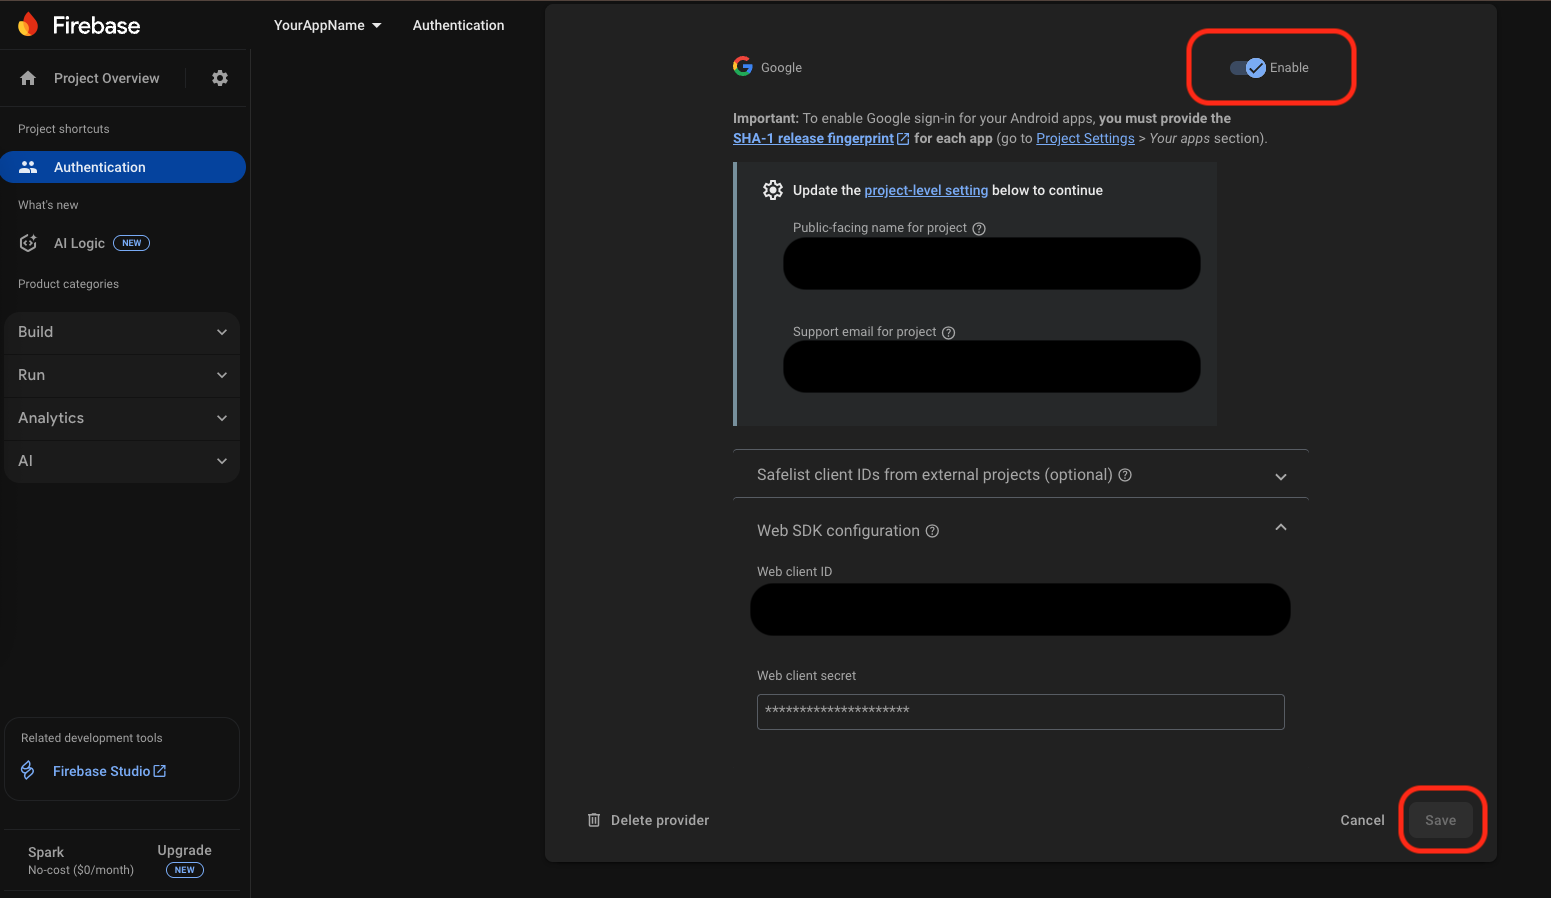
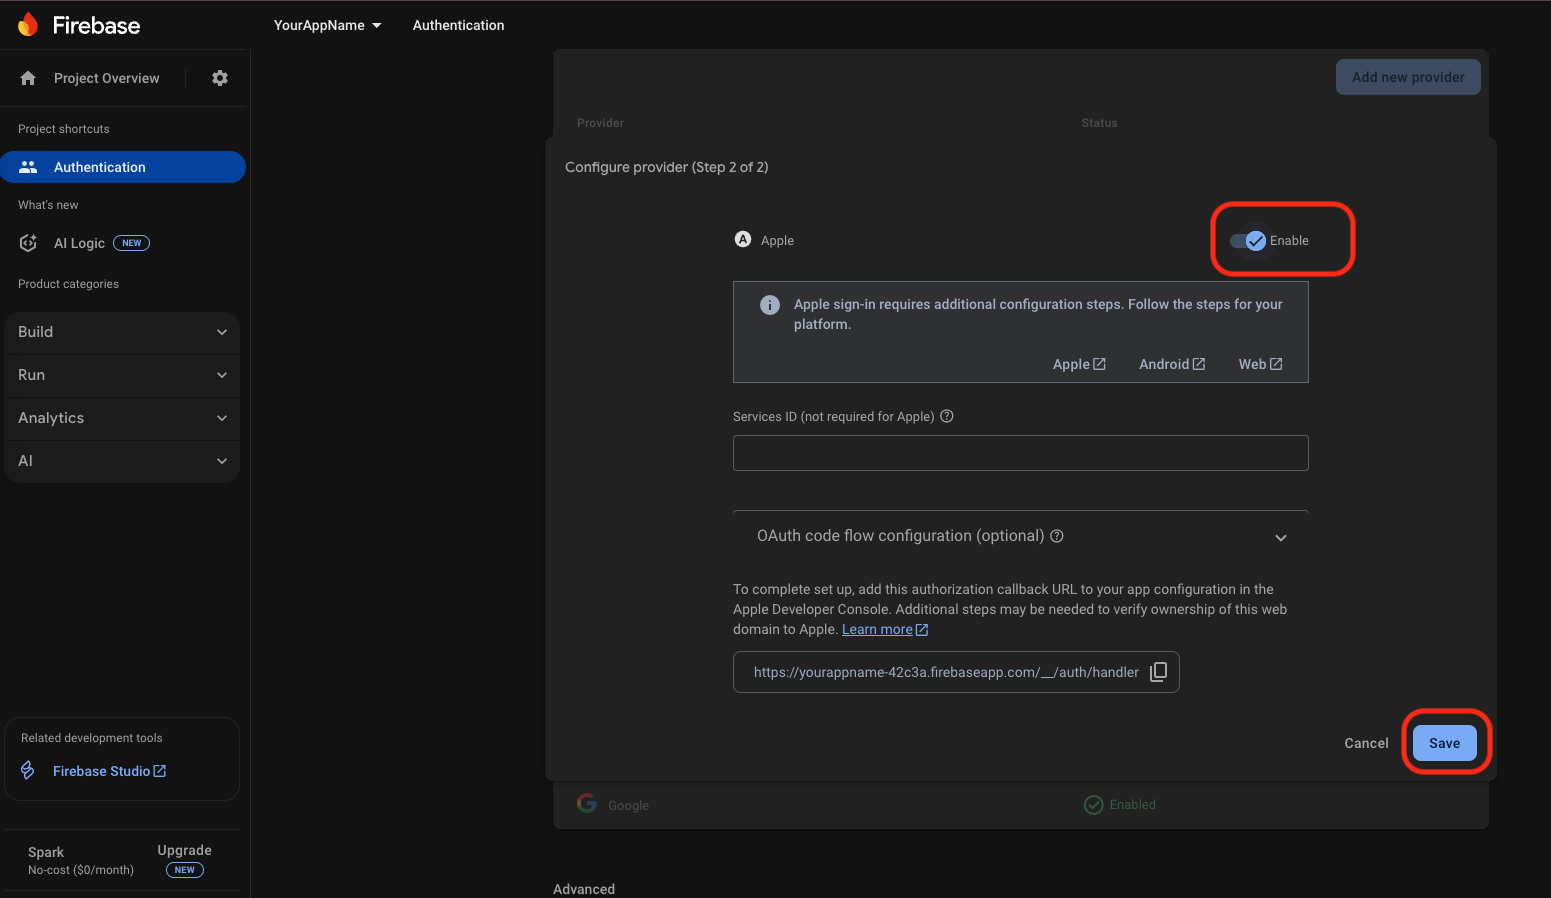
Step 2: Gmail - Apple Auth
- Tap on the switch button to enable Gmail login as shown in the image below.
- Tap on the switch button to enable Apple login as shown in the image below.
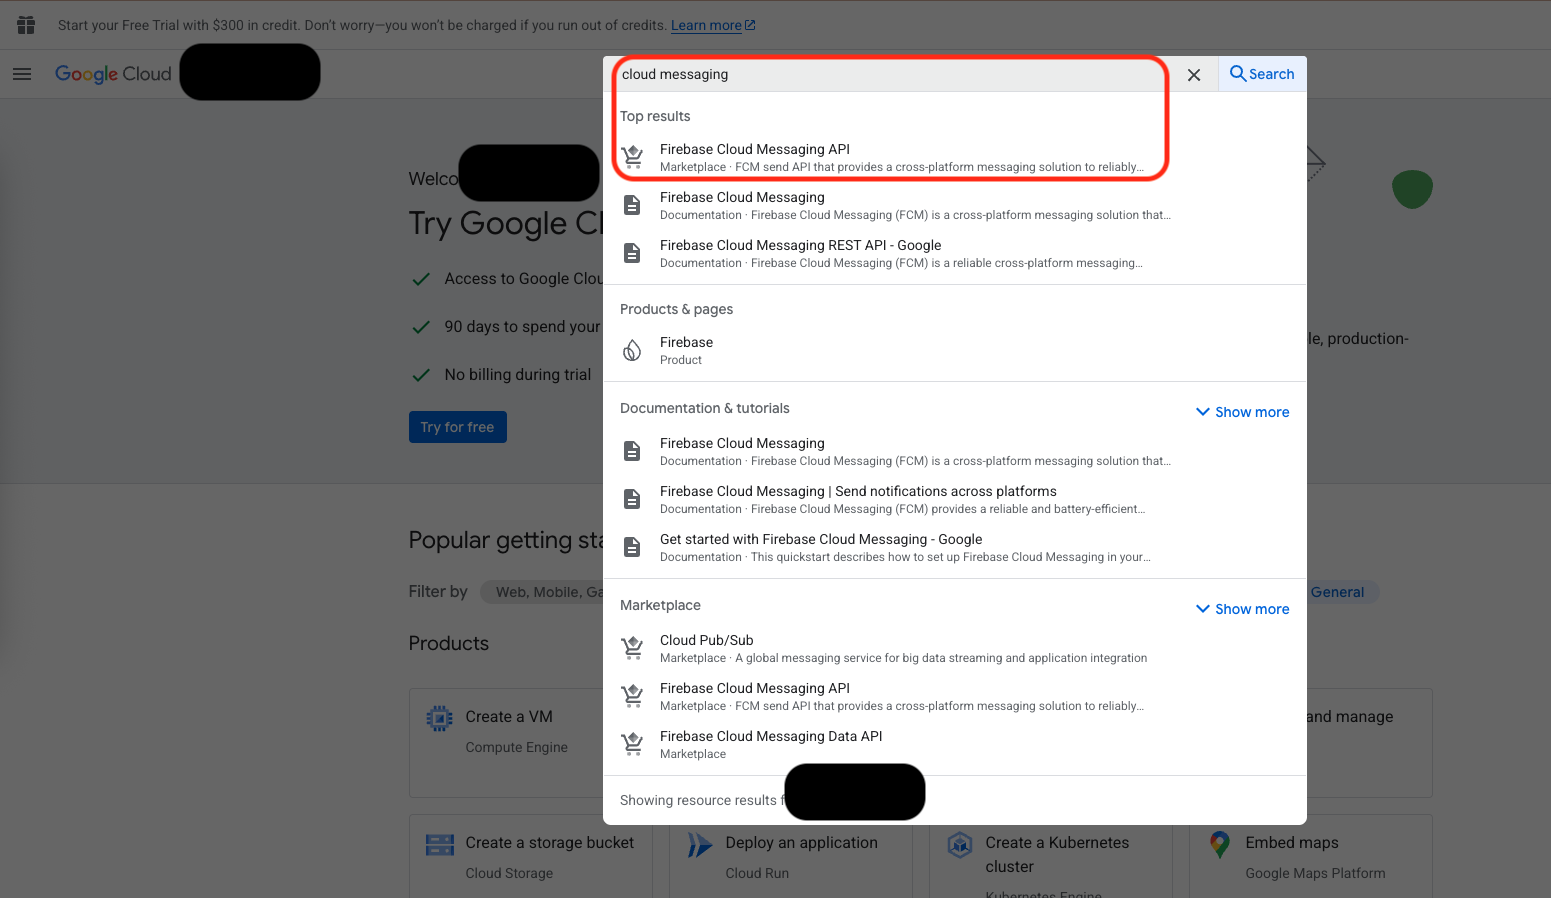
Step 2: Configure Cloud Messaging API for Gmail & OTP Release
App
- Go to Google Cloud Console using this the link: Google Cloud Console.
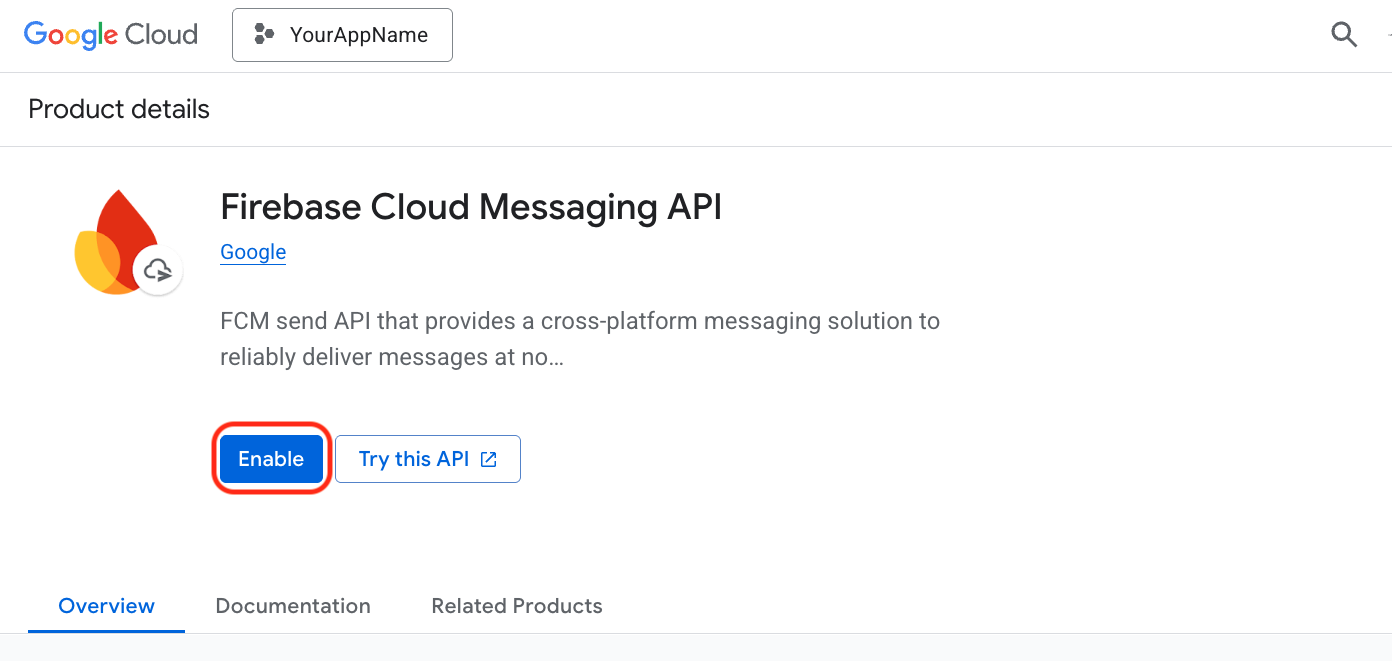
- Search for “Firebase Cloud Messaging” on Google Cloud Console and enable it
as shown in the screenshot below.
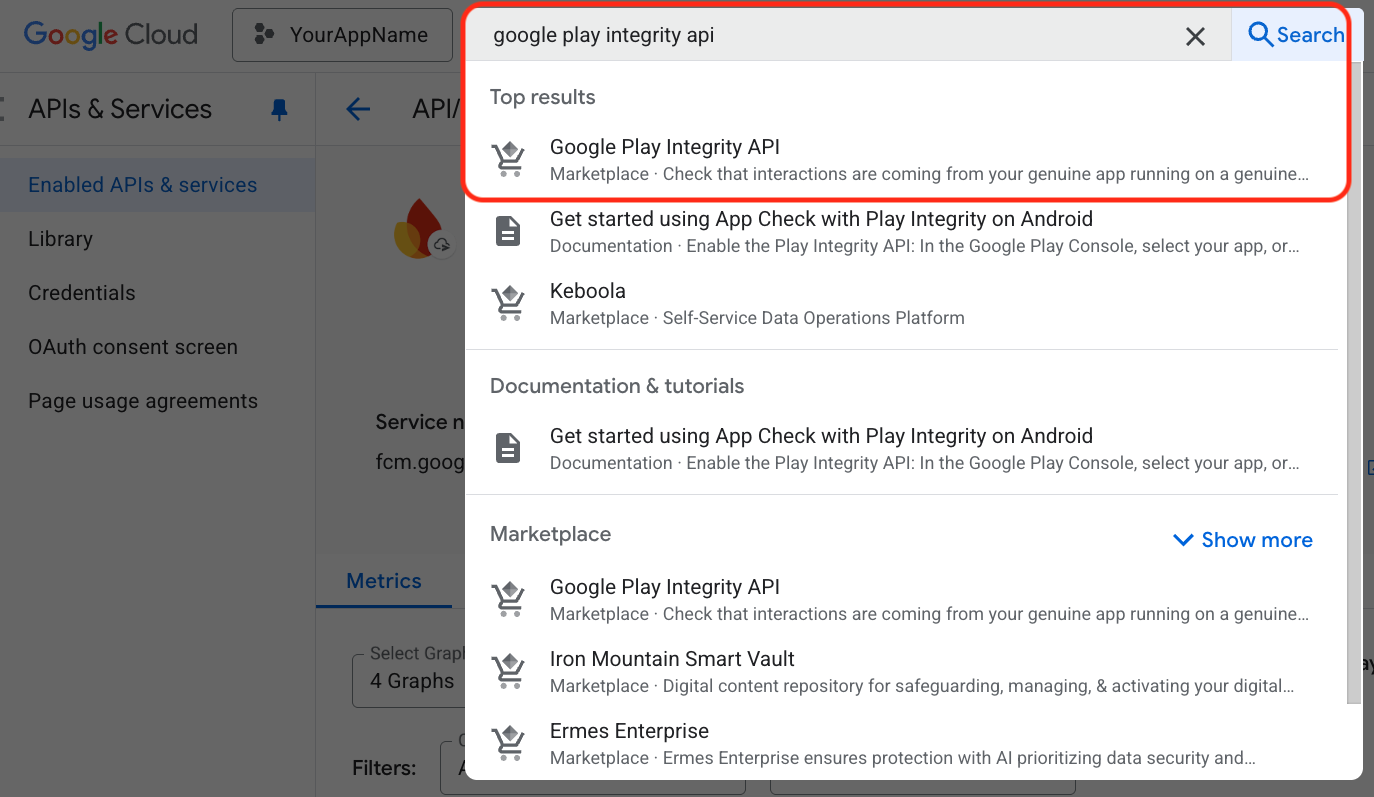
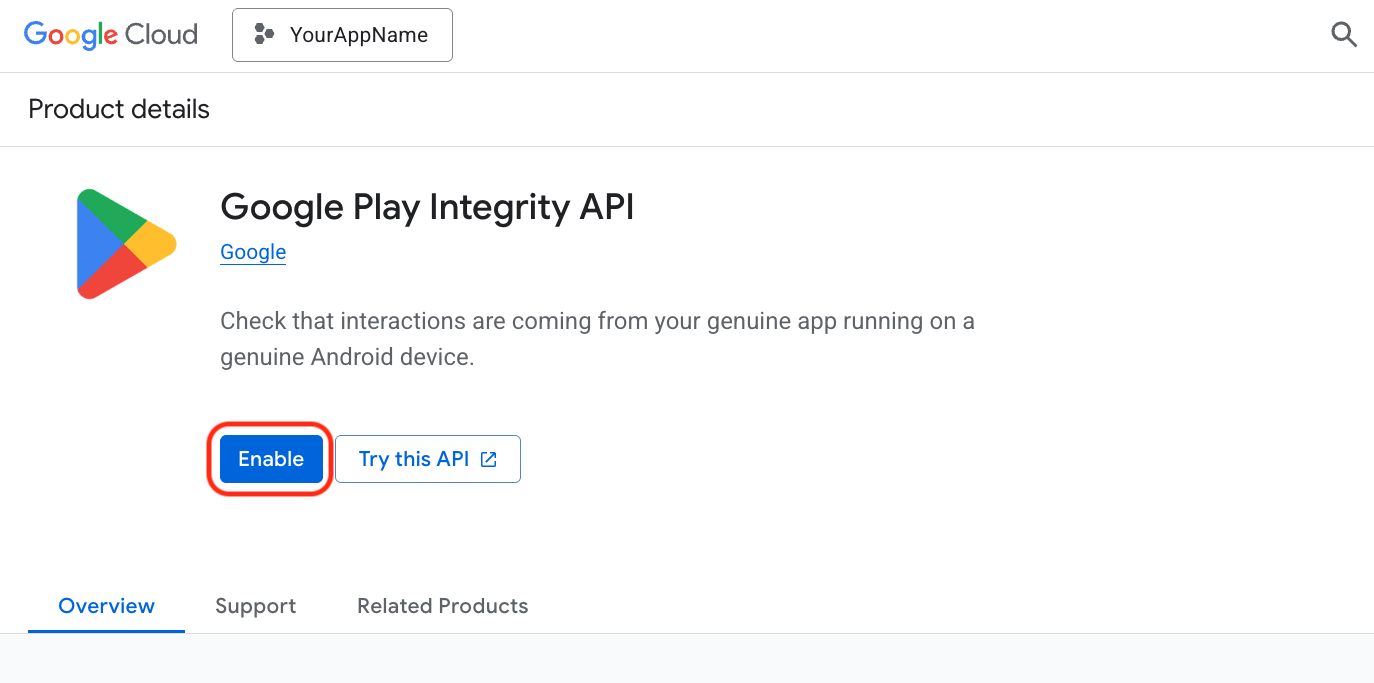
- Search for “Google Play Integrity” on Google Cloud Console and enable it
as shown in the screenshot below.
Note:
Make sure to add a Firebase testing number for testing purposes. If you
login multiple times with the same number or device, Firebase may
temporarily block you.
Push Notification Setup ( Android - iOS App )
Overview
Setting up push notifications is essential for engaging users with timely alerts
and updates. This section provides detailed, step-by-step instructions to
configure push notifications for both Android and iOS platforms using OneSignal
and Firebase. By following these steps, you'll be able to send notifications
that enhance user experience and engagement in your mobile app.
1) Android Setup
Step 1: Generate Firebase Service Account Key
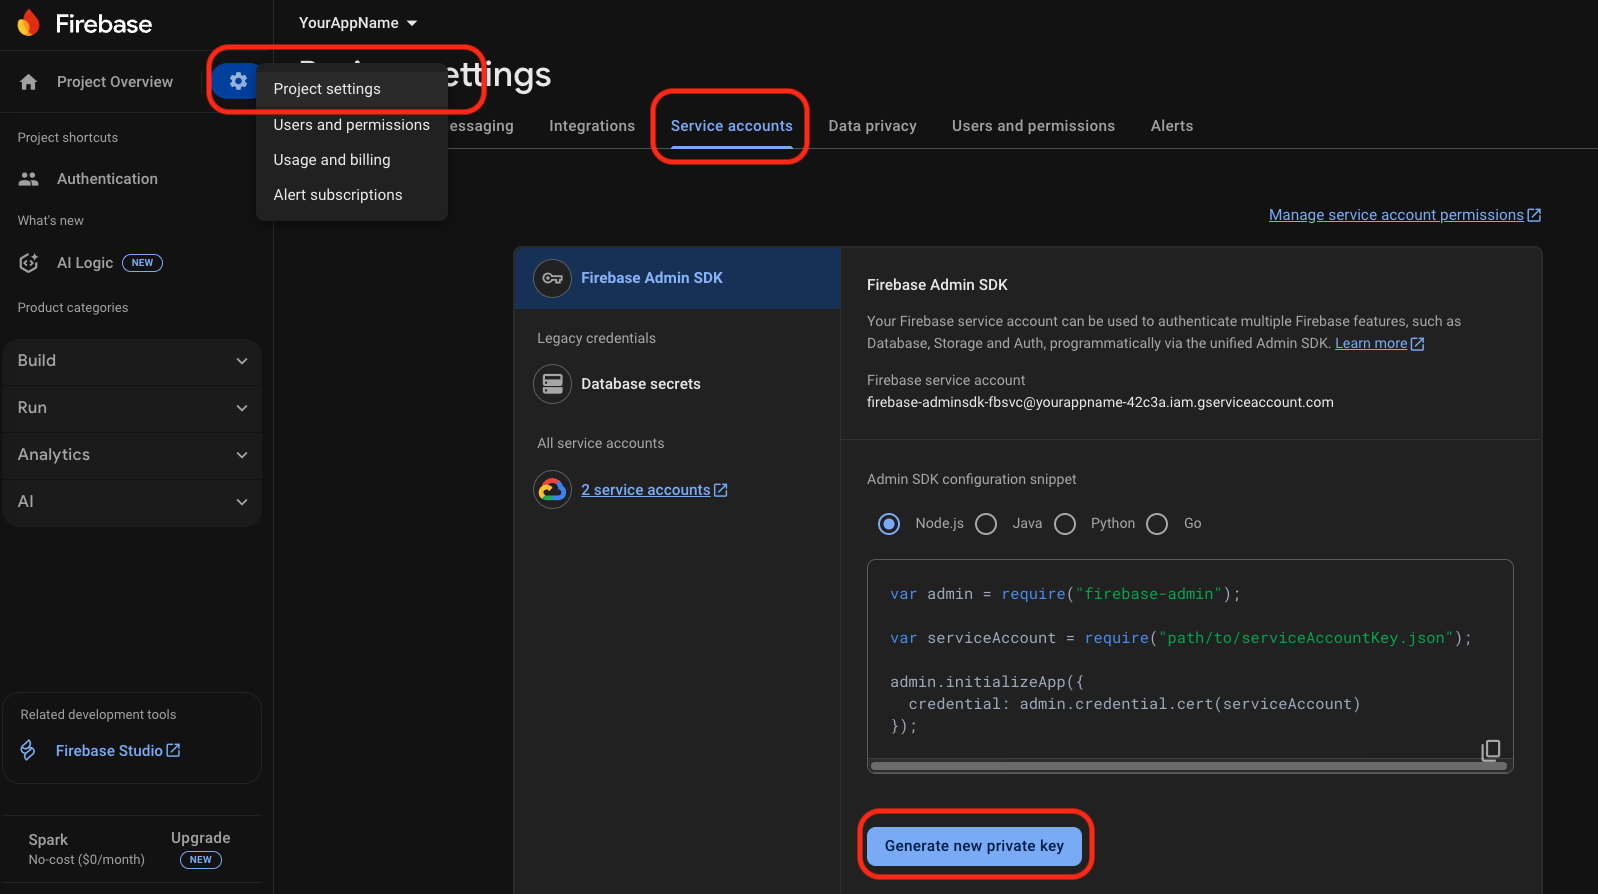
- Open Firebase Console and navigate to Project Settings then Select the
Service
Accounts tab & Click on Generate new private key; a file will be downloaded.
Save this file in a secure location.
- Create or log in to your OneSignal account at OneSignal Dashboard.
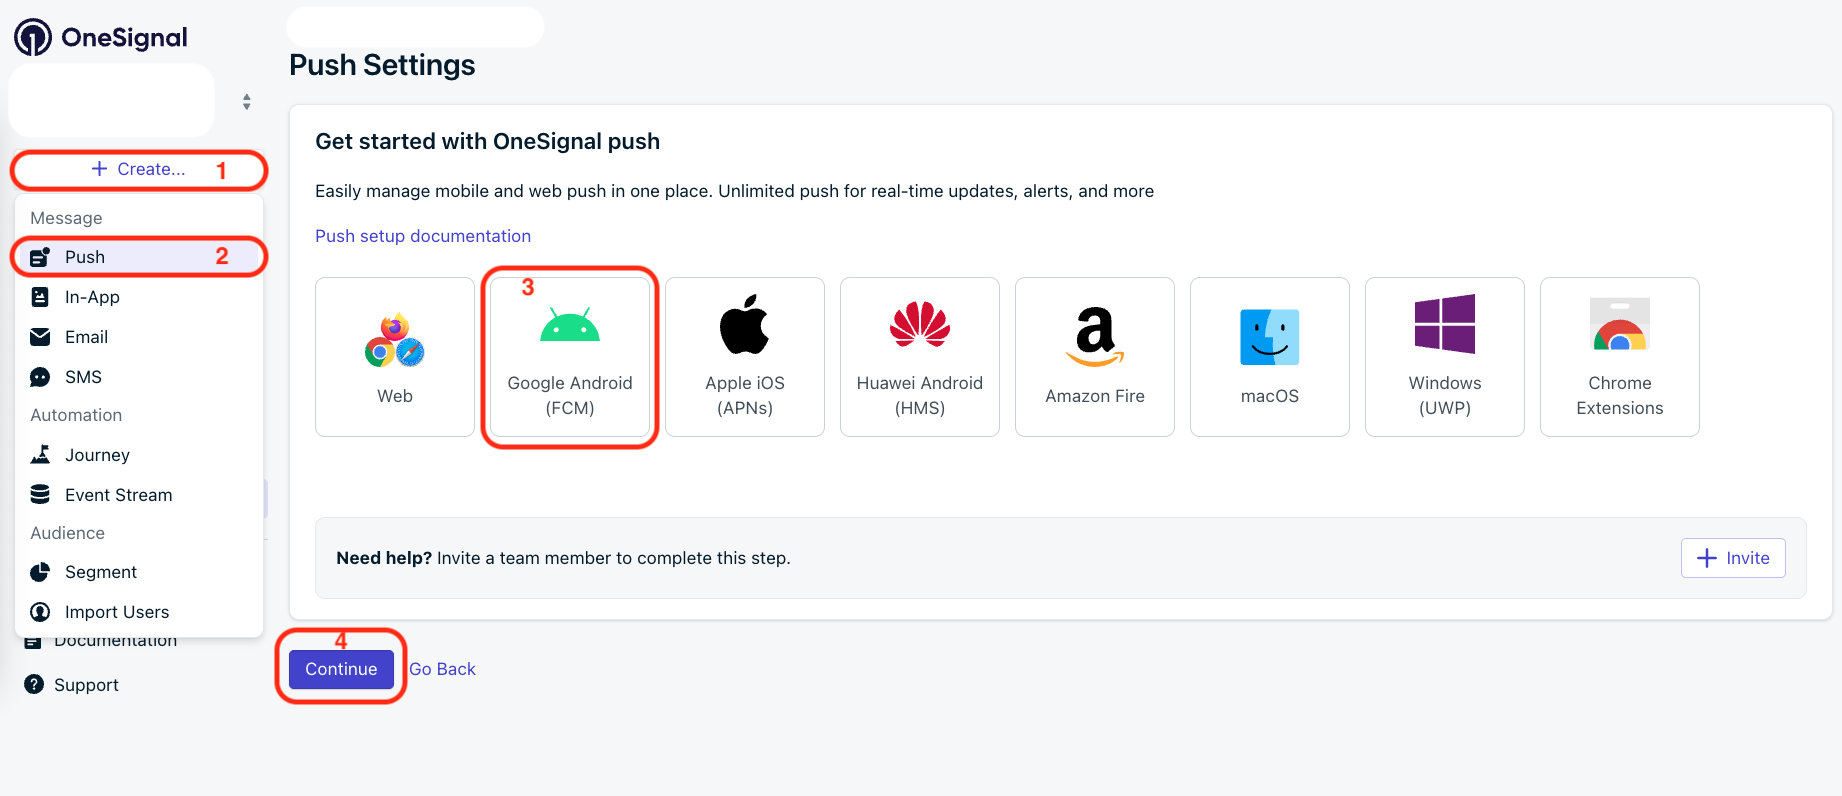
- Create a new app by entering the App Name and Organization Name (create an
organization if it doesn’t exist) & Select Google Android (FCM) as the
platform. Click on Next
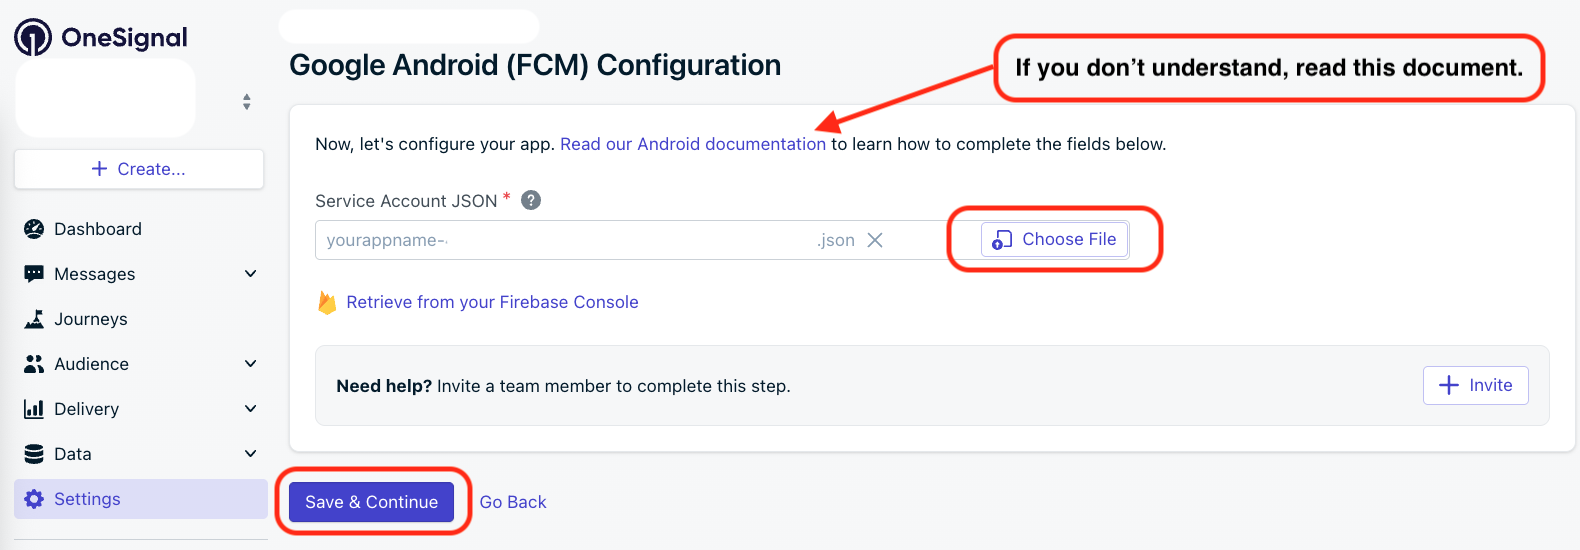
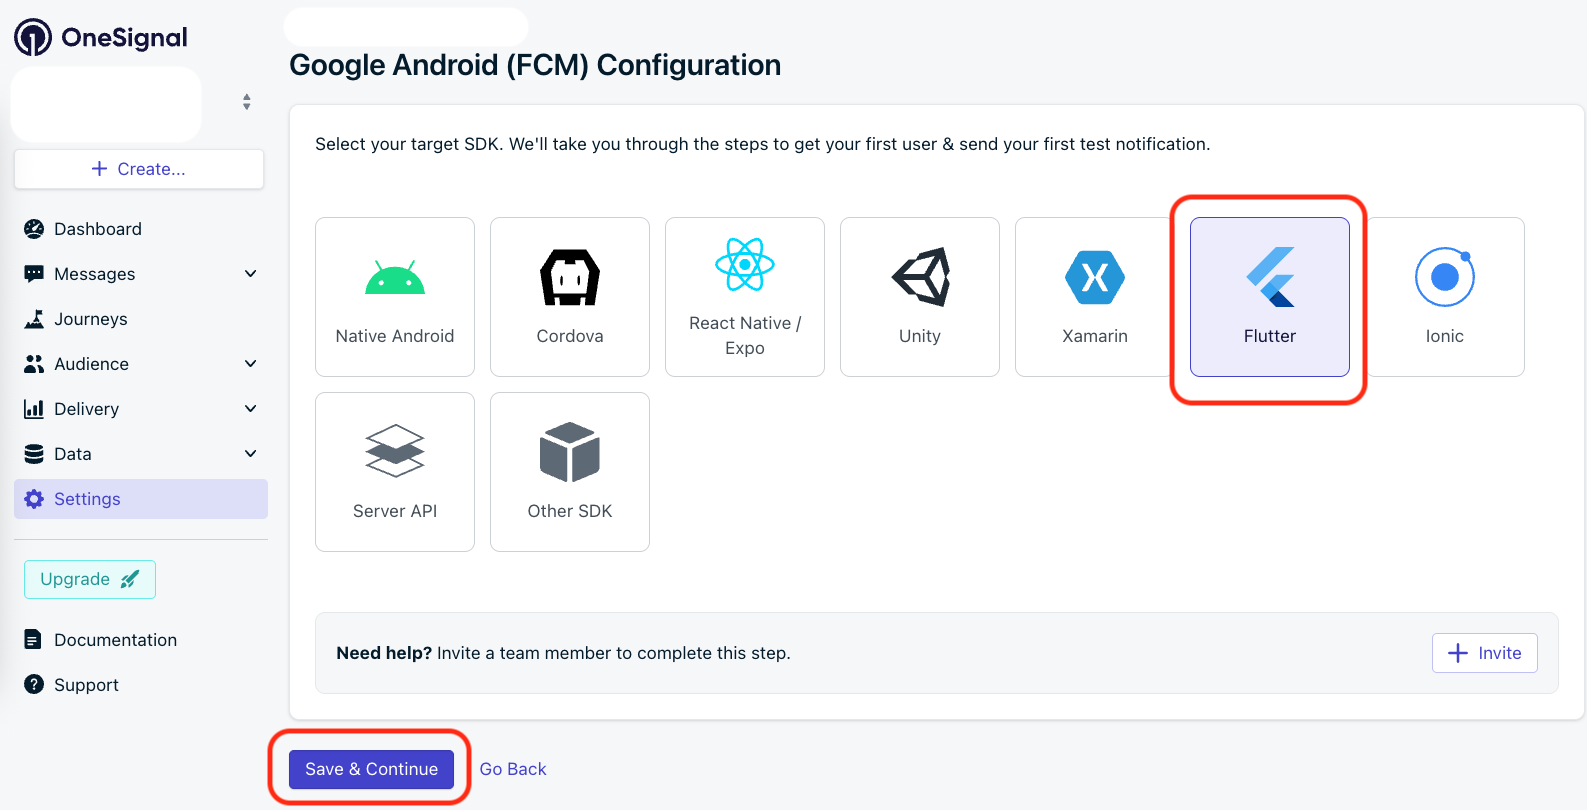
- Upload the Firebase service account key file downloaded in Step 1. & Click
Save & Continue.
- Choose Flutter as the platform and proceed to save the configuration.
- Your OneSignal Android setup is now complete.
2) iOS Setup
Requirements:
- An iOS mobile app
- A paid Apple Developer Account with Admin Role
- A OneSignal Account
- Mac computer with Xcode 12+
- Xcode project with Push Notification capability enabled
Step 1: Generate a .p8 Key for APNs Authentication
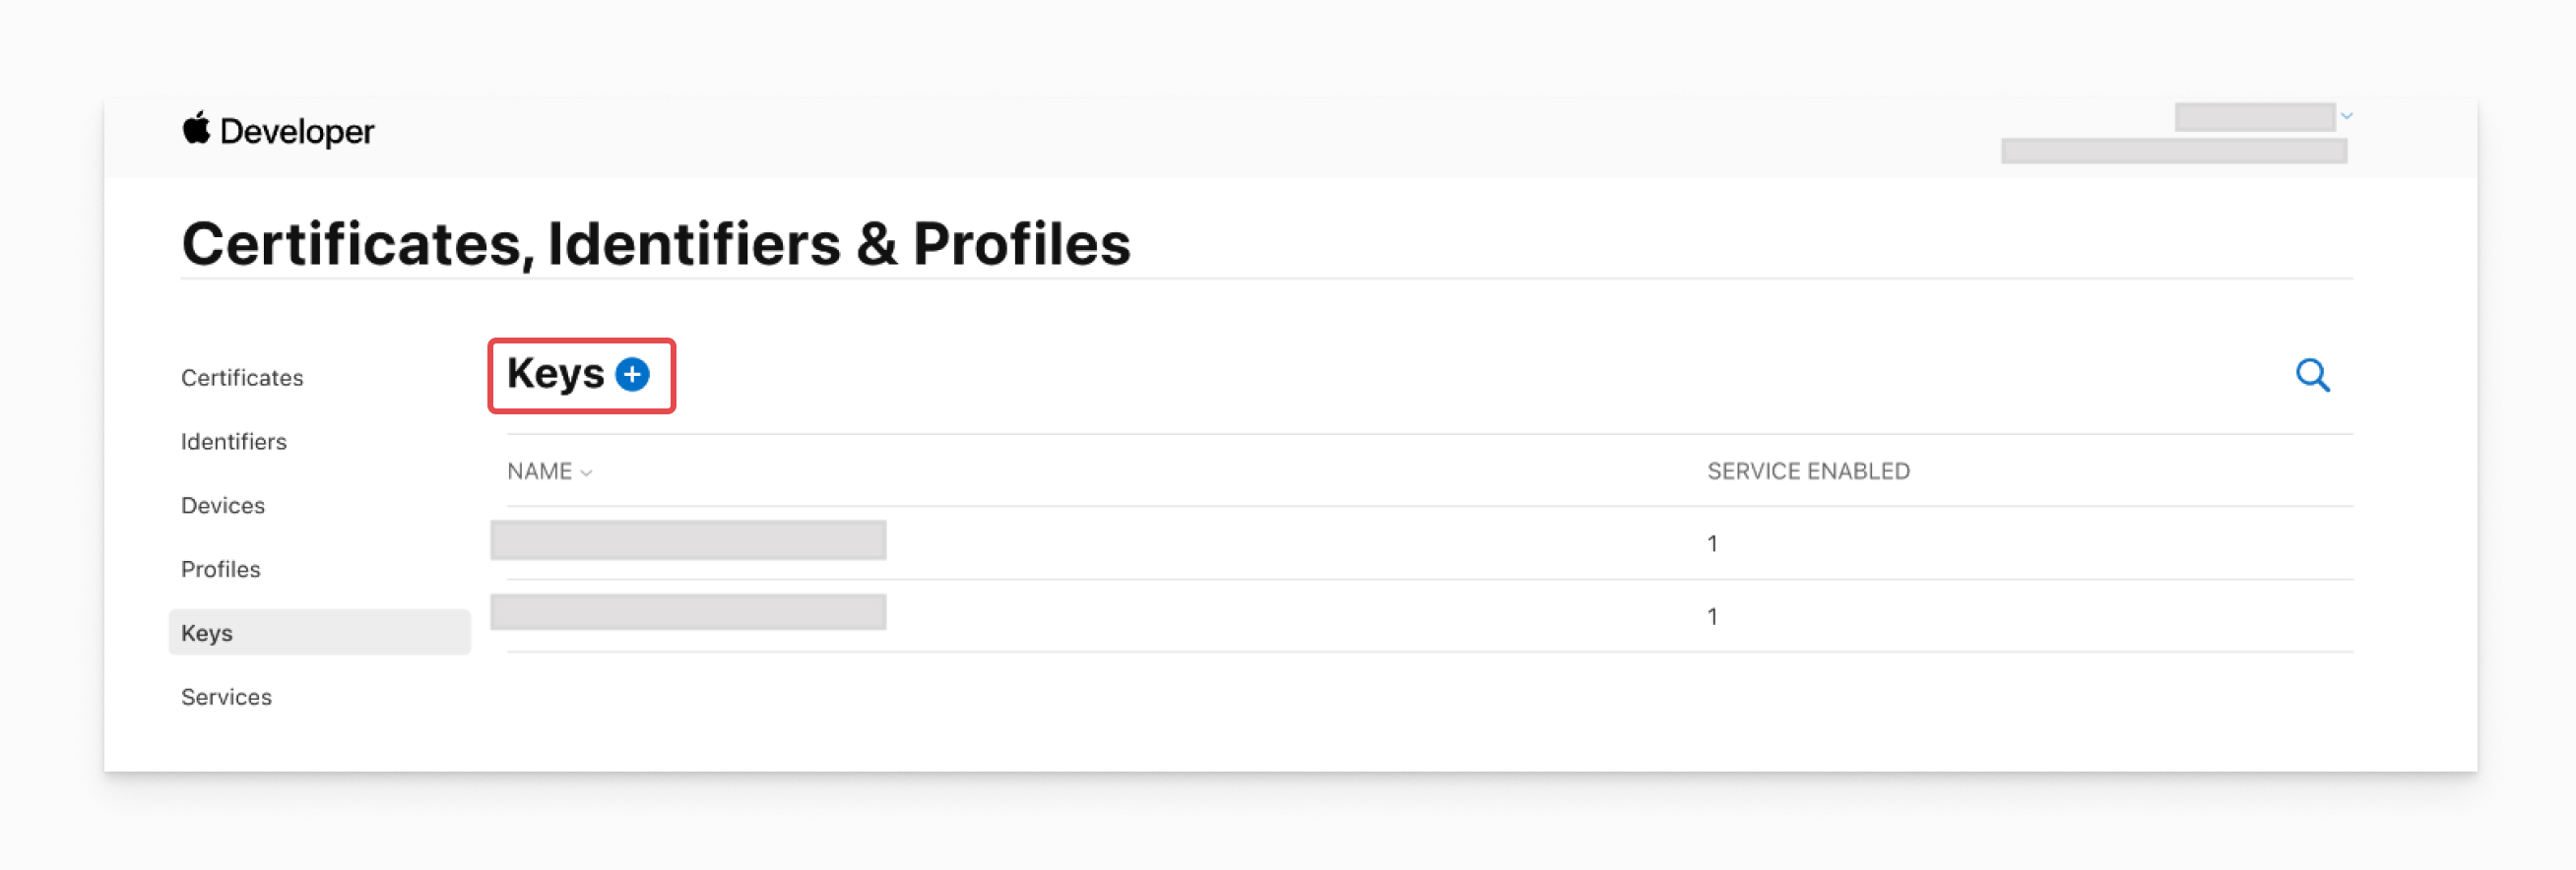
- Log in to your Apple Developer Account Apple Developer Account.
- Navigate to Certificates, Identifiers & Profiles > Keys and click the Blue +
button.
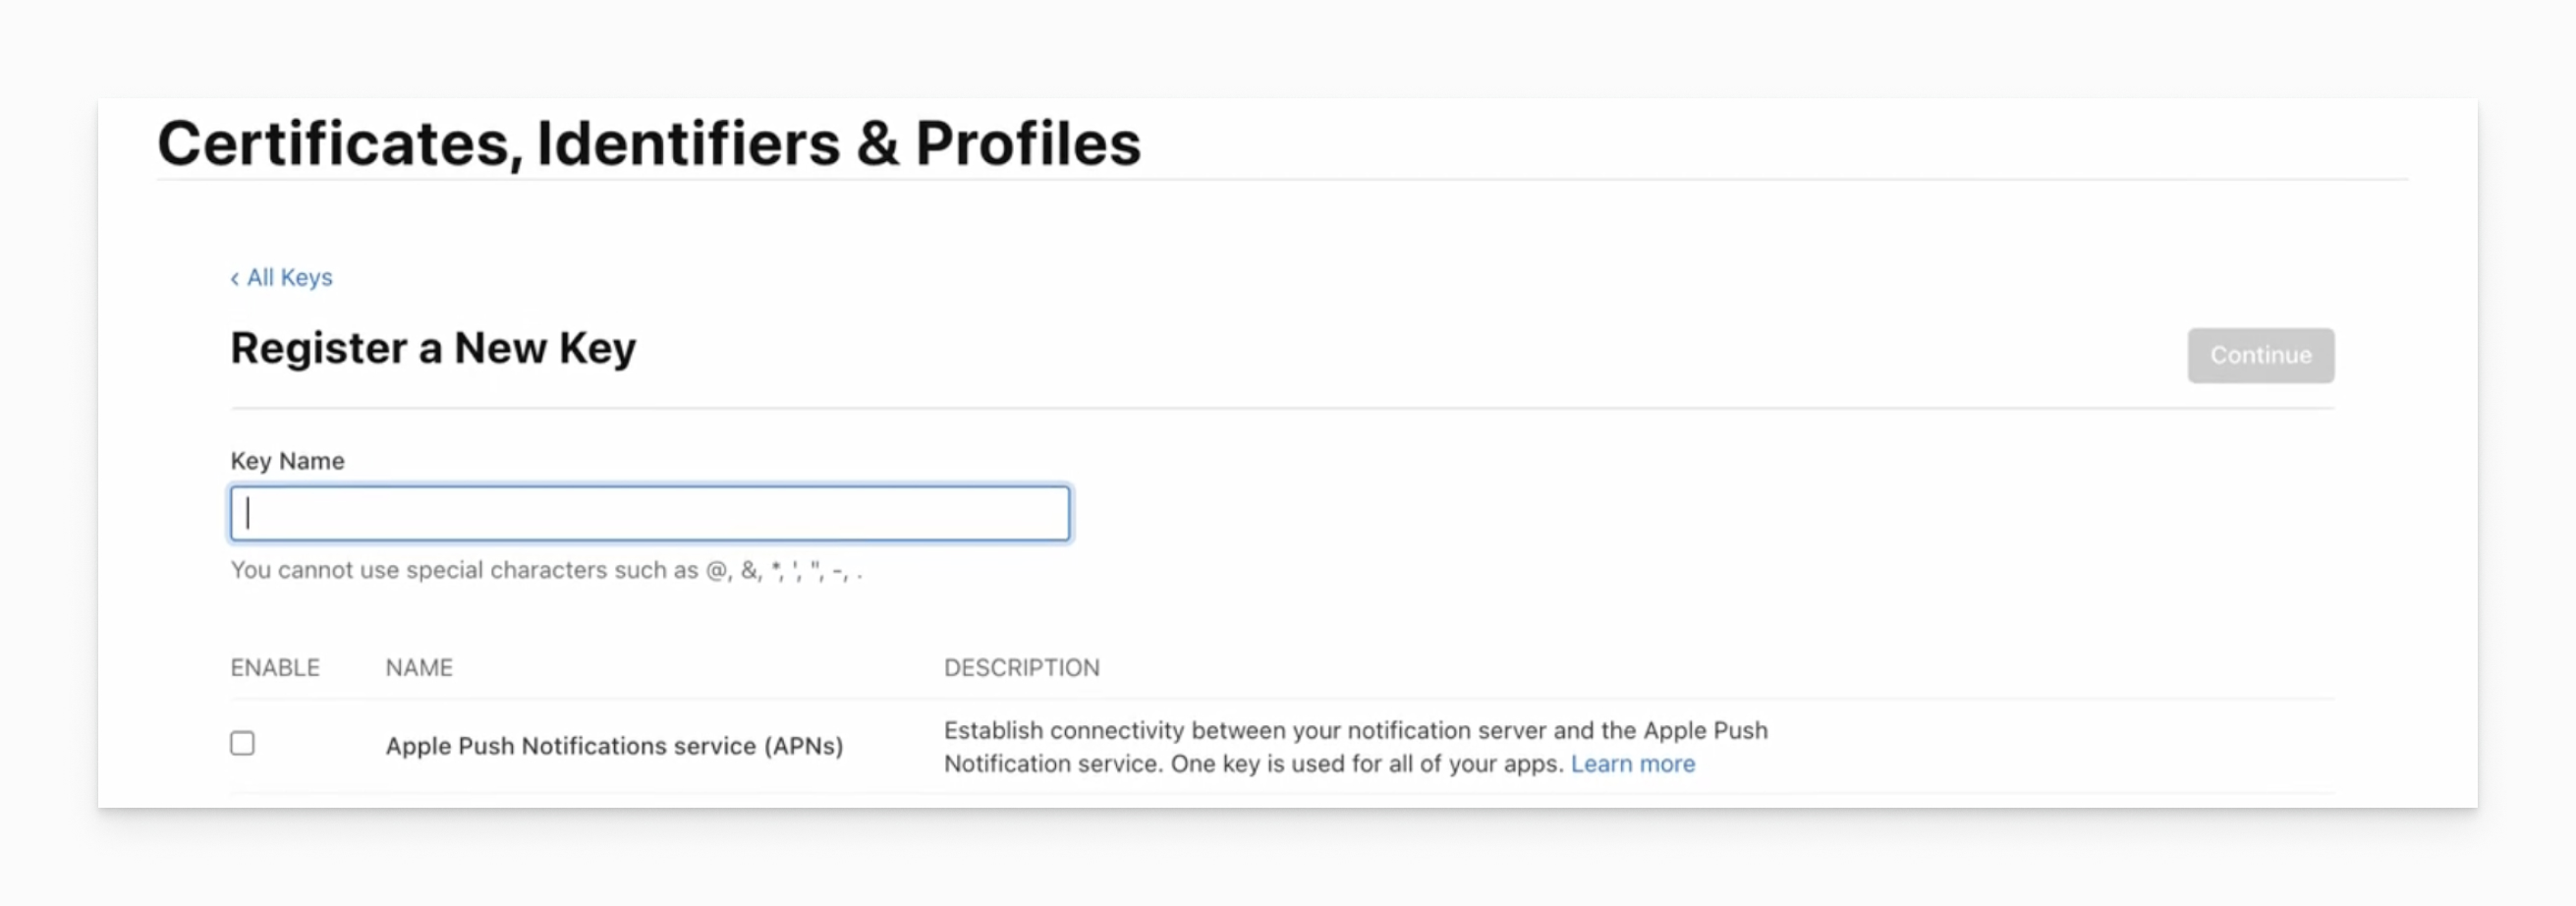
- Select Apple Push Notifications service (APNs) and enter a name for the key.
- Click Continue and then Register.
- Download your new .p8 key and save it in a secure location.
Note:
You can only download the .p8 file once, so make sure to keep it in a
safe place.
Step 2: Upload Your Push Key to OneSignal
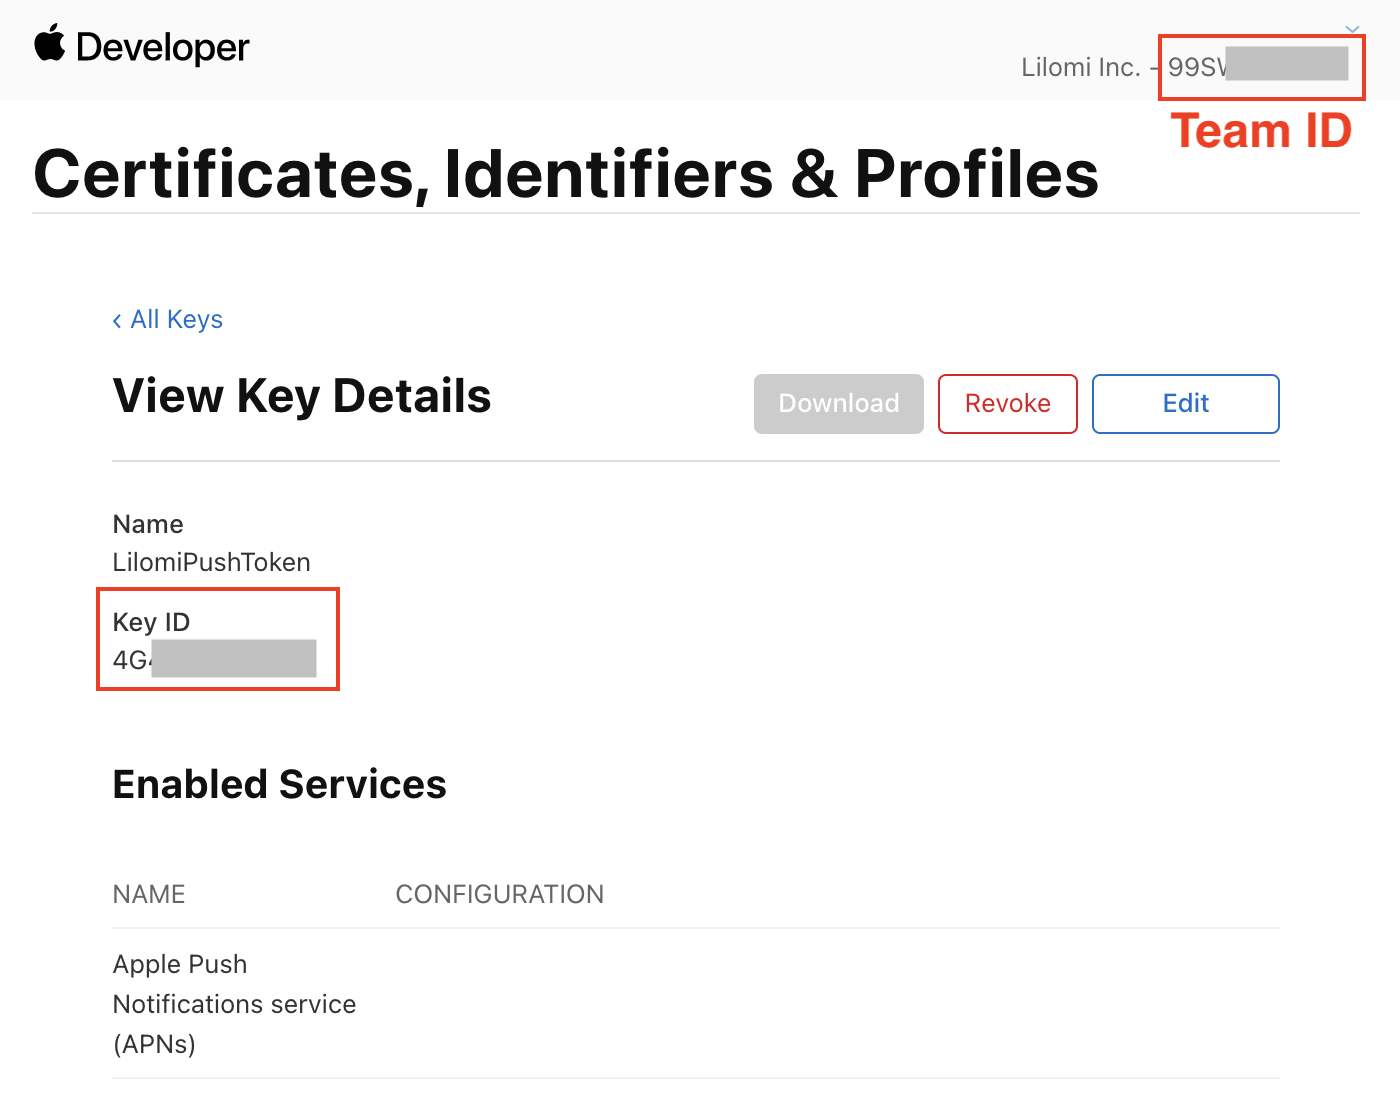
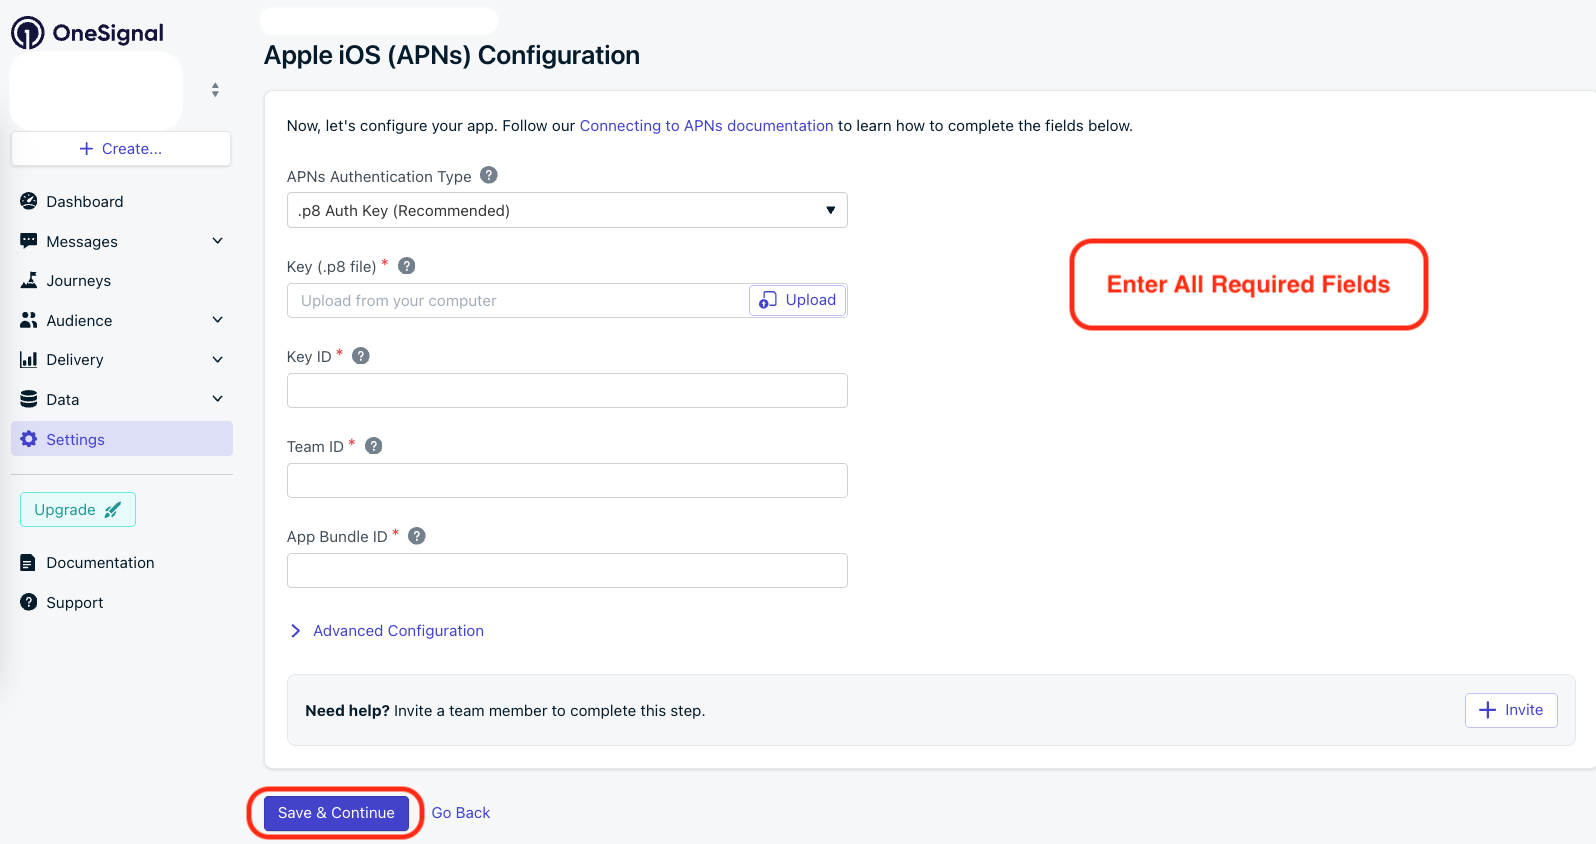
- Team ID: Found in the top right of your Apple Developer
account AND Key ID:
Found in the Keys section of your Apple Developer account.
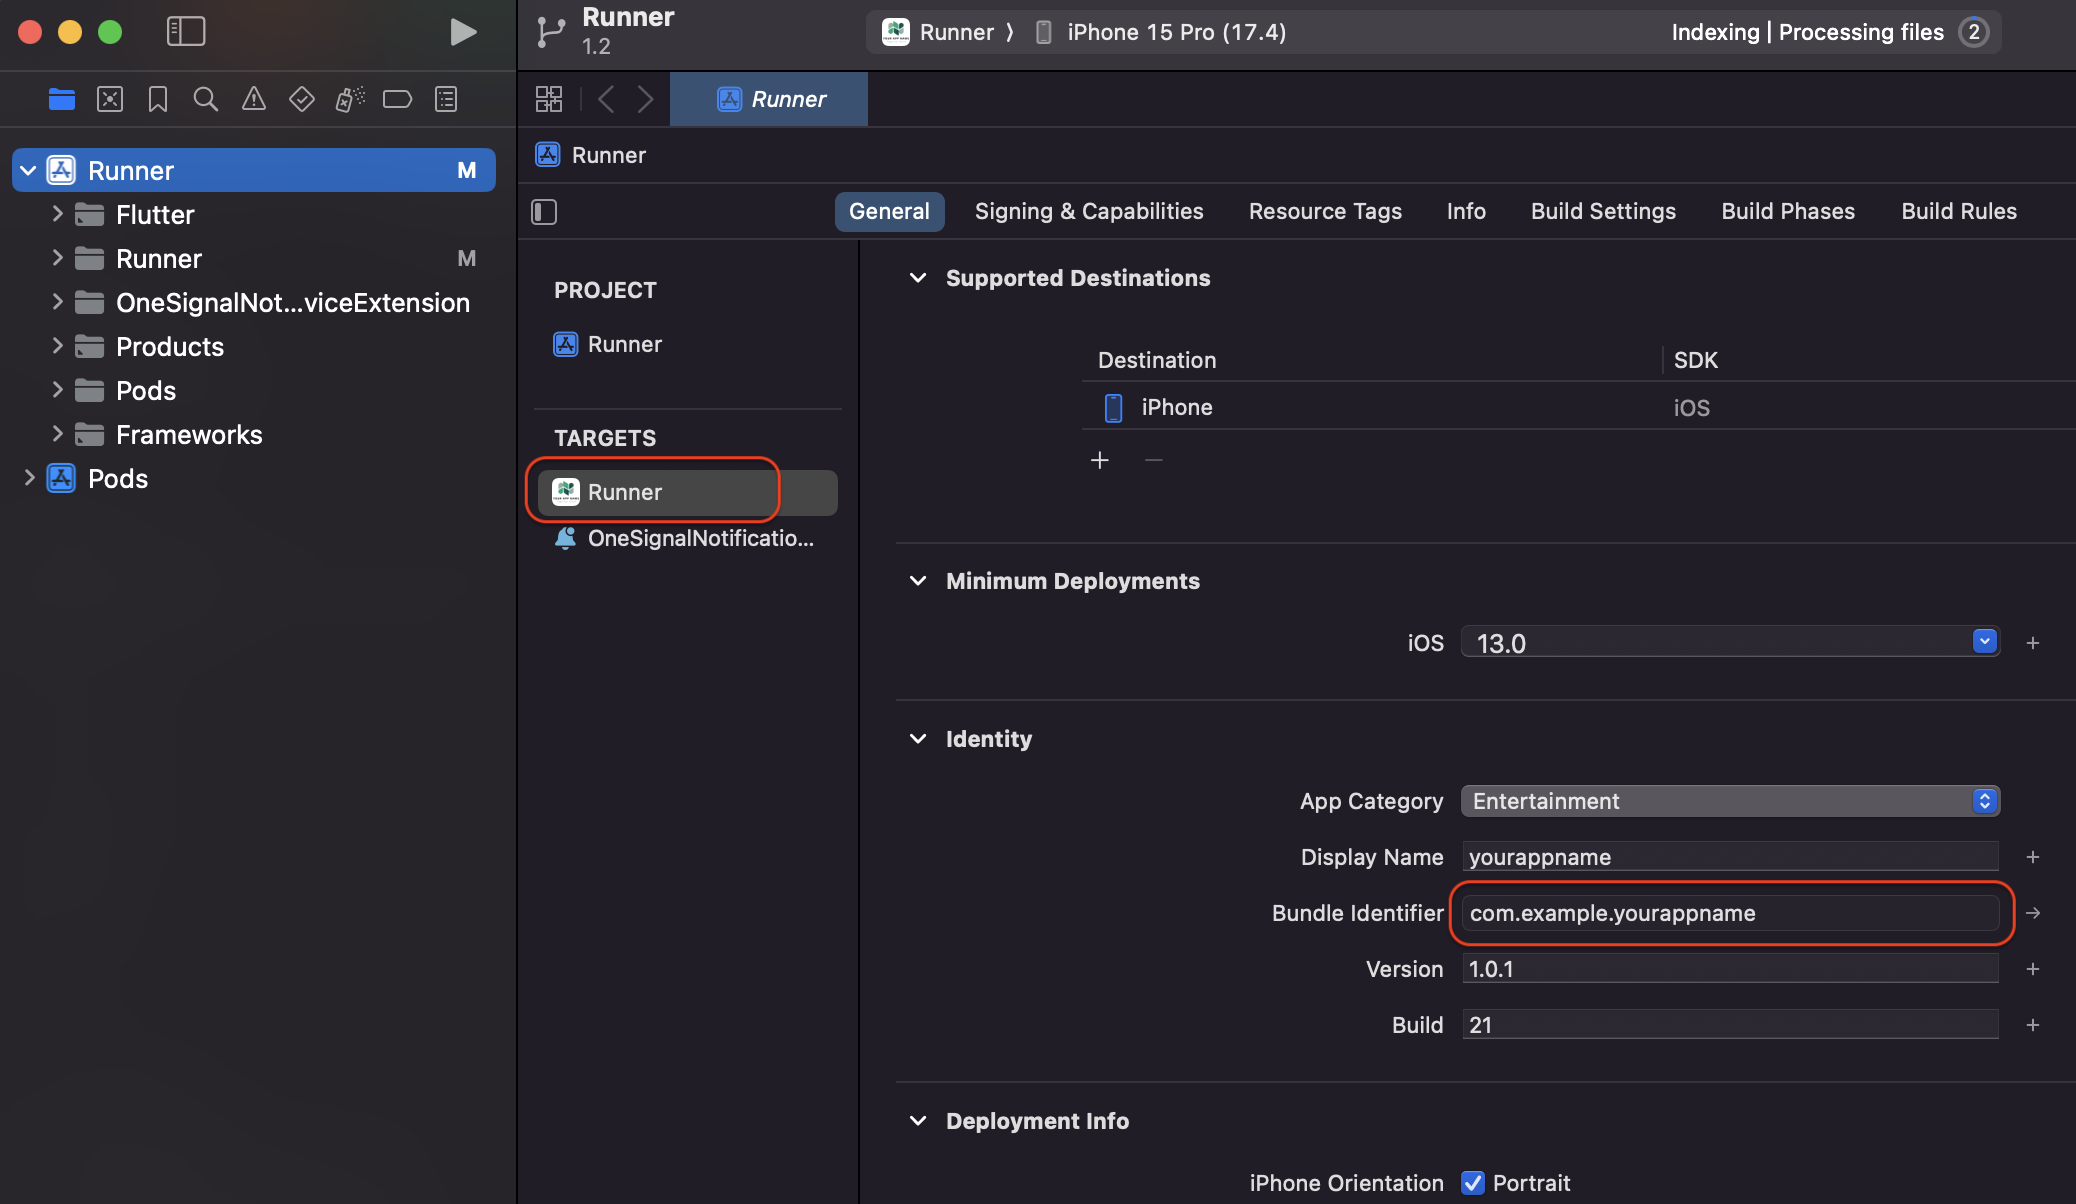
- App Bundle ID: Found in the Identifiers section of your Apple Developer
account or within Xcode > Main App Target > Signing & Capabilities.
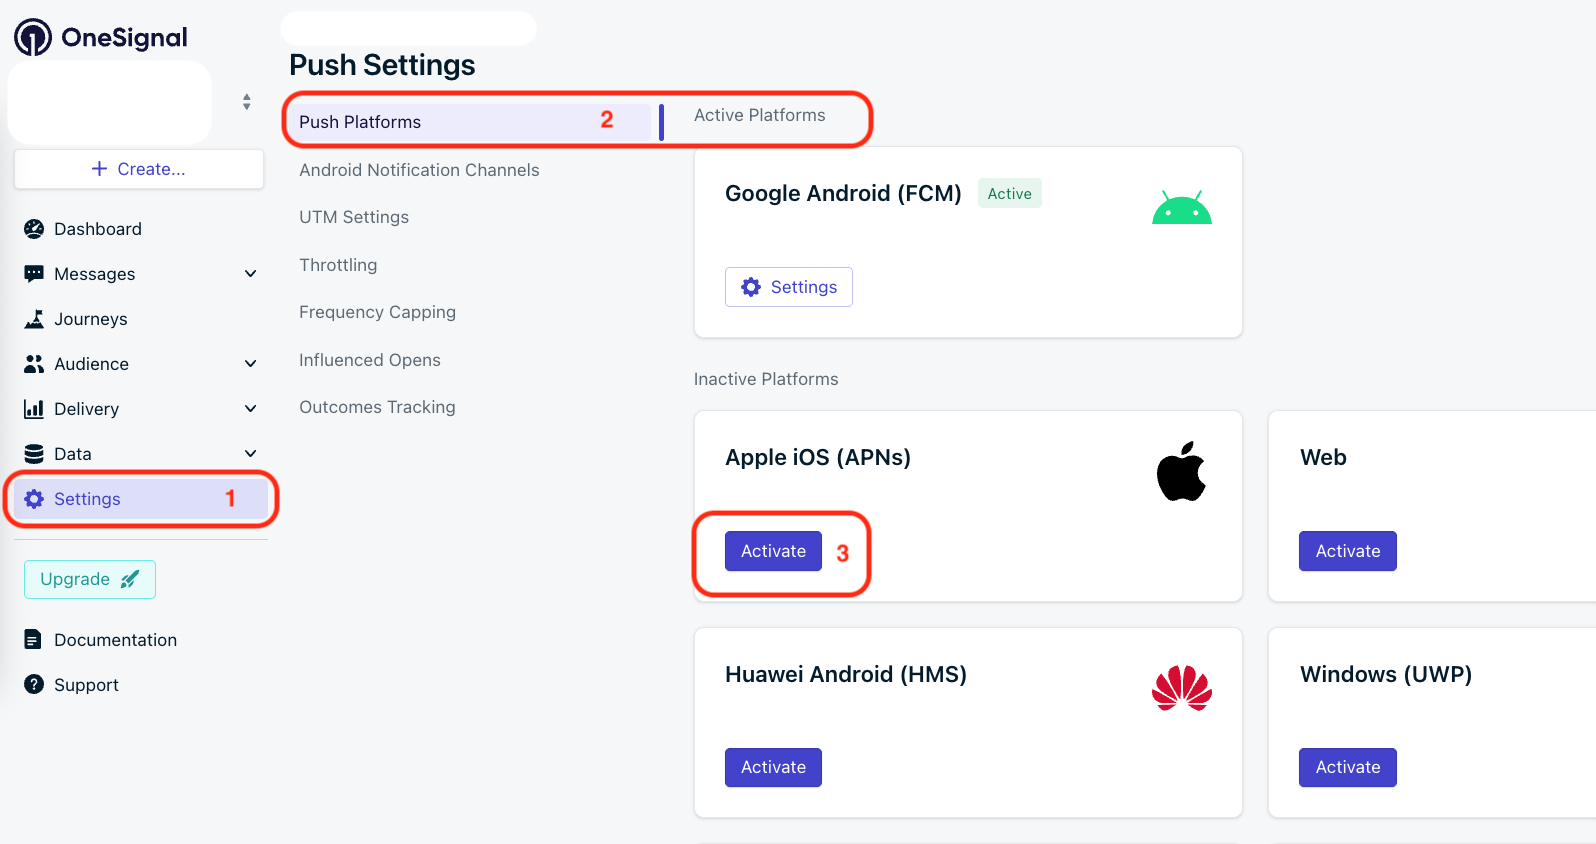
- In the OneSignal dashboard, navigate to Settings > Platforms > Apple iOS
(APNs) Settings.
- In the OneSignal dashboard, navigate to Settings > Platforms > Apple iOS
(APNs) Settings & Choose .p8 Auth Key (Recommended) for the APNs
Authentication Type.
- Upload the .p8 file, fill in the Key ID, Team ID, and Bundle ID fields, and
then click 'Save'.
- Choose Flutter as the platform and proceed to save the configuration.
- Your OneSignal iOS setup is now complete.
With these steps, you should have successfully configured push notifications for
both Android and iOS using OneSignal. If you encounter any issues, ensure all
steps are followed accurately.
Introduction:
This section covers all the remaining adjustments and settings for your app. Be
sure to review these changes carefully to ensure everything is correctly
configured.
1. Default Image Setup for Portrait and Landscape
- Ensure that your app displays appropriate default images for both portrait
and landscape orientations by following these steps:
- Image Files:
                                                    Portrait Image: no_image_port.png
                                                    Landscape Image: no_image_land.png
Recommended Image Ratios:
                                                    Landscape Ratio: 16:9 (Examples: 1920×1080, 1280×720)
                                                    Portrait Ratio: 9:16  (Examples: 1080x1920, 720x1280)
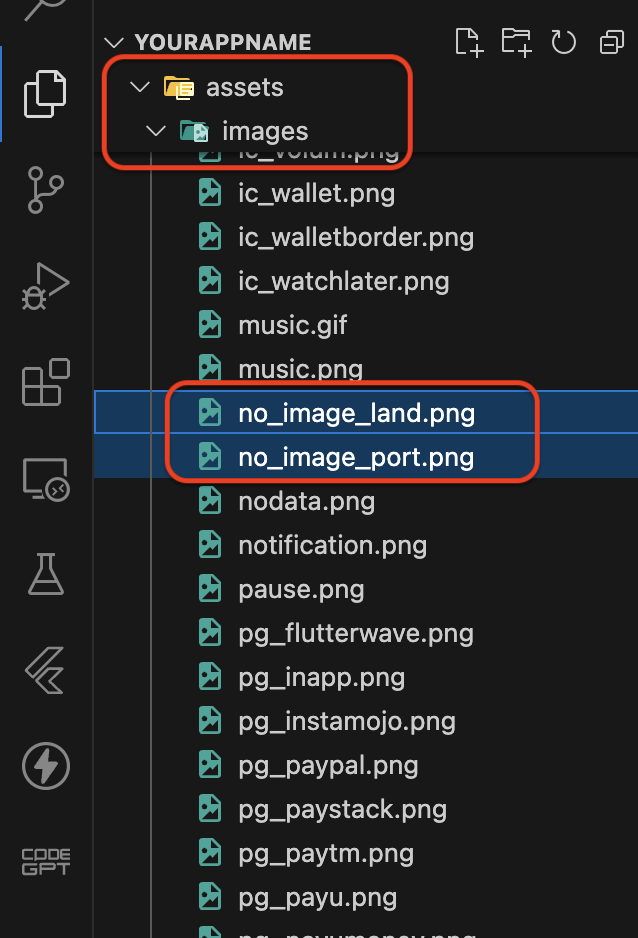
- File Path:
                                                    Place the images in the following directory:
                                                    Assets => images
- Steps to Update:
                                                    •   Create or edit your default images according to the recommended ratios.
	                                                •	Save the portrait image as no_image_port.png.
	                                                •	Save the landscape image as no_image_land.png.
	                                                •	Place the images in the Assets => images directory in your project.
By following these guidelines, your app will display well-proportioned
images for different orientations, enhancing the user experience.
2. Notification Icon Change
This section explains how to update the OneSignal push notification icons in your
app. Ensure that you create the icons with the correct sizes and use the
specified names before replacing the existing files.
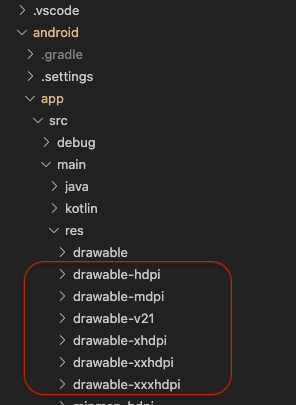
- 1. File Path
Navigate to the following directories in your project to locate the
current notification icons:
                                                    Android > app > res > drawable-mdpi
                                                    Android > app > res > drawable-hdpi
                                                    Android > app > res > drawable-xhdpi
                                                    Android > app > res > drawable-xxhdpi
                                                    Android > app > res > drawable-xxxhdpi
- 2. Icon Sizes and Naming
Create new icons with the following sizes and replace the existing icons
with the exact names as mentioned:
                                                    MDPI (drawable-mdpi):
                                                    Size: 24x24 pixels
                                                    Icon name: ic_stat_onesignal_default.png

                                                    HDPI (drawable-hdpi):
                                                    Size: 36x36 pixels
                                                    Icon name: ic_stat_onesignal_default.png

                                                    XHDPI (drawable-xhdpi):
                                                    Size: 48x48 pixels
                                                    Icon name: ic_stat_onesignal_default.png

                                                    XXHDPI (drawable-xxhdpi):
                                                    Size: 72x72 pixels
                                                    Icon name: ic_stat_onesignal_default.png

                                                    XXXHDPI (drawable-xxxhdpi):
                                                    Size: 96x96 pixels
                                                    Icon name: ic_stat_onesignal_default.png

                                                    Large Icon for Notifications (drawable-xxxhdpi):
                                                    Size: 256x256 pixels
                                                    Icon name: ic_onesignal_large_icon_default.png
- 3. Replace Existing Icons
                                                    •   Create or resize your notification icons to match the sizes listed above.
	                                                •	Replace the existing icons in each directory with your newly created icons, ensuring the names remain exactly as specified.
Please refer to the provided screenshot for additional details on the
icon replacement process.
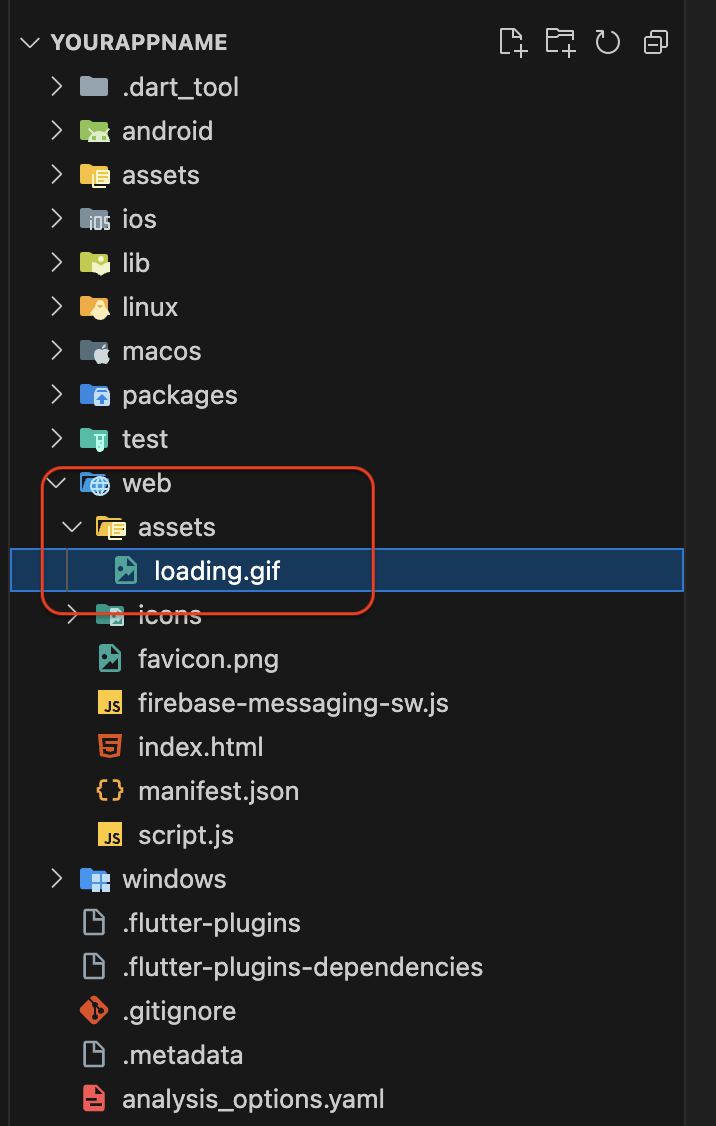
1. Web Version Splash Screen GIF Change
- File Path
Navigate to the following directory in your project to locate the current
splash screen GIF:
Web > Assets > loading.gif
Replace the GIF
                                                    Create or select your new GIF file for the splash screen.
                                                    Name the file loading.gif.
                                                    Replace the existing loading.gif file in the Web > Assets directory with your new GIF.
- Rebuild the Web Version
After replacing the GIF, ensure to rebuild the web version to apply the
changes:
Command: flutter build web --web-renderer auto --release
Firebase Setup on App
This section will guide you through setting up the App for your Backand
application.
Generate Release Build For Android
Step-by-Step Instructions to Generate the App
Create a keystore to securely sign your Android application.
1. Generate Keystore
- Create a keystore to securely sign your Android application.
- Mac/Linux:
keytool -genkey -v -keystore yourappname.jks -keyalg RSA -keysize 2048 -validity 10000 -alias yourappname
- Windows:
keytool -genkey -v -keystore yourappname.jks -storetype JKS -keyalg RSA -keysize 2048 -validity 10000 -alias yourappname
Follow the prompts to enter the required information, such as the
keystore password, distinguished name fields, and alias password. Upon
completion, the keystore file (e.g., 'upload-keystore.jks') will be
saved in the 'android/app' directory.
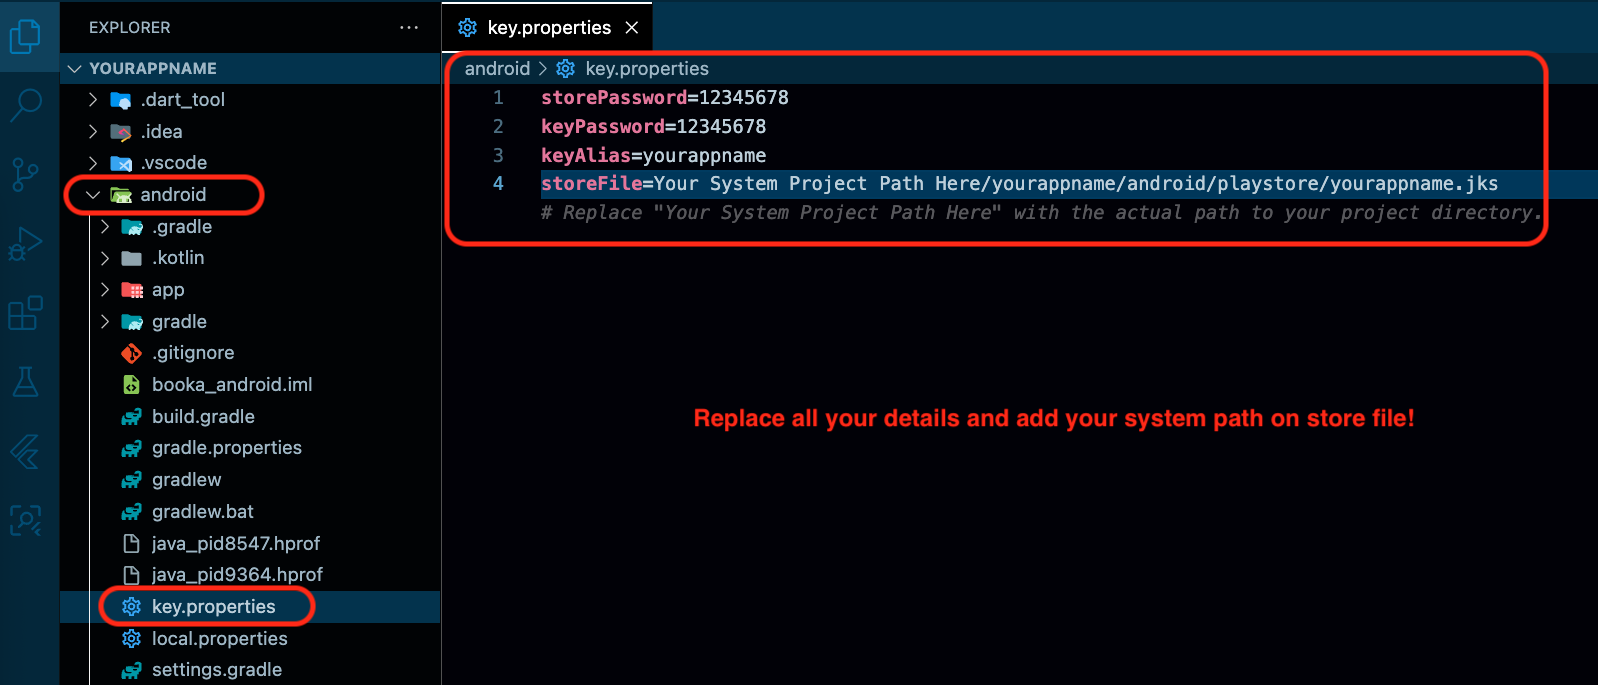
2. Configure key.properties
Update the key.properties file in the android directory to store keystore-related
information.
- Open the key.properties file in the android directory.
- Add the following lines to the file:
                                                    storePassword=your_keystore_password
                                                    keyPassword=your_alias_password
                                                    keyAlias=yourappname
                                                    storeFile=yourappname.jks
- Save the key.properties file.
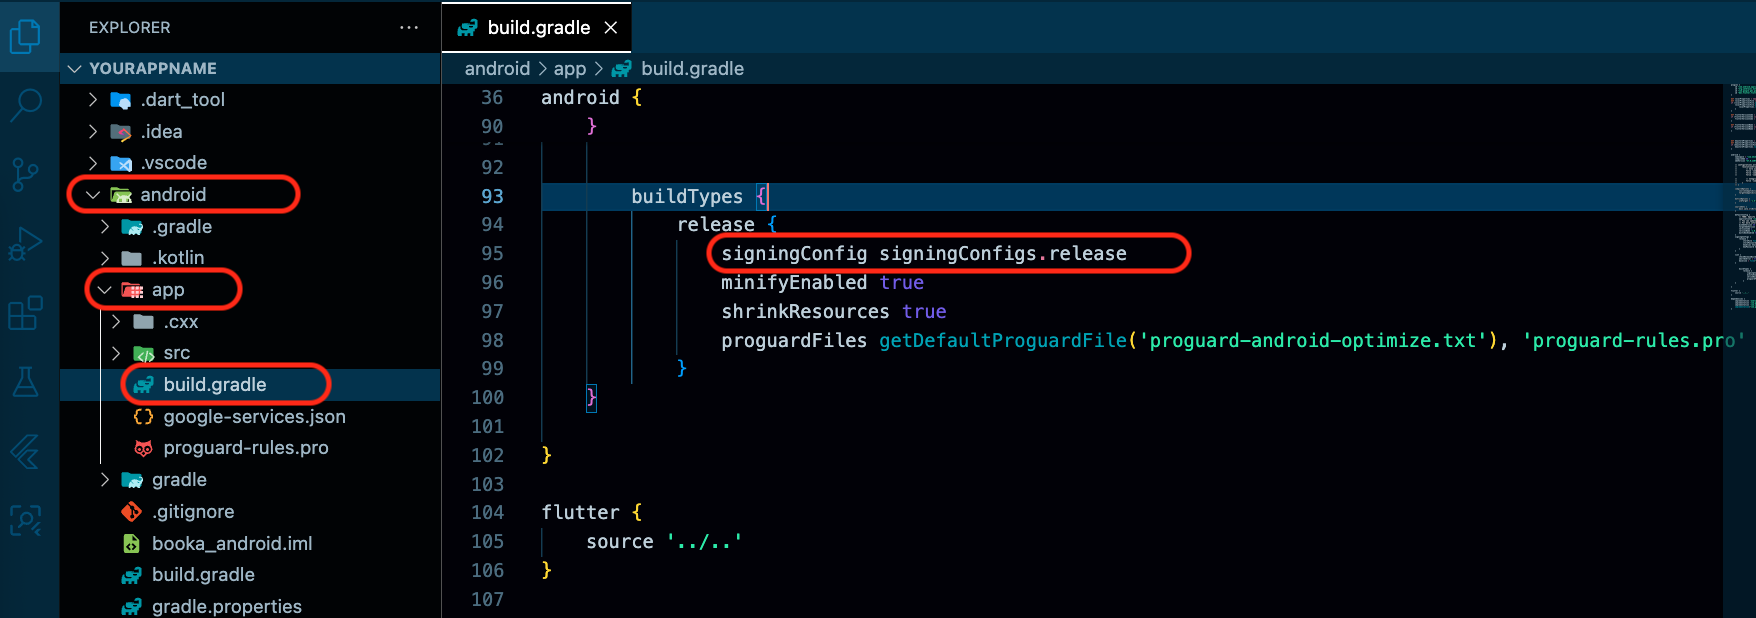
3. Update build.gradle
- In the android/app/build.gradle file, change:
signingConfig signingConfigs.debug
- To:
signingConfig signingConfigs.release
4. Generate Release APK
Create a final version of the APK suitable for distribution to end-users.
- Open the terminal or command prompt & Navigate to your project
directory.
Run the following command to build the release APK:
flutter build apk --release
5.Generate App Bundle
Note:
Before generating the App Bundle, ensure you have completed the 'Update
key.properties' step to configure your keystore information. Refer to
steps 1 and 2 for details.
Package the app as an Android App Bundle for efficient delivery and
optimization on the Play Store.
- Open the terminal or command prompt & Navigate to your project
directory.
Run the following command to build the release APK:
flutter build appbundle
Generate Release Build For Android
Step-by-Step Instructions to Generate the App
Create a keystore to securely sign your Android application.
1. Generate Keystore
- Create a keystore to securely sign your Android application.
- Mac/Linux:
keytool -genkey -v -keystore yourappname.jks -keyalg RSA -keysize 2048 -validity 10000 -alias yourappname
- Windows:
keytool -genkey -v -keystore yourappname.jks -storetype JKS -keyalg RSA -keysize 2048 -validity 10000 -alias yourappname
Follow the prompts to enter the required information, such as the
keystore password, distinguished name fields, and alias password. Upon
completion, the keystore file (e.g., 'upload-keystore.jks') will be
saved in the 'android/app' directory.
2. Configure key.properties
Update the key.properties file in the android directory to store keystore-related
information.
- Open the key.properties file in the android directory.
- Add the following lines to the file:
                                                    storePassword=your_keystore_password
                                                    keyPassword=your_alias_password
                                                    keyAlias=yourappname
                                                    storeFile=yourappname.jks
- Save the key.properties file.
3. Update build.gradle
- In the android/app/build.gradle file, change:
signingConfig signingConfigs.debug
- To:
signingConfig signingConfigs.release
4. Generate Release APK
Create a final version of the APK suitable for distribution to end-users.
- Open the terminal or command prompt & Navigate to your project
directory.
Run the following command to build the release APK:
flutter build apk --release
5.Generate App Bundle
Note:
Before generating the App Bundle, ensure you have completed the 'Update
key.properties' step to configure your keystore information. Refer to
steps 1 and 2 for details.
Package the app as an Android App Bundle for efficient delivery and
optimization on the Play Store.
- Open the terminal or command prompt & Navigate to your project
directory.
Run the following command to build the release APK:
flutter build appbundle
Firebase Setup for Web Version
In this section, we will guide you through the process of setting up
Firebase
for the web version of your app. By following these steps, you will
configure
Firebase to handle authentication, connect with your web app, and authorize
your
domain for a seamless integration. This setup is crucial for ensuring that
your
app's web version is fully functional and secure.
Step-by-Step Instructions to Setup Firebase
1. Open Firebase Account:
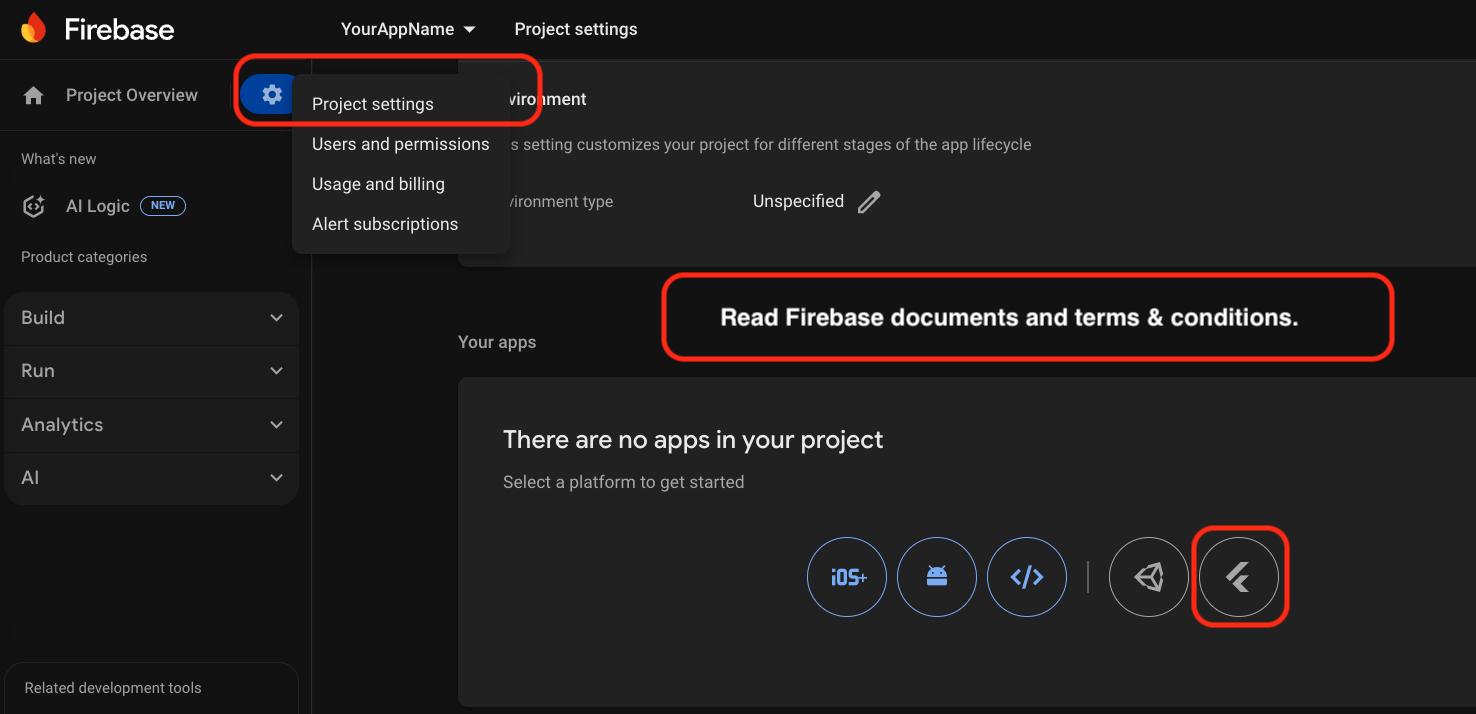
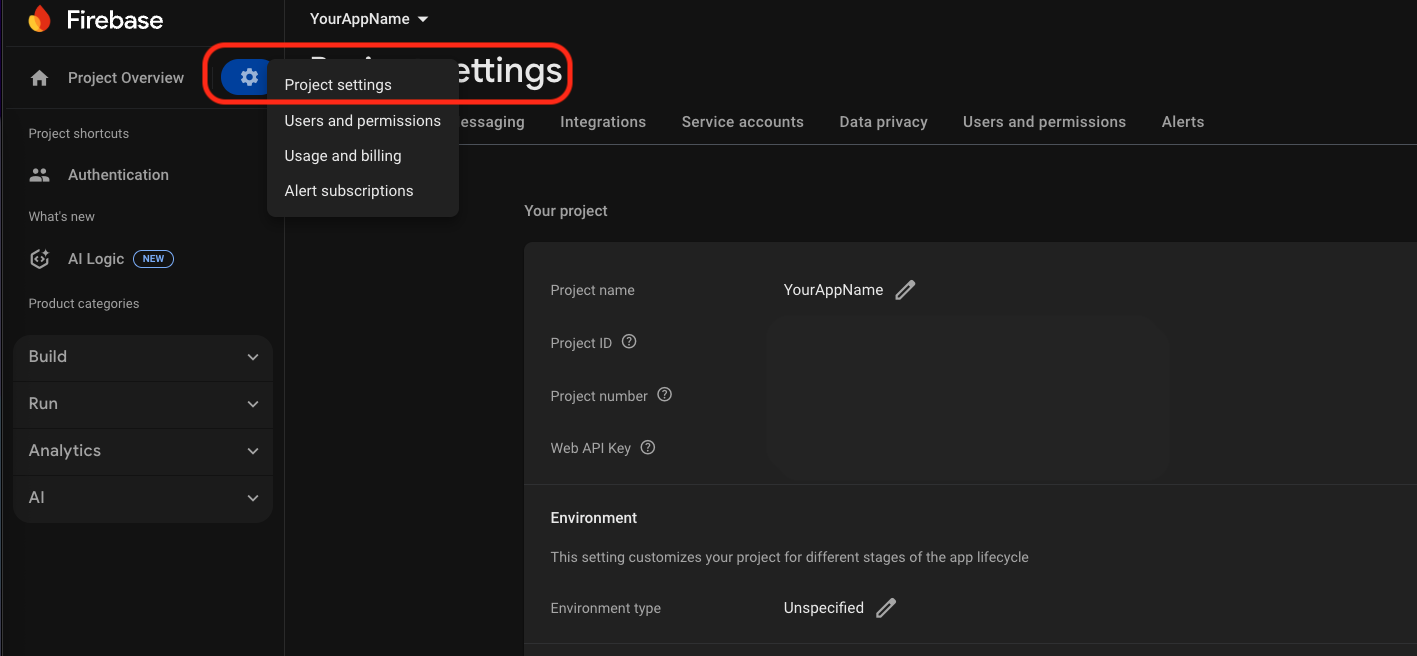
- Log in to your Firebase account and navigate to the Project Settings. (See
the screenshot below for reference.)
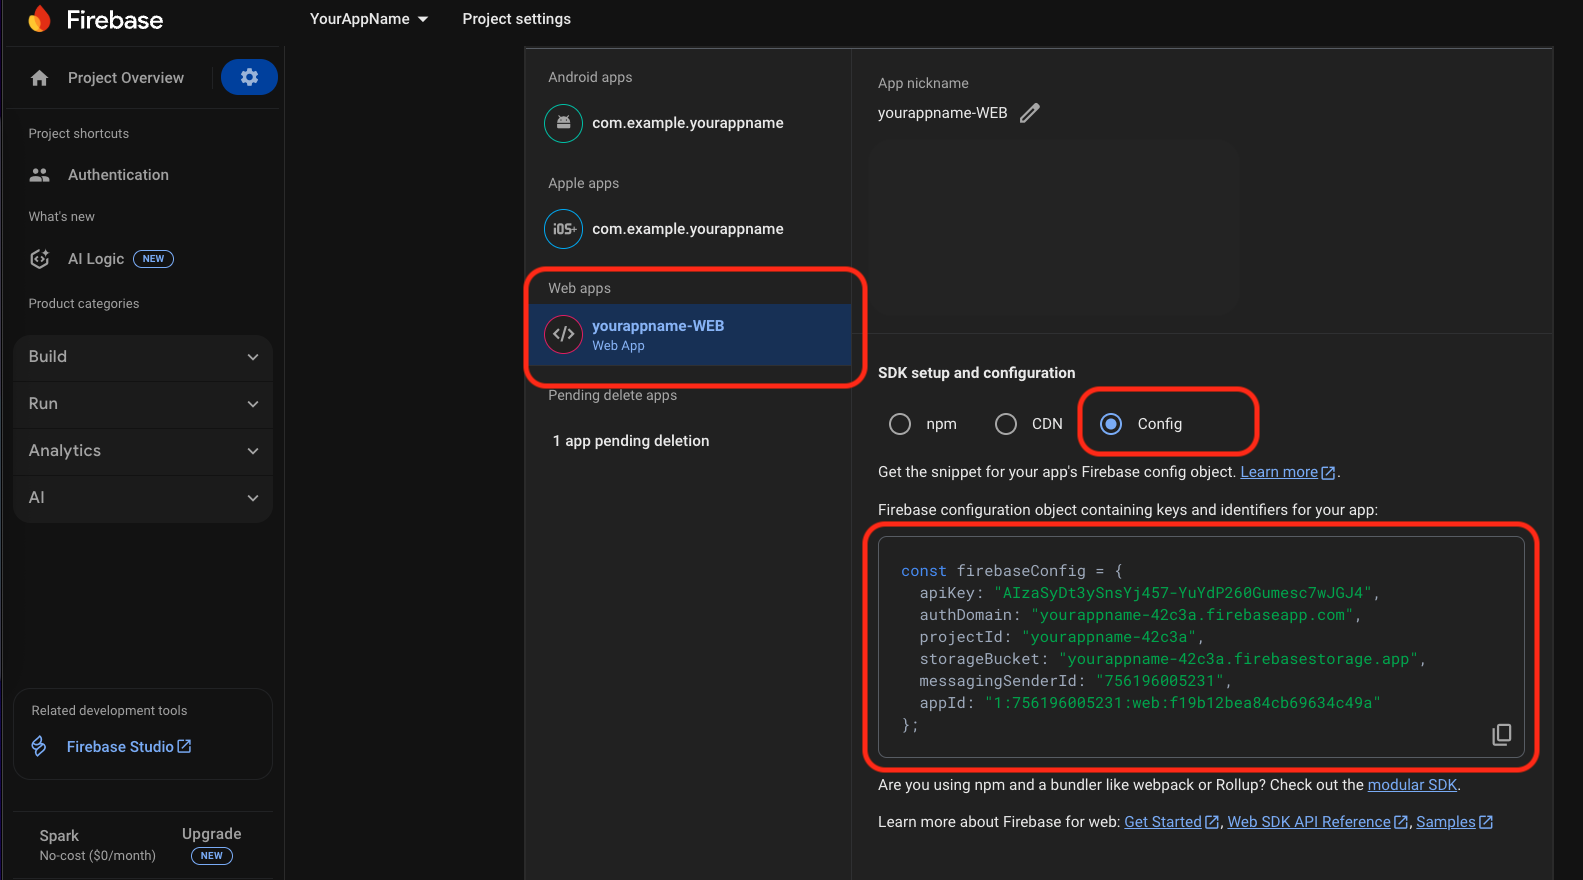
- Copy the Firebase configuration code provided in the Project
Settings. (See the screenshot below for reference.)
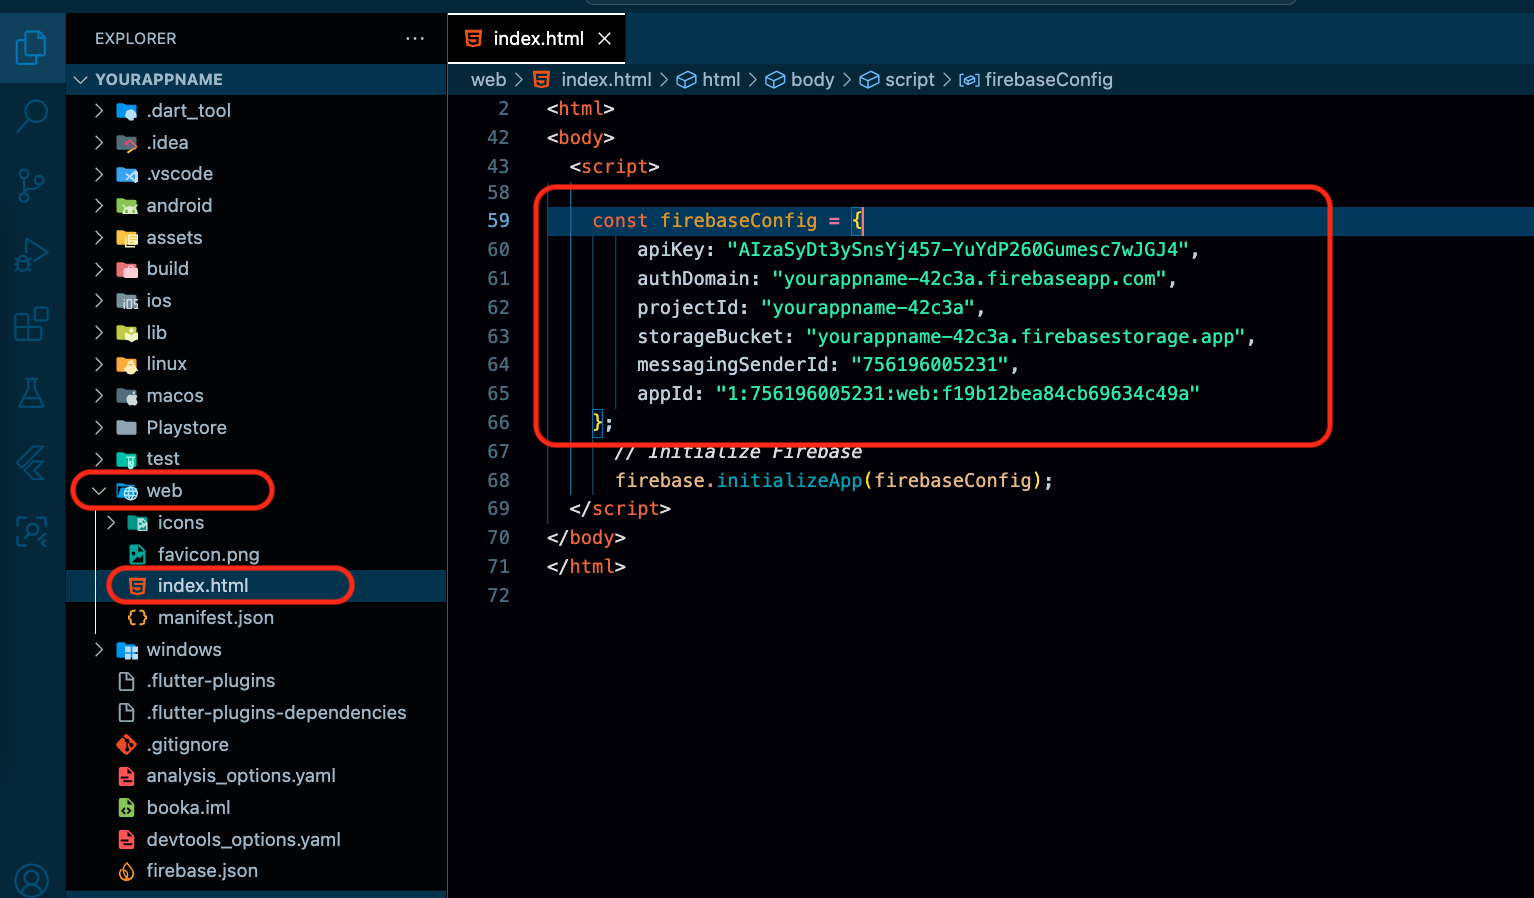
- Paste it into the index.html file located in the web folder. (Refer
to the screenshot below.)
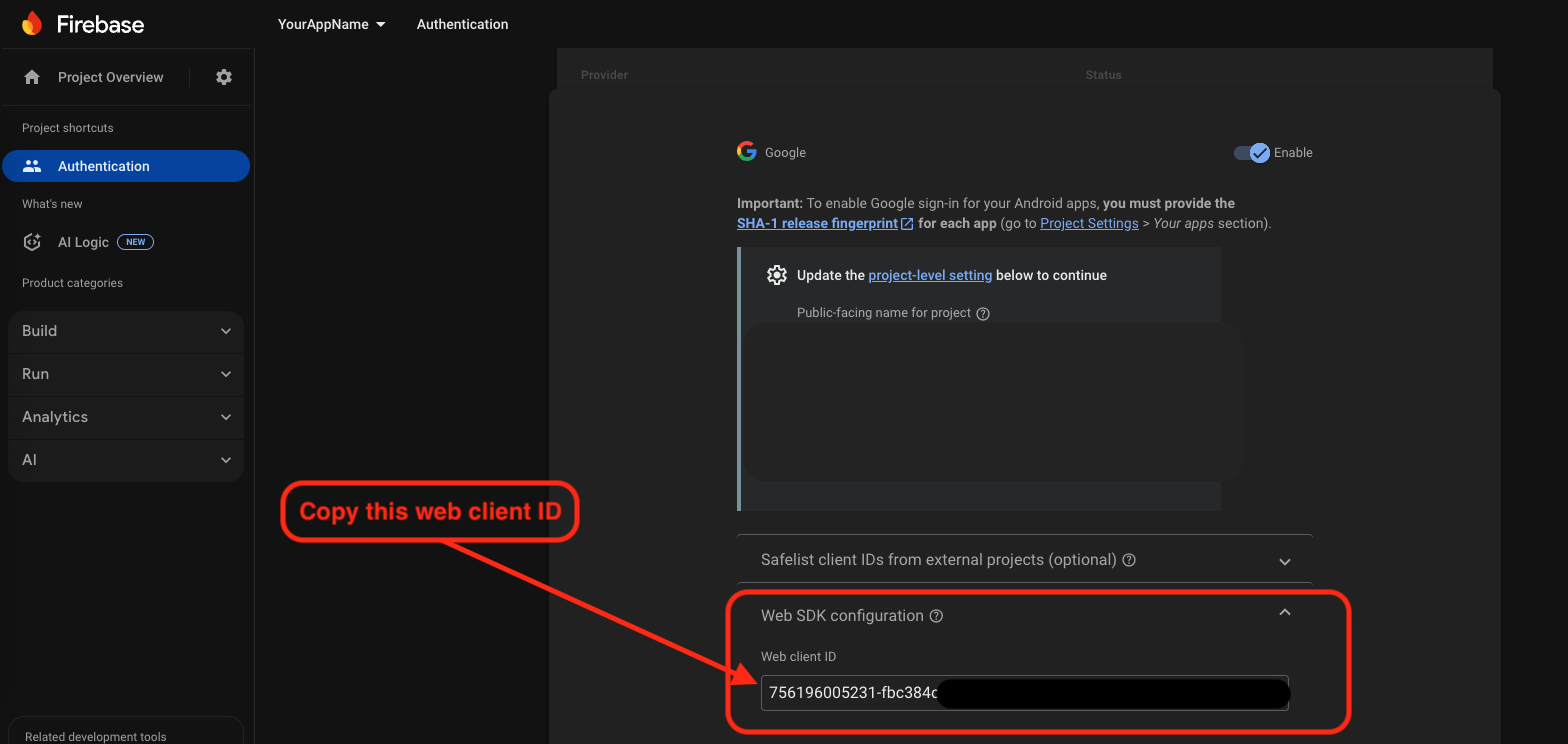
2. Set Up Google Authentication:
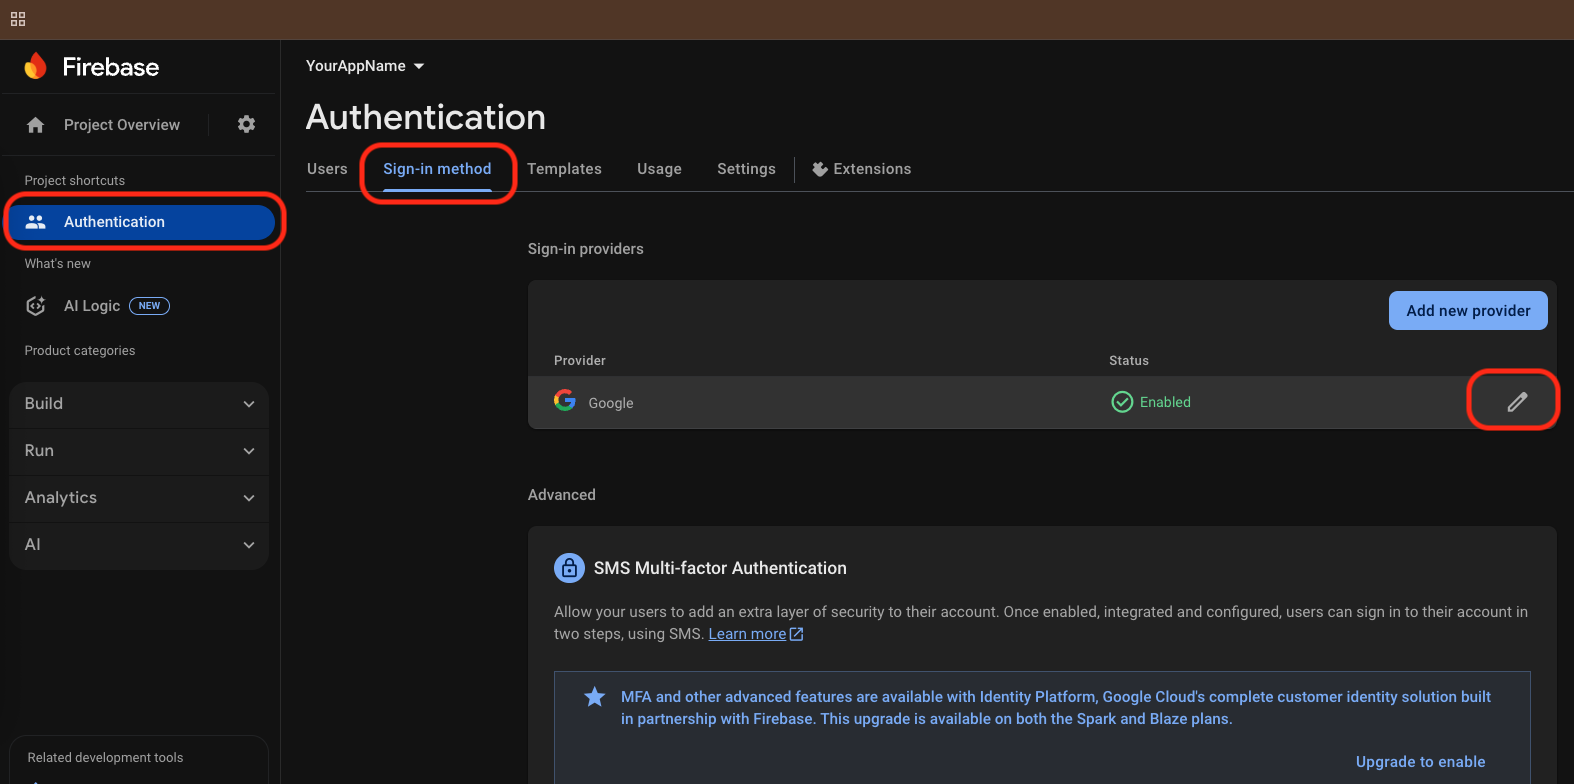
- In Firebase, go to Authentication > Sign-in Method. Edit the Google sign-in
method.
- Copy the Web Client ID as shown in the screenshot below.
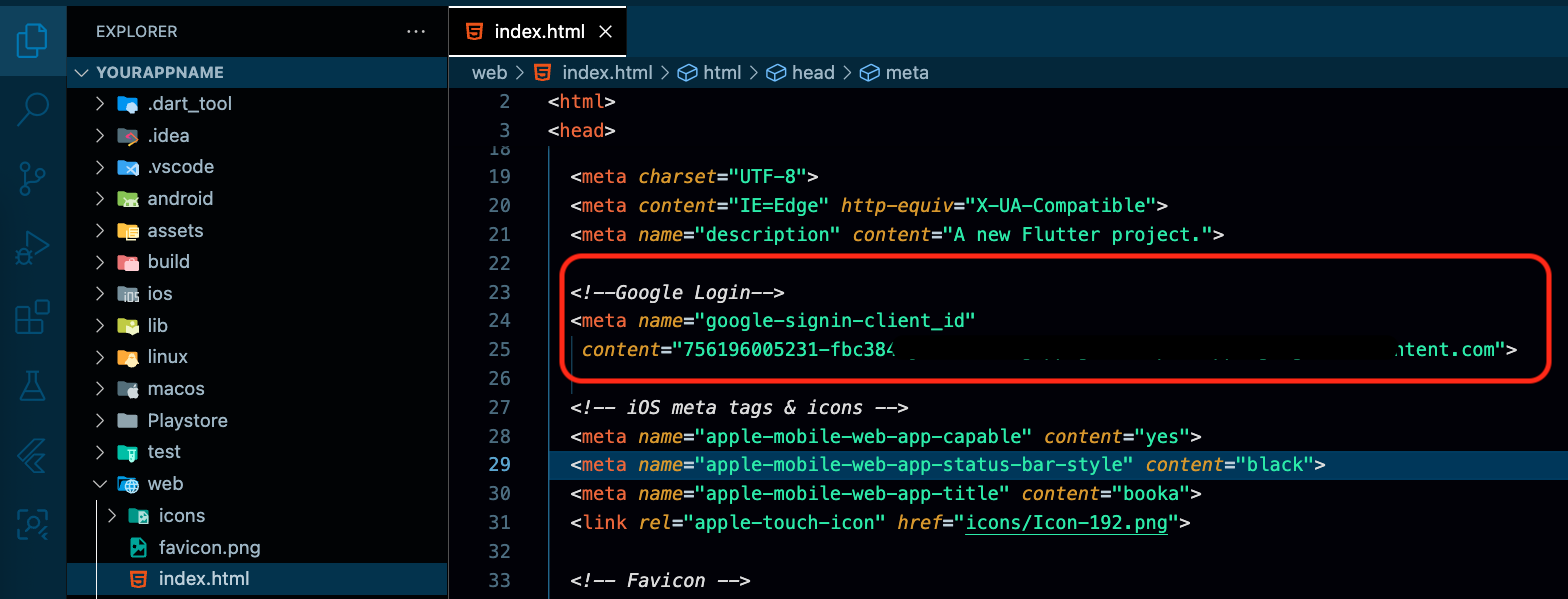
- Paste the Web Client ID into the
head section of the index.html file. (Refer to the
screenshot below.)
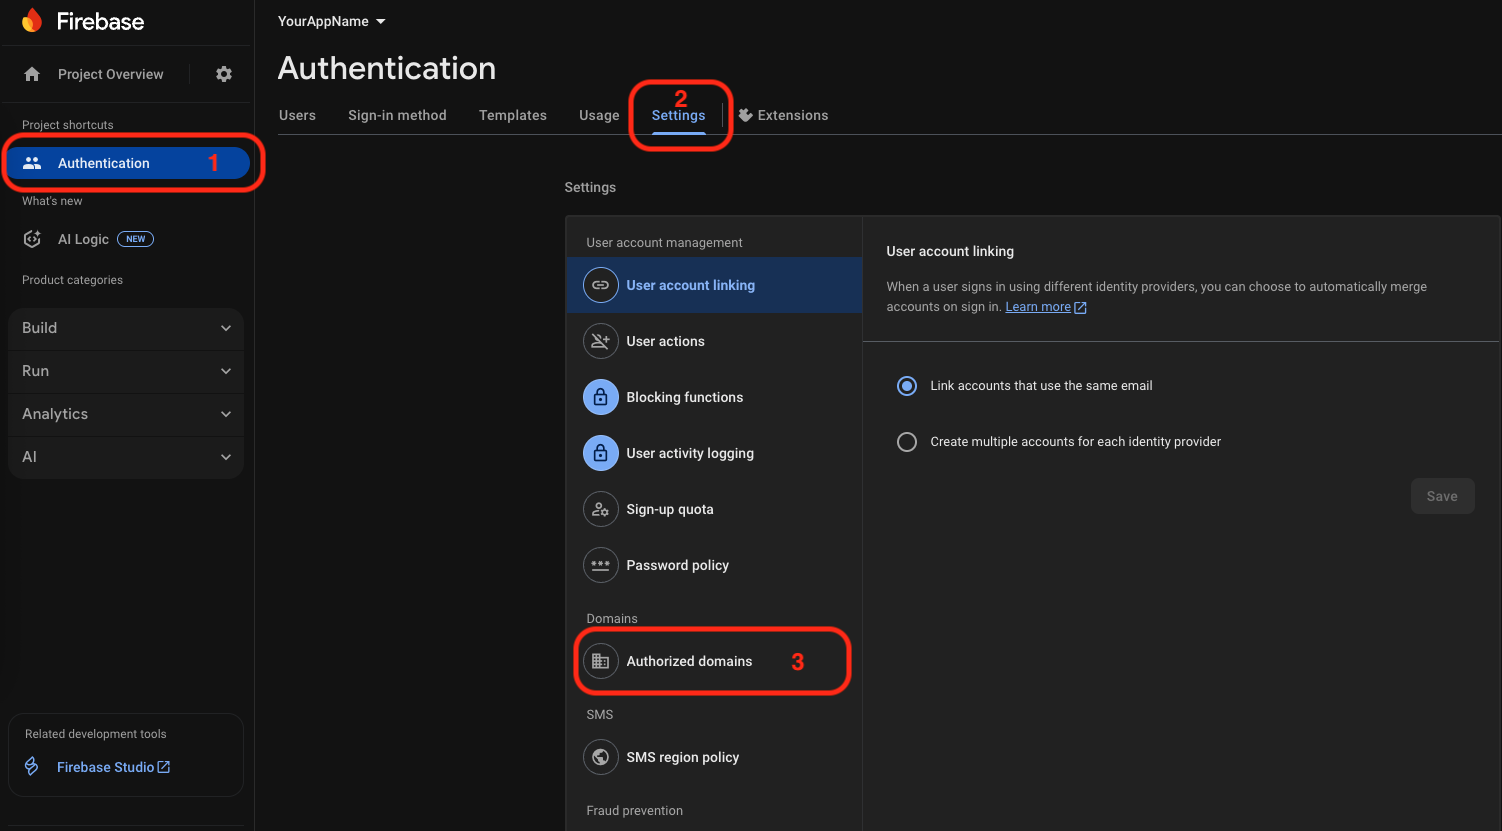
3. Authorize Domain:
- In Firebase, navigate to Authentication > Settings > Authorized
Domains.
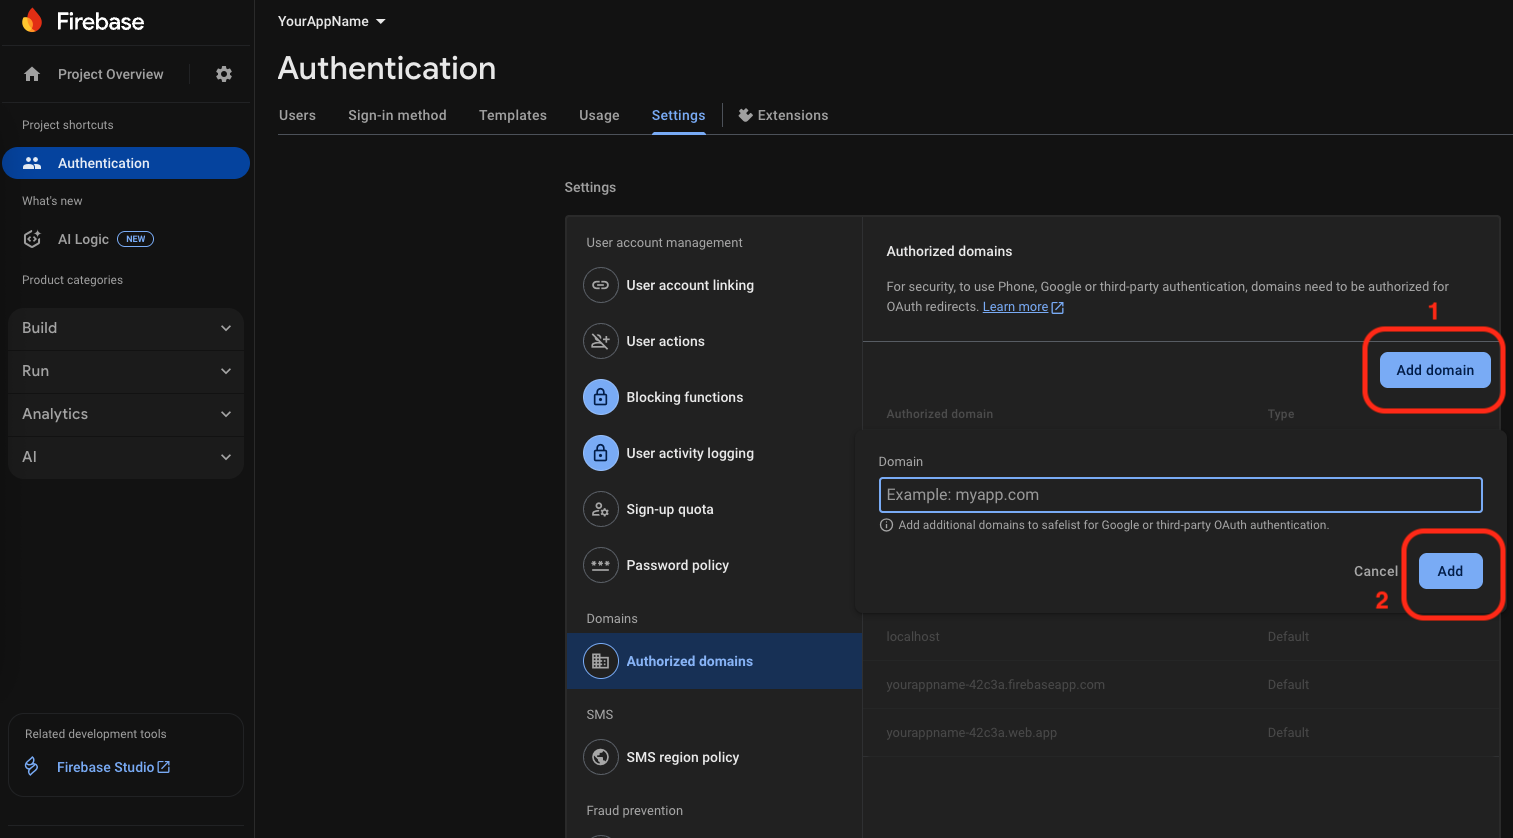
- Add the main domain where you plan to upload your website. (Check the
screenshot below.)
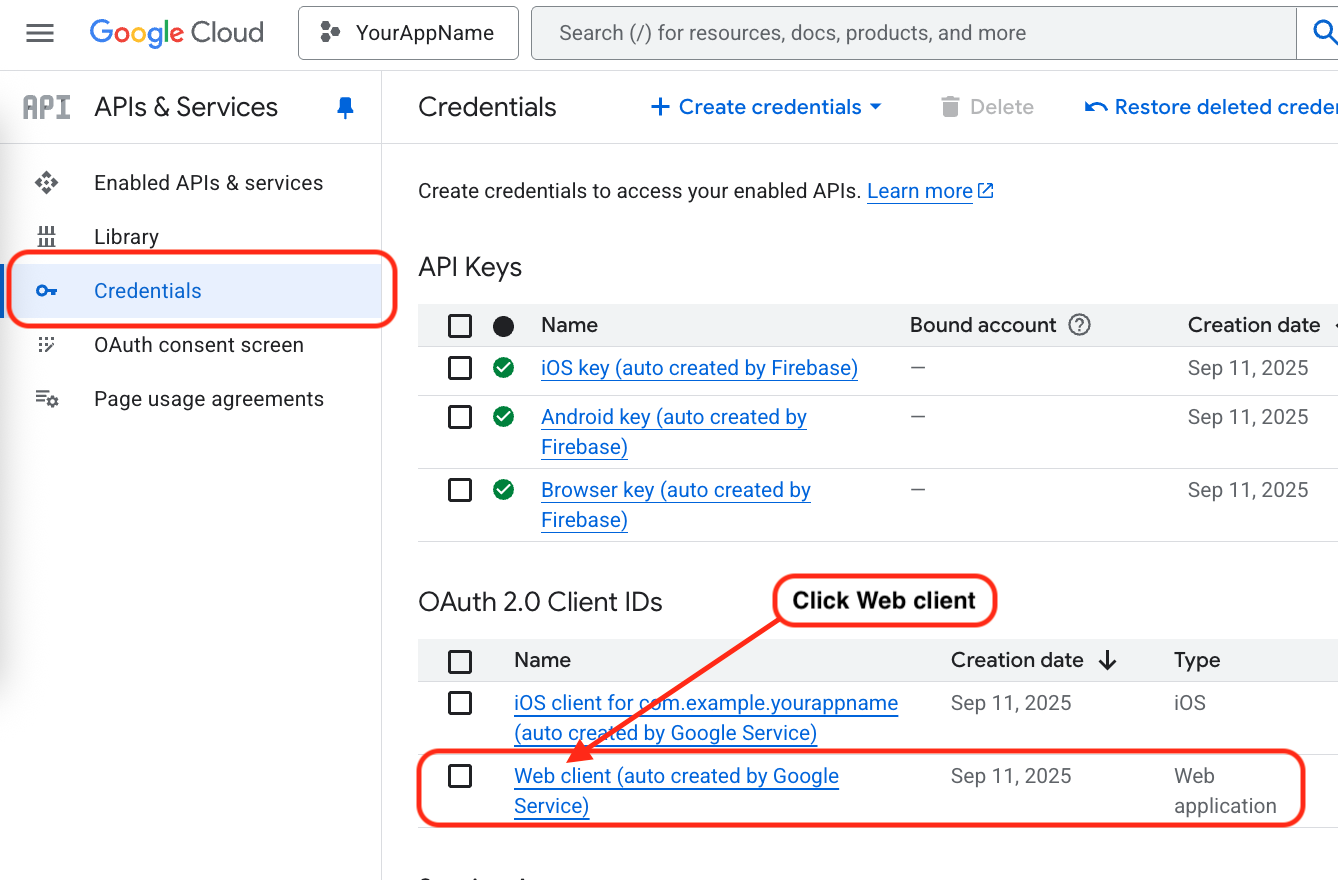
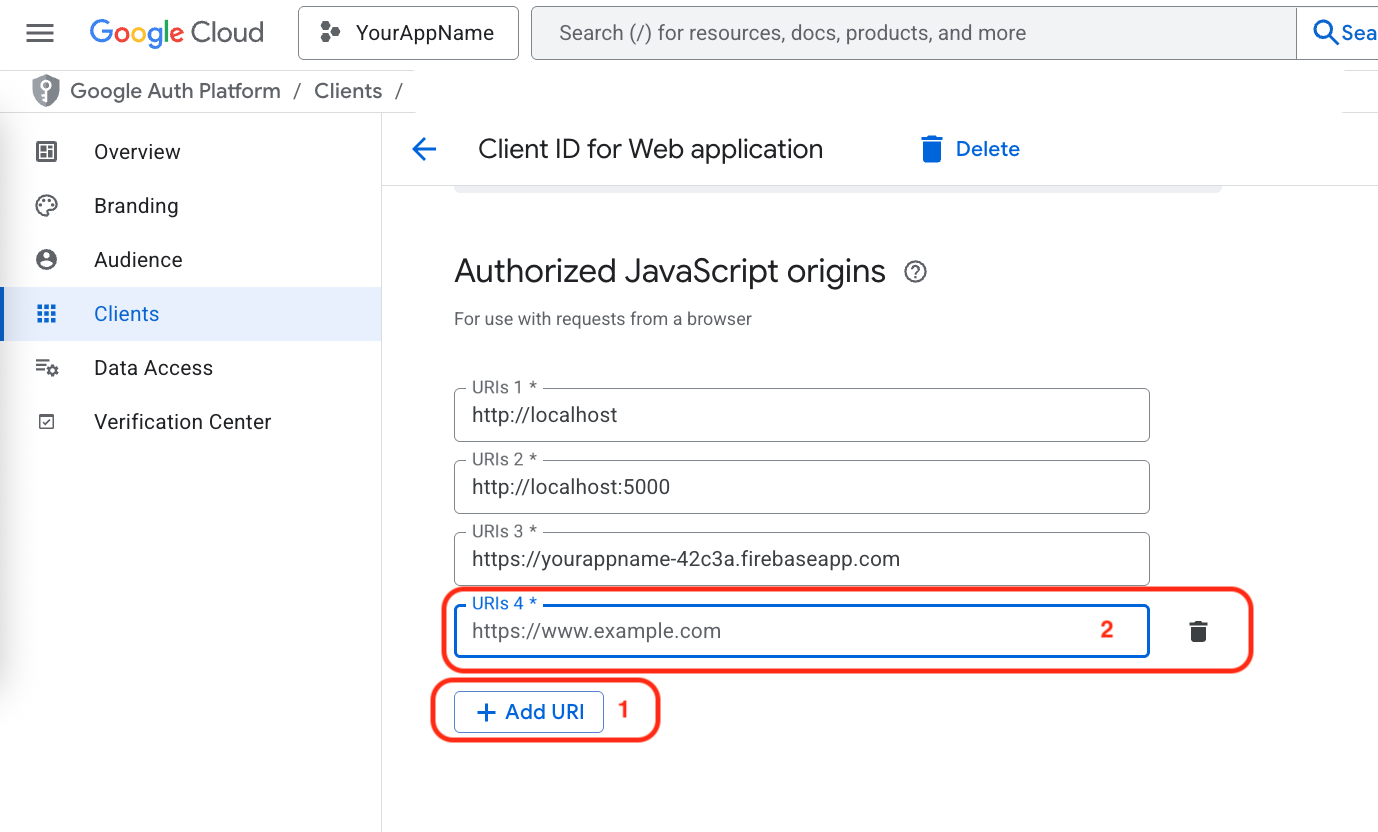
4. Update Google Cloud Console:
- Open the Google Cloud Console & Go to APIs & Services > Credentials. Click here
- Find the Web client (auto-created by Google Service) and add your full
domain name. (See the screenshot below for guidance.)
You've successfully set up Firebase for the web
version of your app.
After completing all the above steps, follow these commands to build and
deploy your web version:
1. Run Web on Chrome:
- If web support is not enabled, run the following command:
flutter config --enable-web
- Use the following command to run your app on Chrome:
flutter run -d chrome --web-renderer html
2. Build Web Version:
- Make a build of the web version using the command below:
flutter build web --web-renderer auto --release
3. Deploy the Web Version:
- Upload the contents of the build / web directory to your
web hosting service.
- Test the deployed web version on multiple browsers and devices to ensure
everything works as expected.
Support
We are delighted to serve and support you! Contact our support team on
HelpDesk / Create
Support Ticket
To assist our customers, we stay in constant touch to provide any needed
assistance
regarding our products. Our support is available from Monday to Friday, 10:00 AM
to
6:00 PM IST (GMT +5:30) – We are a team located in India – Asia.
Typically, we reply to all customer questions and queries within 24 hours via
comments, our support forum, or emails.
Your Feedback
Dear valuable customer,
Thank you very much for choosing our product. It's our pleasure to provide
top-notch service to you. Please give us your honest feedback, which will help
us make our product stronger and more reliable..
Click here to Rate
Us.
Thank you very much.